In this Ansible cheatsheet I have a page with all the playbooks, plus below I detail these files and the various options. Its best you use the Ansible documentation to see if any modules have been updated or any new modules have been created, below is just some of the highlights of what Ansible can do. You can also use the Ansible Galaxy website to see what others have created in regards to roles.
Ansible is an open-source software provisioning, configuration management, and application-deployment tool, it runs on many Unix-like systems, and can be configured for both Unix (Linux, Solaris, HPUX, etc) and Microsoft Windows. The diagram below shows the Ansible architecture
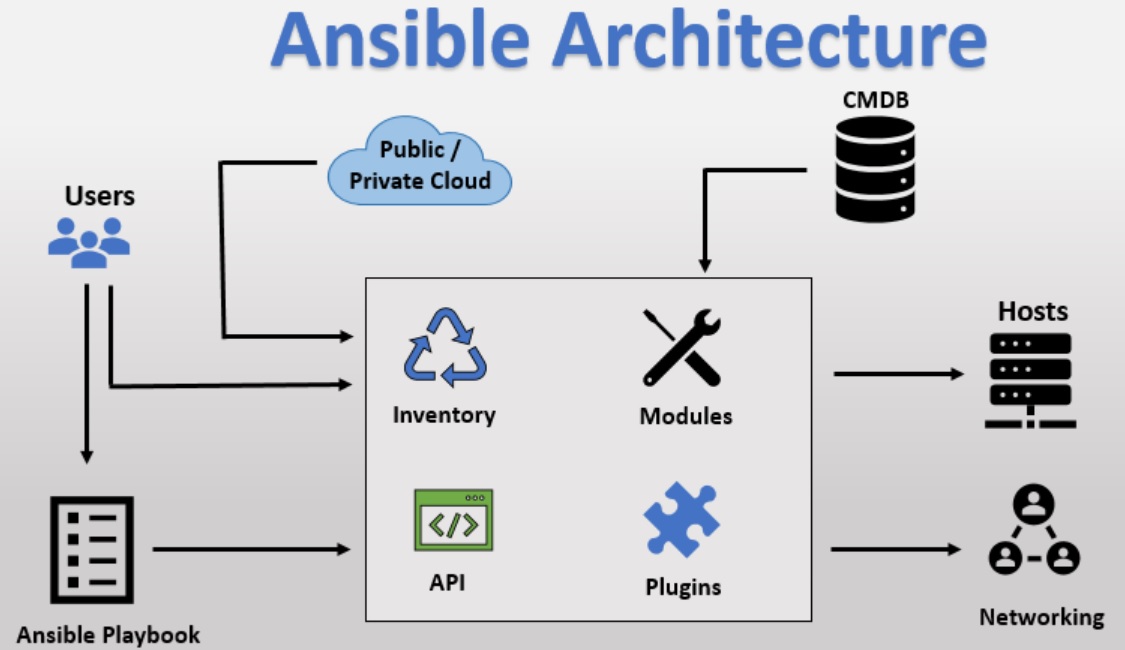
| Ansible Server | a system where Ansible is installed and configured to connect and execute commands on nodes |
| Node (Hosts) | a server that is controlled by Ansible |
| Inventory File | a file that contains information about the servers and groups Ansible controls, typically located at /etc/ansible/hosts |
| Play | a full Ansible run. A play can have several playbooks and roles, included from a single playbook that acts as entry point |
| Playbook | a file containing a series of tasks to be executed on a remote server. Playbooks exist to run tasks. |
| Tasks | combine an action (a module and its arguments) with a name and optionally some other keywords (like looping directives) |
| Action | An action is a part of a task that specifies which of the modules to run and which arguments to pass to that module |
| Role | a collection of playbooks and other files that are relevant to a goal such as installing a web server |
| Facts | are simply things that are discovered about remote nodes. While they can be used in playbooks and templates just like variables, facts are things that are inferred, rather than set. Facts are automatically discovered by Ansible when running plays by executing the internal setup module on the remote nodes |
| Modules | are the units of work that Ansible ships out to remote machines |
| Plugins | are a piece of code that expends the core functionality of Ansible. There are many useful plugins, and you also can write your own. |
| CMDB | is a type of repository which acts as a data warehouse for the IT installations |
| Cloud | is a network of remote servers on which you can store, manage, and process the data |
Ansible is agentless, temporarily connecting remotely via SSH or Windows Remote Management (allowing remote PowerShell execution) to do its tasks.

I will leave you to the web and other youtube videos on how to install the latest version of ansible.
Below is the instructions on how to setup a private/public key pair that can be used to allow the Ansible server to directly SSH into the the client. You should setup the root user to allow SSH to any client without a password. Start by setting up the clients first
| Client (Node) | ssh-keygen -t rsa # you can call it something and specify the directory, you can also use a passphase |
| Ansible Server | # copy the above clients public key to the Ansible server (you can use scp) cd ~/.ssh echo <client public key> >> authorized_keys # >> means append ssh <client> # now you should be able to login to the client without a password Notes ------------------------------------------------------------------------------------------------------ .ssh directory should have permissions of 700 and authorized_keys file should have permissions of 600 Its also a good ides to update the /etc/hosts file with the clients IP address |
The Inventory will list the ansible hosts plus can have some additional information (connection details). A file (ini or yaml) is used for the inventory, the default location /etc/ansible/hosts
| Inventory file (INI) | control.example.com ansible_connection=local # don't use SSH as control is same host [webservers] foo.example.com bar.example.com [dbservers] one.example.com two.example.com three.example.com |
| Inventory file (YAML) | all:
hosts:
control.example.com:
children:
webservers:
hosts:
foo.example.com:
bar.example.com:
dbservers:
hosts:
one.example.com:
two.example.com:
three.example.com:
Default groups |
Tasks are nothing more than a call to an ansible module. Tasks are made up of two parts the module and any arguments to that module. When you run a task, the Ansible server SSH into the client and then using the Python module runs the command you have requested (examples are ping, command, etc), all tasks have a return status. There are many modules, below is a list grouped by category, see Ansible docs for latest list

Plays are simply a set of hosts and tasks that need to be executed against those hosts, A Playbook is made up of plays. When running a playbook the display is in four parts
- Firstly is the play itself
- The next step is gathering facts, the ansible server logs into each host to collects information about the client, this info is then injected into the playbook
- The next step are the tasks being executed, this phase we are only interested in executing the task and making sure its successful.
- Lastly we have the output which recaps a summary of the playbook

| Playbook example (basic (YAML)) | ---
- hosts: all
tasks:
- name: get server hostname
command: hostname |
There are many playbooks you can create to perform some of the below, generally you can go to the Ansible module page and then select the module that you want, it will give you details on how to use the module, options that are available, etc. You can then use that module inside your playbooks.
- Install or remove packages
- Start/Stop/Restart services
- Create, remove, change permission of files
- Configure Firewalls
- Configure web servers like Apache
- Setup databases
- Many, many more
I will demostrate some of the modules below, first starting with installing packages.
| Packages (simple) | loadbalancer.yml
---------------------------------------------------------
---
- hosts: loadbalancer
become: true # use sudo command (you may or may not need)
tasks:
- name: install nginx
apt: name=nginx state=present update_cache=yes
## yum: name=nginx state=present # there is more to this but using yum instead
database.yml
---------------------------------------------------------
---
- hosts: database
become: true # use sudo command (you may or may not need)
tasks:
- name: install mysql-server
apt: name=mysql-server state=present update_cache=yes
## yum: name=mysql-server state=present # there is more to this but using yum instead |
| Packages (multiple) | ---
- hosts: webserver
become: true
tasks:
- name: install web components
apt: name={{item}} state=present update_cache=yes # {{item}} use the with_items list (using jinja syntax)
with_items:
- apache2
- libapache2-mod-wsgi
- python-pip
- python-virtualenv |
Next we look at services
| Services (start/enabled) | loadbalancer.yml
---------------------------
---
- hosts: loadbalancer
become: true
tasks:
- name: install nginx
apt: name=nginx state=present update_cache=yes
- name: ensure nginx started
service: name=nginx state=started enabled=yes # service module, enable means startup mode
database.yml
--------------------------
---
- hosts: database
become: true
tasks:
- name: install mysql-server
apt: name=mysql-server state=present update_cache=yes
- name: ensure mysql started
service: name=mysql state=started enabled=yes # service module, enable means startup mode |
| Service (stop/restart/start) | ---
# Bring stack down
- hosts: loadbalancer
become: true
tasks:
- service: name=nginx state=stopped
- hosts: webserver
become: true
tasks:
- service: name=apache2 state=stopped
# Restart mysql
- hosts: database
become: true
tasks:
- service: name=mysql state=restarted
# Bring stack up
- hosts: webserver
become: true
tasks:
- service: name=apache2 state=started
- hosts: loadbalancer
become: true
tasks:
- service: name=nginx state=started
|
| Service (handlers) | ---
- hosts: webserver
become: true
tasks:
- name: install web components
apt: name={{item}} state=present update_cache=yes
with_items:
- apache2
- libapache2-mod-wsgi
- python-pip
- python-virtualenv
- name: ensure apache2 started
service: name=apache2 state=started enabled=yes
- name: ensure mod_wsgi enabled
apache2_module: state=present name=wsgi
notify: restart apache2 # we notify the handler below (use handler name)
handlers: # handler won't do anything unless you notify it
- name: restart apache2
service: name=apache2 state=restarted |
Now lets take a look at files
| Files (copy) | # place this into the webserver playbook
- name: copy demo app source
copy: src=demo/app/ dest=/var/www/demo mode=0755 # destination directory will be created
notify: restart apache2 # we notify the handler to restart apache
- name: copy apache virtual host config
copy: src=demo/demo.conf dest=/etc/apache2/sites-available mode=0755
notify: restart apache2 # we notify the handler to restart apache |
| Files (using pip) | # place this into the webserver playbook
- name: setup python virtualenv
pip: requirements=/var/www/demo/requirements.txt virtualenv=/var/www/demo/.venv
notify: restart apache2 |
| Files (symlinks) | # place this into the webserver playbook
- name: de-activate default apache site
file: path=/etc/apache2/sites-enabled/000-default.conf state=absent # remove symlink
notify: restart apache2
- name: activate demo apache site
file: src=/etc/apache2/sites-available/demo.conf dest=/etc/apache2/sites-enabled/demo.conf state=link # create symlink
notify: restart apache2 |
| Files (template) | # place this into the loadbalancer playbook
- name: configure nginx site
template: src=templates/nginx.conf.j2 dest=/etc/nginx/sites-available/demo mode=0644
notify: restart nginx
nginx.conf.j2 (template file (jinja syntax))
--------------------------------------------------------------
upstream demo {
{% for server in groups.webserver %} # get all the hosts in the webserver group
server {{ server }};
{% endfor %}
}
server {
listen 80;
location / {
proxy_pass http://demo;
}
} |
| Files (inline) | # place this into the database playbook
- name: ensure mysql listening on all ports
lineinfile: dest=/etc/mysql/my.cnf regexp=^bind-address line="bind-address = 0.0.0.0" # subsitute a line in the my.cnf file
notify: restart mysql |
There are many modules for databases (mysql, postgres, mongodb, etc) which you can use to setup databases, user, etc. I demostrate the MySQL one below
| MySQL Module | database.yml file
----------------------------------------------------
---
- hosts: database
become: true
tasks:
- name: install tools
apt: name={{item}} state=present update_cache=yes
with_items:
- python-mysqldb # we need the python-mysqldb package
- name: install mysql-server
apt: name=mysql-server state=present update_cache=yes
- name: ensure mysql started
service: name=mysql state=started enabled=yes
- name: ensure mysql listening on all ports
lineinfile: dest=/etc/mysql/my.cnf regexp=^bind-address line="bind-address = 0.0.0.0"
notify: restart mysql
- name: create demo database
mysql_db: name=demo state=present # create a database called demo
- name: create demo user
mysql_user: name=demo password=demo priv=demo.*:ALL host='%' state=present # create a user called demo and grant permissions
handlers:
- name: restart mysql
service: name=mysql state=restarted |
The shell module is useful to retrieve information from the system for example get a directopry listing
| Shell Module | - name: get active sites
shell: ls -1 /etc/nginx/sites-enabled
register: active # save return output into variable
- name: de-activate sites
file: path=/etc/nginx/sites-enabled/{{ item }} state=absent # use below with_items array
with_items: active.stdout_lines # use above variable that was saved
when: item not in sites
notify: restart nginx |
A good idea is to create a playbook to check the status of the environment, this also highlights some of the other features that are available with Ansible. You can of course could use a monitoring tool as well.
| Status playbook | ---
- hosts: loadbalancer
become: true
tasks:
- name: verify nginx service
command: service nginx status # standard command execution to check nginx
- name: verify nginx is listening on 80
wait_for: host={{ ansible_eth0.ip4.address }} port=80 timeout=1 # test connection, wait for 1 second to get response (I will cover facts later)
- hosts: control # run from the control host (Ansible server)
tasks:
- name: verify end-to-end index response
uri: url=http://{{item}} return_content=yes # make sure we get a 200 status and also return the contents of the web page
with_items: groups.loadbalancer # run the above against the loadbalance group
register: lb_index # save the output so that we can use later (array)
- fail: msg="index failed to return content" # this will check the above output, using the fail module
when: "'Hello, from sunny' not in item.content" # check that this is in the web page
with_items: "{{lb_index.results}}" # we use the saved register from above task (lb_index)
- name: verify end-to-end db response
uri: url=http://{{item}}/db return_content=yes
with_items: groups.loadbalancer
register: lb_db
- fail: msg="db failed to return content"
when: "'Database Connected from' not in item.content"
with_items: "{{lb_db.results}}"
|
Roles are ways of automatically loading certain vars_files, tasks, and handlers based on a known file structure, allows for better scaling. Grouping content by roles also allows easy sharing of roles with other users. You can use a tool called Ansible Galaxy to scaffold the directory structure
| Galaxy (scaffolding) | mkdir /ansible/roles cd /ansible/roles ansible-galaxy init <directory name> # use something meaningful for the directory name ansible-galaxy init control # used for the Ansible server (for example) ansible-galaxy init nginx # used for nginx configuration (for example) ansible-galaxy init mysql # used for mysqld configuration (for example) |
The directory structure will look something like below, you can see that I have created a directory structure for each part of the project (control, nginx, mysql, app, etc), you can create what ever structure you like based on what you will be using Ansible for.
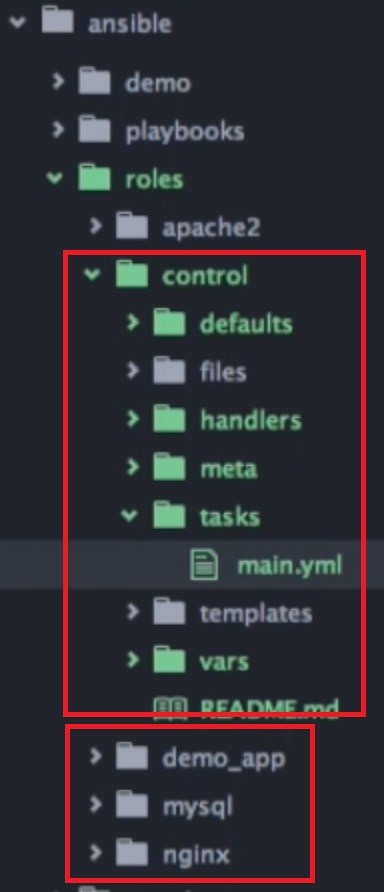
So now we can use the directory structure and roles for the playbooks, for example lets take the control, below i show the tasks but you will also need to change the handlers, templates, etc.
| /ansible/control/tasks/main.yaml | # some of the boiler code can be removed
---
- name: install tools
apt: name={{item}} state=present update_cache=yes
with_items:
- curl
- python-httplib2 |
| /ansible/control.yml | ---
- hosts: control
become: true
roles: # point to the control role
- control |
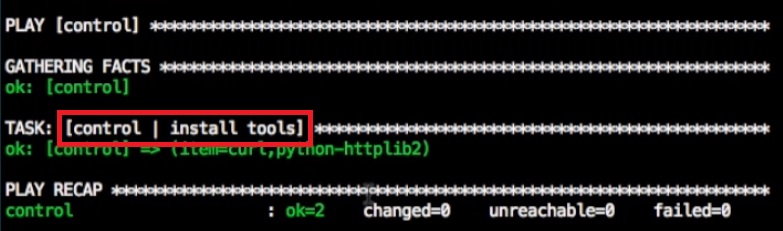
When you run the playbook you will now see the role name and the task
You can create a playbook that runs other playbooks, generally this is called site.yml
| site.yml | --- - include: control.yml # include a playbook to run - include: database.yml - include: webserver.yml - include: loadbalancer.yml |
Variables can be setup in Ansible that can be used with playbooks, Ansible provides dynamic variables called facts that can be used inside playbooks.
| Facts (IP address) | # we can use the ansible_eth0.ipv4.address fact to get the IP address
- name: ensure mysql listening on all ports
lineinfile: dest=/etc/mysql/my.cnf regexp=^bind-address line="bind-address = {{ ansible_eth0.ipv4.address }}"
notify: restart mysql |
You can use the specific defaults/main.yml (for each project playbook) file to create custom variables that can be used in other files
| defaults.yml | ---
db_name: myapp
db_user_name: dbuser
db_user_pass: dbpass
db_user_host: localhost
to use the variables
-----------------------------------------------
- name: create database
mysql_db: name={{ db_name }} state=present
- name: create user
mysql_user: name={{ db_user_name }} password={{ db_user_pass }} priv={{ db_name }}.*:ALL
host='{{ db_user_host }}' state=present |
you can also use the vars/main.yml
| vars/main.yml | --- some_var1: var1 some_var2: var2 |
You can loop through the elements of a hash using with_dict
| with_dict example | ---
sites: # top level
myapp: # key
frontend: 80 # value
backend: 80 # value
using with_dict in playbooks
--------------------------------
- name: configure nginx sites
template: src=nginx.conf.j2 dest=/etc/nginx/sites-available/{{ item.key }} mode=0644
with_dict: sites
notify: restart nginx
- name: activate nginx sites
file: src=/etc/nginx/sites-available/{{ item.key }} dest=/etc/nginx/sites-enabled/{{ item.key }} state=link
with_dict: sites
notify: restart nginx
using with_dict in templates
-------------------------------
upstream {{ item.key }} {
{% for server in groups.webserver %}
server {{ server }}:{{ item.value.backend }};
{% endfor %}
}
server {
listen {{ item.value.frontend }};
location / {
proxy_pass http://{{ item.key }};
}
} |
You can create a directory at the top level called /ansible/group_vars and then create a file called all, global variables can then be added to this file that can be used across all roles. You can create a file for each group if you wish. You can also create a file called /ansible/all/vars which would do the same thing.
| group varibles | # nothing new here file: group_vars/all --- db_name: demo db_user: demo db_pass: demo |
You may need to encrypt some variables and we can use Ansible Vault to do this, its better to create the vault file where the global variable file resides. You need to create a vault file see the commands section below
| Vault | # nothing new here
---
vault_db_pass: demo
use the vault file
----------------------------------
---
db_name: demo
db_user: demo
db_pass: "{{ vault_db_pass }}" |
Ansible has variable precedence as can be seen below which is taken from the Ansible documentation, the top of the list has the lowest priority and the bottom of the list has the highest priority. You can include variables inside the playbooks (site level, playbook top level, etc) but try to keep things simple.

This section covers the remaining bits and pieces of Ansible, performance improvements, optimizations and tidy ups.
- You can turn off the fact gather if you don't use it
- You can use a apt cache (or yum) limt time, so that cache is not always updating
- You can limit what to run in a yaml file using the --limit option
- You can limit execution by using tags
- You can override the change output because you know nothing changed
- For debuging you can use the ignore errors option
- You can use debug to output any variable values
| turn off fact gathering | gather_facts: false Note: might be a good idea to add when creating files and remove when you need to gather facts. |
| cache vaild time | tasks: -name: update apt cache apt: update_cache=yes cache_vaild_time=86400 # 24 hour cache valid time |
| limit option | ansible-playbook site.yml --limit <hostname> # will limit to just that host |
| tags | - name: install tools
apt: name={{item}} state=present update_cache=yes
with_items:
- curl
- python-httplib2
tags: [ 'package' ] # this task is now tagged with the package tag
ansible-playbook site.yml --list-tags # list all the tags that are available in the site.yml (and included)
ansible-playbook site.yml --tags "package" # run the playbook with the tag/s specified
ansible-playbook site.yml --skip-tags "package" # run the playbook but skip the specified tags |
| changed_when | tasks:
- name: verify nginx service
command: service nginx status
changed_when: false # we know the outcome so we set to false
change_when: "active.stdout_lines != site.keys()" # you can do complex code but result must be a boolean |
| ignore_errors | tasks:
- name: verify nginx service
command: service nginx status
changed_when: false # we know the outcome so we set to false
ignore_errors: true # ignore any errors at this stage and move on to the next step |
| debug option | - debug: var=active.stdout_lines # var will be printed to the console when playbook is run - debug: var=vars # print out all variables |
Some but not all of the commonly used Ansible commands:
| Directories and files | /etc/ansible/hosts # default inventory file /etc/ansible/ansible.cfg # ansible configuration file <own directory>/ansible.cfg # create own directory for all ansible file Configuration file options (ansible.cfg) ------------------------------------------- inventory = <some directory> # change the default directory of inventory file |
| Inventory (hosts, groups) | ansible --list-hosts all # list all hosts ansible -i <inventory file> --list-hosts all # list all hosts using specific inventory file ansible --list-hosts "*" # list all hosts using wildcard ansible --list-hosts <group name> # list all hosts in group ansible --list-hosts <hostname> # list all hosts with specific hostname ansible --list-hosts <string*> # list all hosts using search string and wildcard ansible --list-hosts <control[:|,]database> # list all hosts using multiple groups , : = old way and , = new way ansible --list-hosts <webserver[0]> # list all hosts using group and indexing ansible --list-hosts <\!webserver> # list hosts except anything in webserver group Options to inventory file ------------------------------------------------- ansible_connection=local # use local conneection as control is as as running host vault_password_file = <location> # set the vault password file location (text file that is locked down) Note: you can create a ansible.cfg in you own created directory and if you run commands it will use this cfg file. |
| Tasks (modules) | # useful tasks to check host connectivity ansible -m ping all # use ping module ansible -m command -a "hostname" all # run the hostname command on all hosts |
| Playbooks (plays) | ansible-playbook <playbook file> # run a playbook ansible-playbook <site.yml file> # run a site file that includes other playbooks ansible-playbook site.yml --limit <hostname> # will limit to just that host ansible-playbook site.yml --limit @<failed file name> # run playbook only on the failed hosts in the specified fail host file ansible-playbook --list-tasks # lists the tasks in the playbook ansible-playbook --start-at-task <task name> # run the playbook starting at task specified ansible-playbook site.yml --list-tags # list all the tags that are available in the site.yml (and included) ansible-playbook site.yml --tags "package" # run the playbook with the tag/s specified ansible-playbook site.yml --skip-tags "package" # run the playbook but skip the specified tags ansible-playbook site.yml --limit ? --tags ? --start-at-task ? # you can mix and match limit, start-at-task and tags ansible-playbook site.yml --step # ansible will prompt/ask each step in the playbook ansible-playbook --syntax-check <yaml file> # check the syntax of the yaml file ansible-playbook --check <yaml file> # perform a dry run but don't actually do anything (report only) ansible-playbook --ask-vault-pass <playbook> # allows you to enter vault password ansible-playbook --vault-password-file <location> # specify the file that has the vault password, text file that is locked down |
| Facts | ansible -m setup <hostname> # list facts for specific hostname in inventory |
| Vault | ansible-vault create <file name> # generally called vault, enter password to encrypt file ansible-vault edit <file name> # view and edit vault file |
| Performance | time ansible-playbook <playbook> # record how long a playbook takes to run (benchmark) |