Gradle is a build automation tool very much like Maven, however Gradle uses the Groovy programming language (DSL language) instead of using XML like Maven (you can also use Kotlin). Gradle uses a directed acyclic graph to determine the order in which tasks can be run. Gradle can be used with Java, C++, roovy, Android and many others. Some of the features that Gradle offers over Maven
- Compiler daemon that makes compiling faster
- Incremental compilations for Java classes
- Compile avoidance for Java
- The use of APIs for incremental subtasks
- The use of subsitution rules for compatible libraries
- The use of ReplacedBy rules
- Better metadata resolution
- Ability to dynamically replace project dependencies with external ones
- More readable project files
Gradle scripts are regular programs and thus we get a lot more power, its best to have a little bit of Groovy knowledge but you don't need to be an expert. Gradle uses a gradle.build file and you can actually use any Groovy commands (and even some Java one's too), this means you can even import Java classes (for example SimpleDataFormat) and you can use it, you can even use variables, methods, etc.

Gradle Object Model and Lifecycles
Gradle uses plugins which have there own API's, there are 6 key interfaces that you will use, each interface has its own properties that you can use
- Script - implemented by all Gradle scripts, associated with files ending in .gradle
- Project - associated with the build.gradle file
- Gradle -
- Settings - this for multi-project projects
- Task - represents some atomic piece of work which a build performs
- Action -
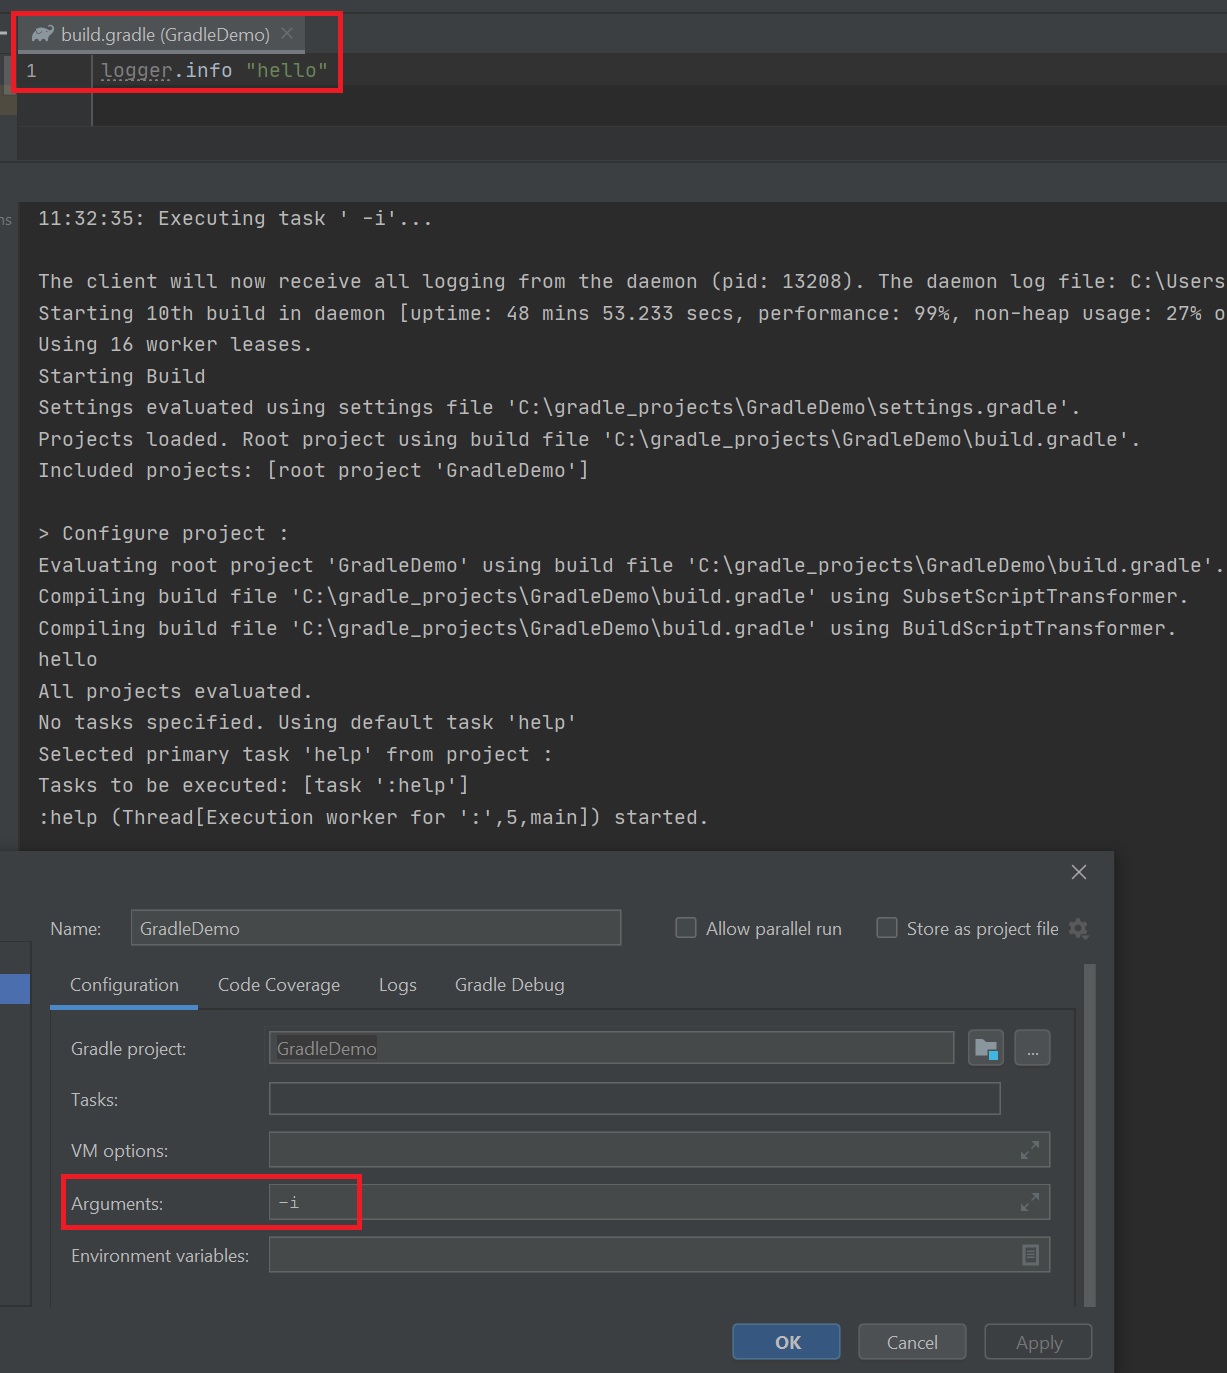
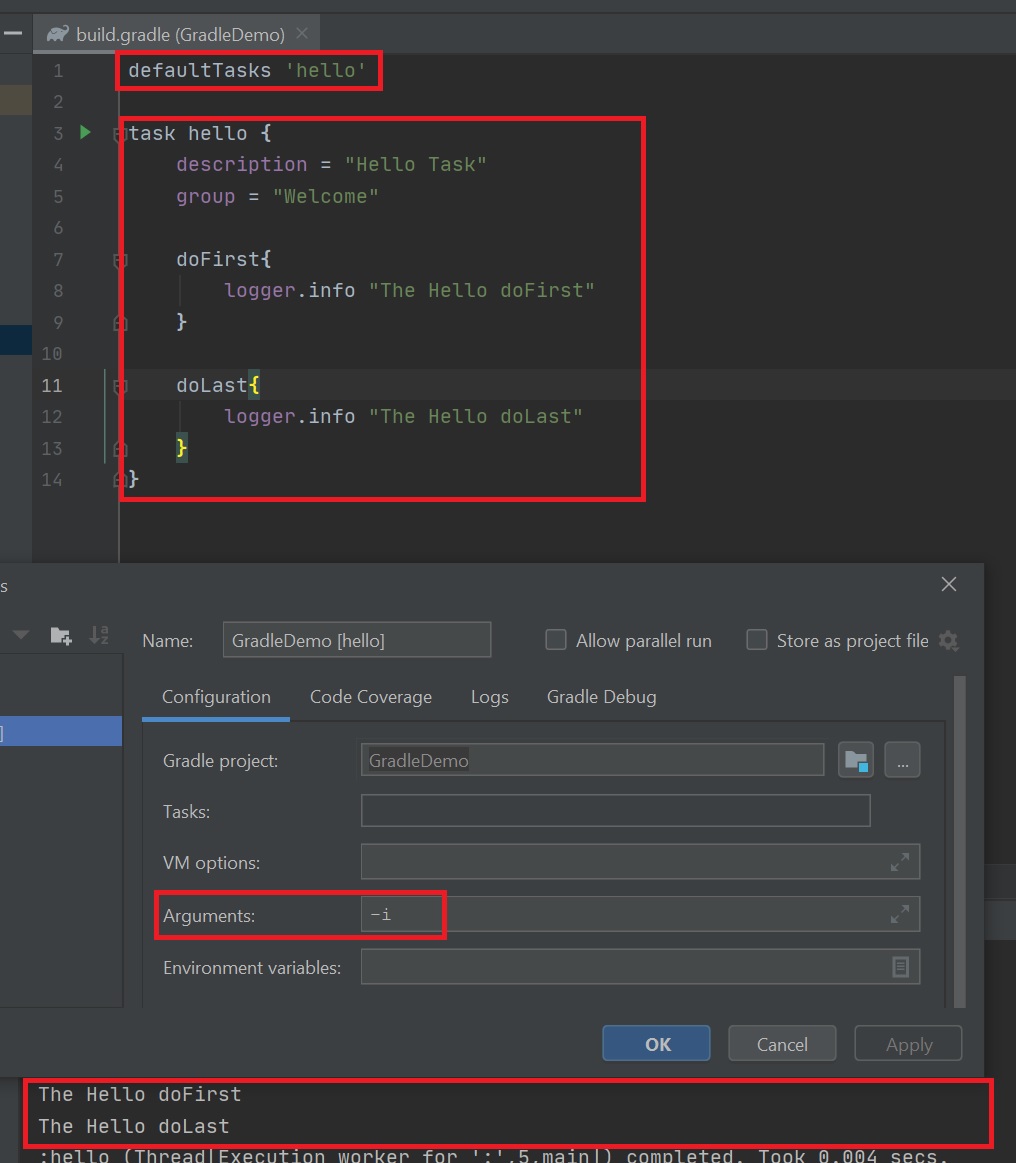
The script interfaces use files ending in .gradle, you need to add the -i option but you can use any of the properies or methods of the script interface, the example below i have used logger and thus the output will give you additional information based on what you have asked.
The Gradle lifecycle has 3 phases
- Initialization - determines which projects are going to take part in the build, and creates a Project instance for each of these projects (init.gradle, settings.gradle)
- Configuration - the project objects are configured. The build scripts of all projects which are part of the build are executed (build.gradle)
- Execution - Gradle determines the subset of the tasks, created and configured during the configuration phase, each task is then executed (build.gradle)
The Gradle initialization phase uses two scripts the init.gradle and settings.gradle. The init script runs before the build this setups plugins, properties, database authenication, etc. The settings script is used with multi-project projects and determines which projects need to be built.
The Gradle configuration phase uses the build.grade script, each project has a its own build script
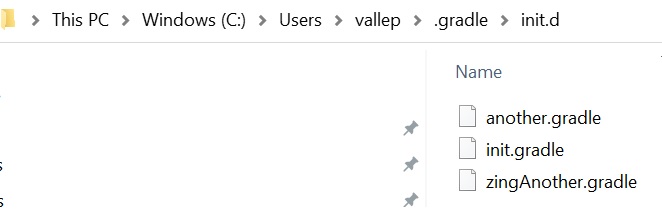
You can have a ~/<home_dir>/.gradle/init.d directory where you can place additional gradle initialization scripts, they are ordered by filename (alphabetical). The init.d scripts run first then the settings script and finally the build script as can be seen in the right-side screenshot.
 |
 |
Each file (phase) has access to the script interface and depending on what phase each will have a delegate to either the project, settings or grade interface. The diagrams below represent each file and what it ultimately has access too in terms on what interfaces and thus what properties and methods you can use within the files.
| Build | 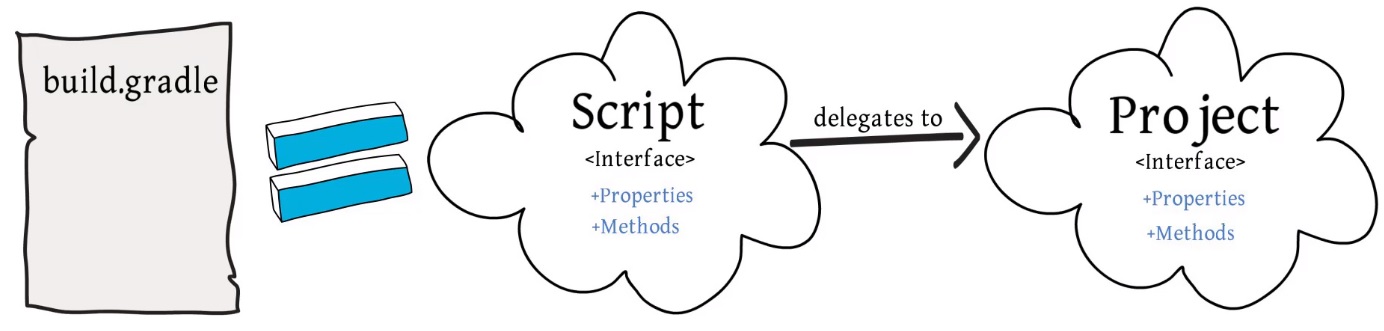 |
| Settings | 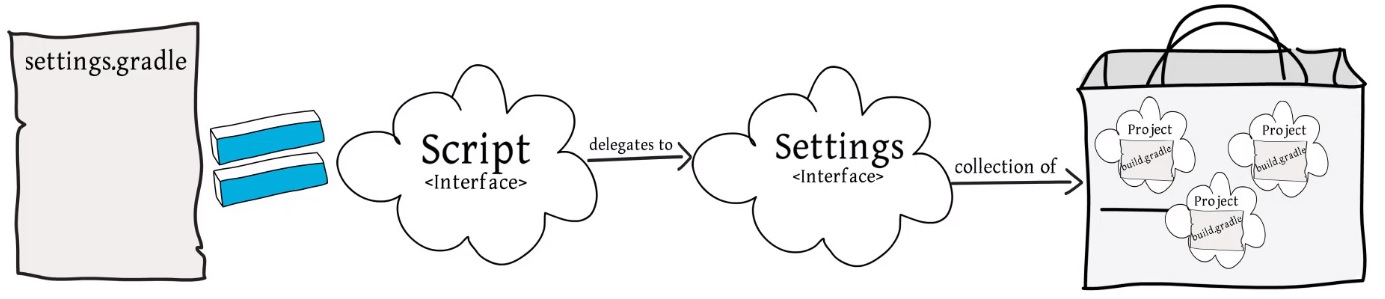 |
| Init | 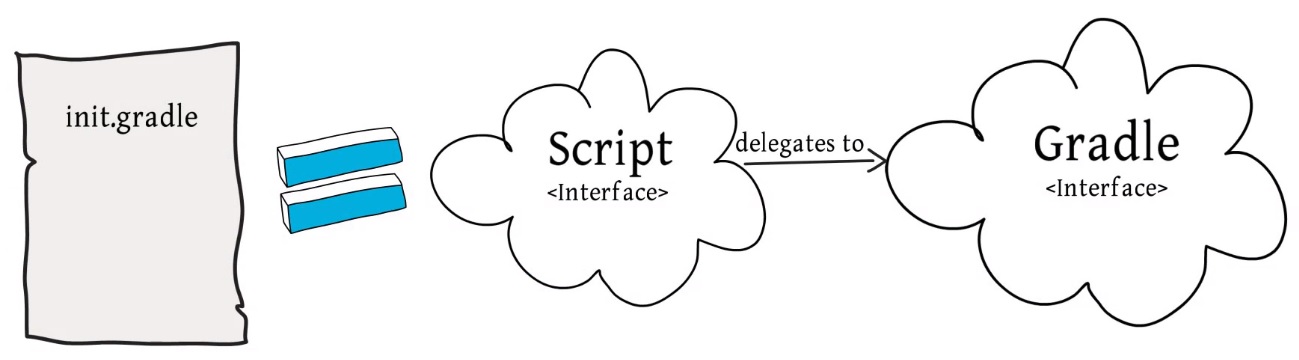 |
| Overall picture | 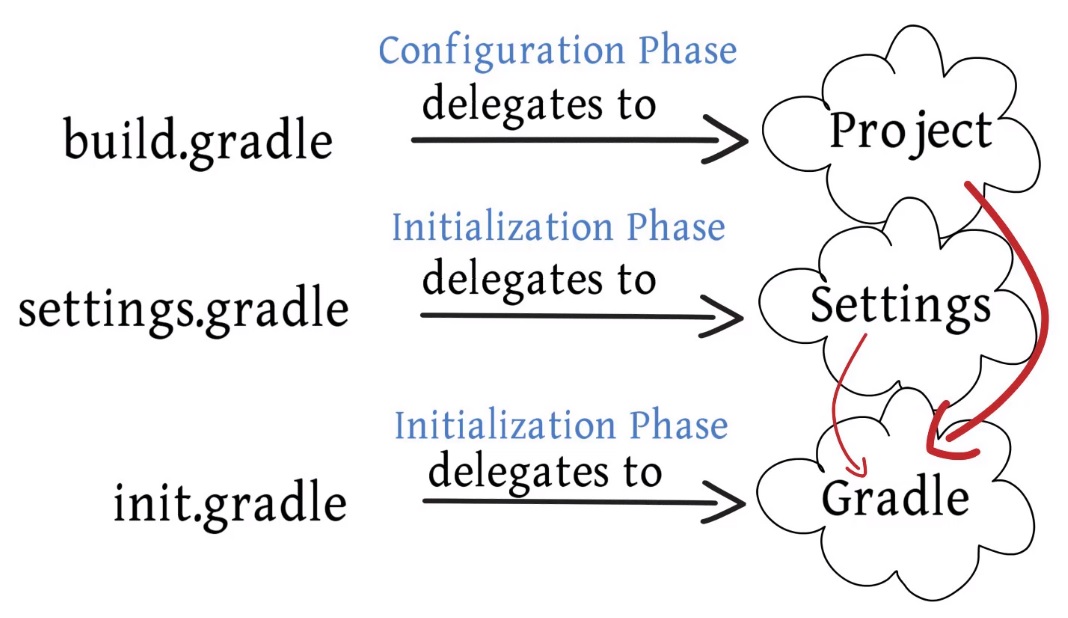 For example in the build script you have access to project.gradle.timestamp() method, because the project is the delegate object you actually don't need to specify project so gradle.timestamp will also work but the init script has only access to the gradle interface, here you can simply use timestamp() (don't need to use gradle as its the delegate). So you could use something like below in your build script logger.info """
******************************************************************************
Welcome to Gradle $gradle.gradleVersion - http://www.gradle.org
Gradle home is set to: $gradle.gradleHomeDir
Gradle user directory is set to: $gradle.gradleUserHomeDir
Base directory: $projectDir
Running script ${relativePath(buildFile)}
******************************************************************************
"""
Each interface has many properties and methods that you can use, see the Gradle documenation for more information. |
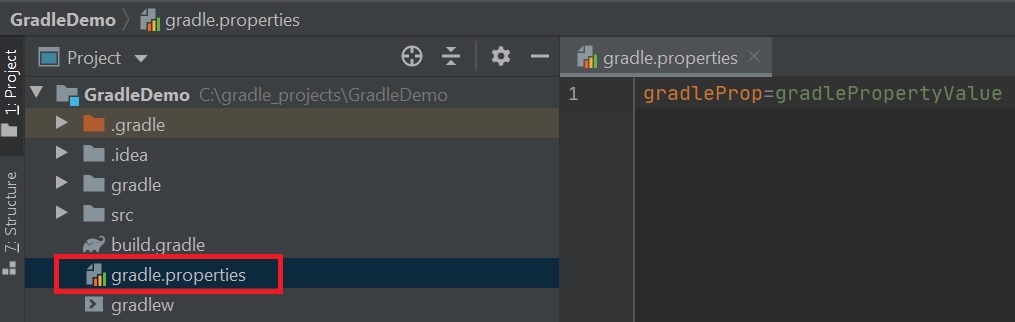
In Gradle you can create your own gradle.properties file that uses key/value pairs, this is available to both settings and the build phases, this property file can live in the root directory of Gradle, GRADLE_USER_HOME directory or can be passed on the commandline using the -Dgradle.user.home.
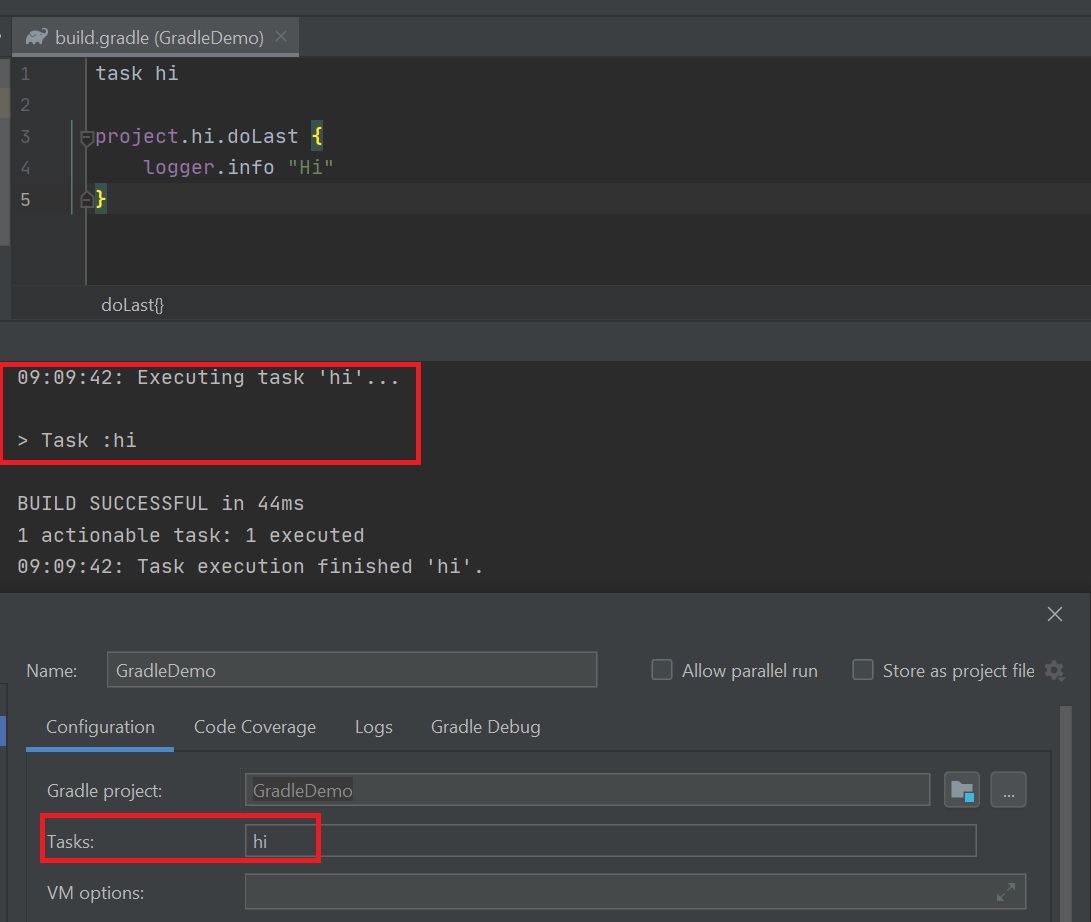
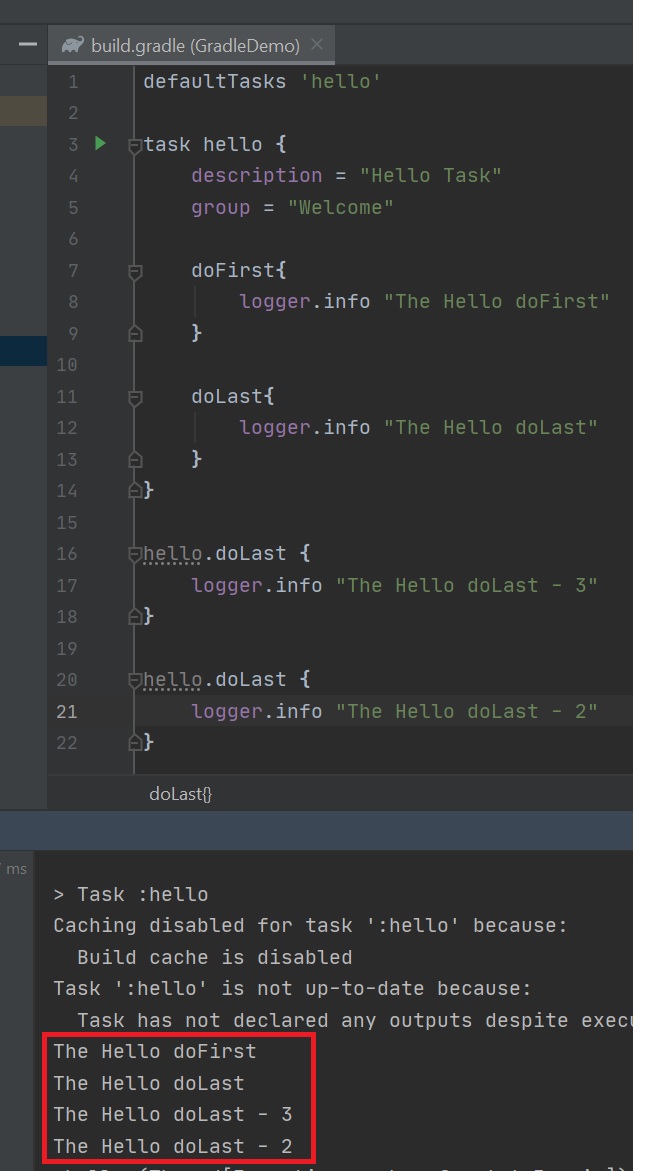
A project can be made up of zero or more tasks, a task represents some atomic piece of work and uses the task interface, each task has a unique name. In the configuration phase you can create or configure tasks (setting up tasks), then in the execution phase you execute the task which performs the build. A task can contain zero or many actions (or closures) which is a atomic piece of work for a build and uses the action interface, the actions could compile Java or enerate Java docs, etc. The task interface uses two methods called doFirst() and doLast() which allow you to add actions to a task, you can also chain tasks which allow you to perform multiple actions.
Below are two simple ways to create a task, the screenshot on the right also uses the doFirst() and doLast() methods, plus i add some task properties (description, group) note in intellij you need to add the -i argument to see the logger output, also you can use the property defaultTasks that will run the task when executed.
 |
 |
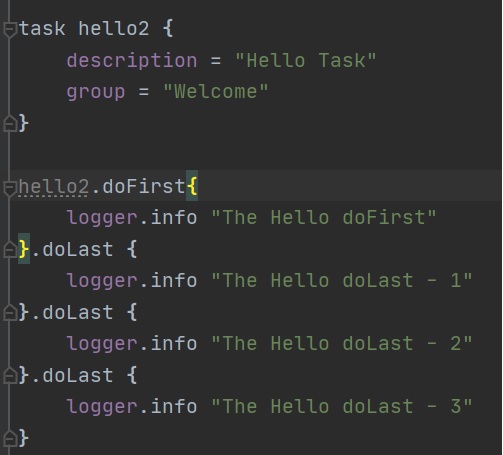
You can chain additional tasks, doLast basically adds task to the end of the action list. This is different for the doFirst which adds the task to the beginning of the doFirst action list. The doFirst action list is executed before the doLast action list. The right-hand screenshot show a short-hand of coding using chaining.
 |
 |
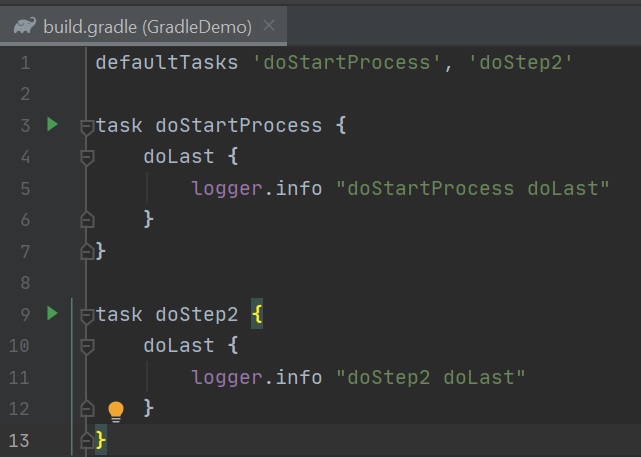
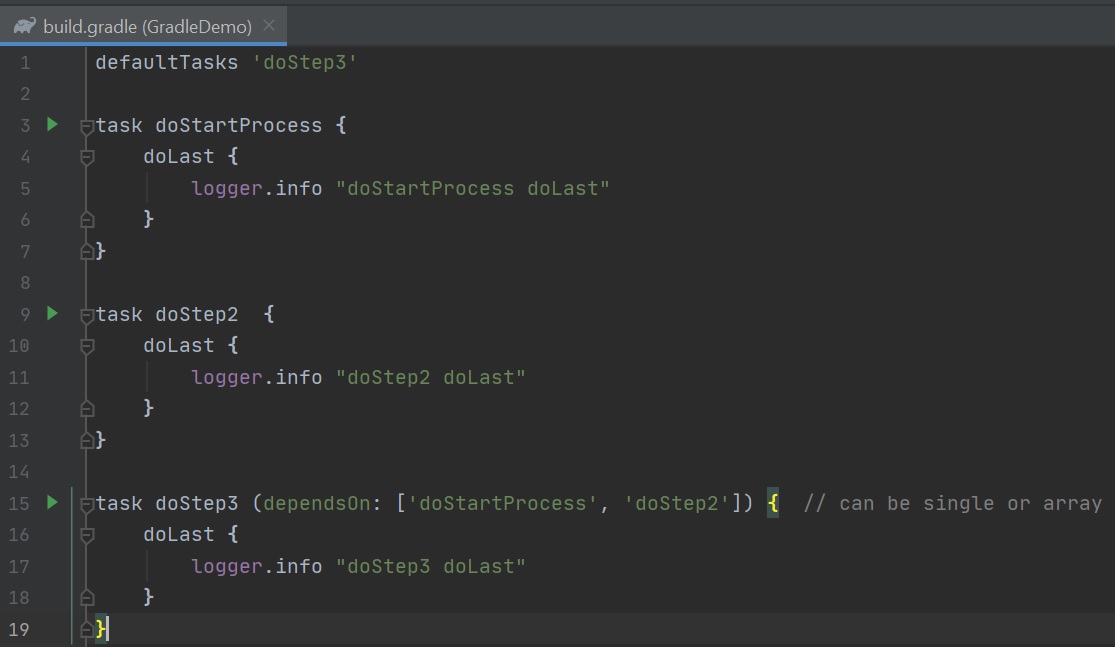
Tasks can be sequenced using dependencies, you could use the defaultTask property but this is not very flexible (left-hand screenshot), you should use the dependsOn property of the task this then allows Gradle to build a dependency graph (direct acyclic graph, which means you cannot have cyclic dependencies, you get runtime execption) during configuration phase and thus execute in the order that you desire. You can use the project.tasks.findAll() method to find all tasks of a specific task.
 |
 you can also use the dependsOn method, this can be used if you want to only add a dependency on a specific condition (wrap it with a if statement). |
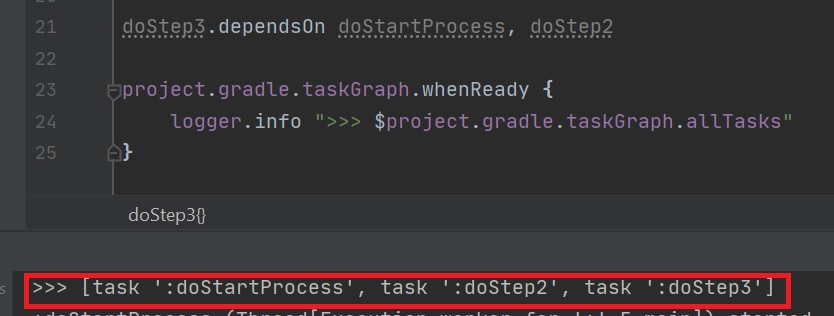
You can get access to the dependency graph using the whenReady() method (used to delay until Graph has been created) and the taskGraph.allTasks() method, this can be used to debug or troubleshoot especially on large projects.
Plugins add new tasks (e.g. JavaCompile), domain objects (e.g. SourceSet), conventions (e.g. Java source is located at src/main/java) as well as extending core objects and objects from other plugins, they basically extend the Gradle Model.
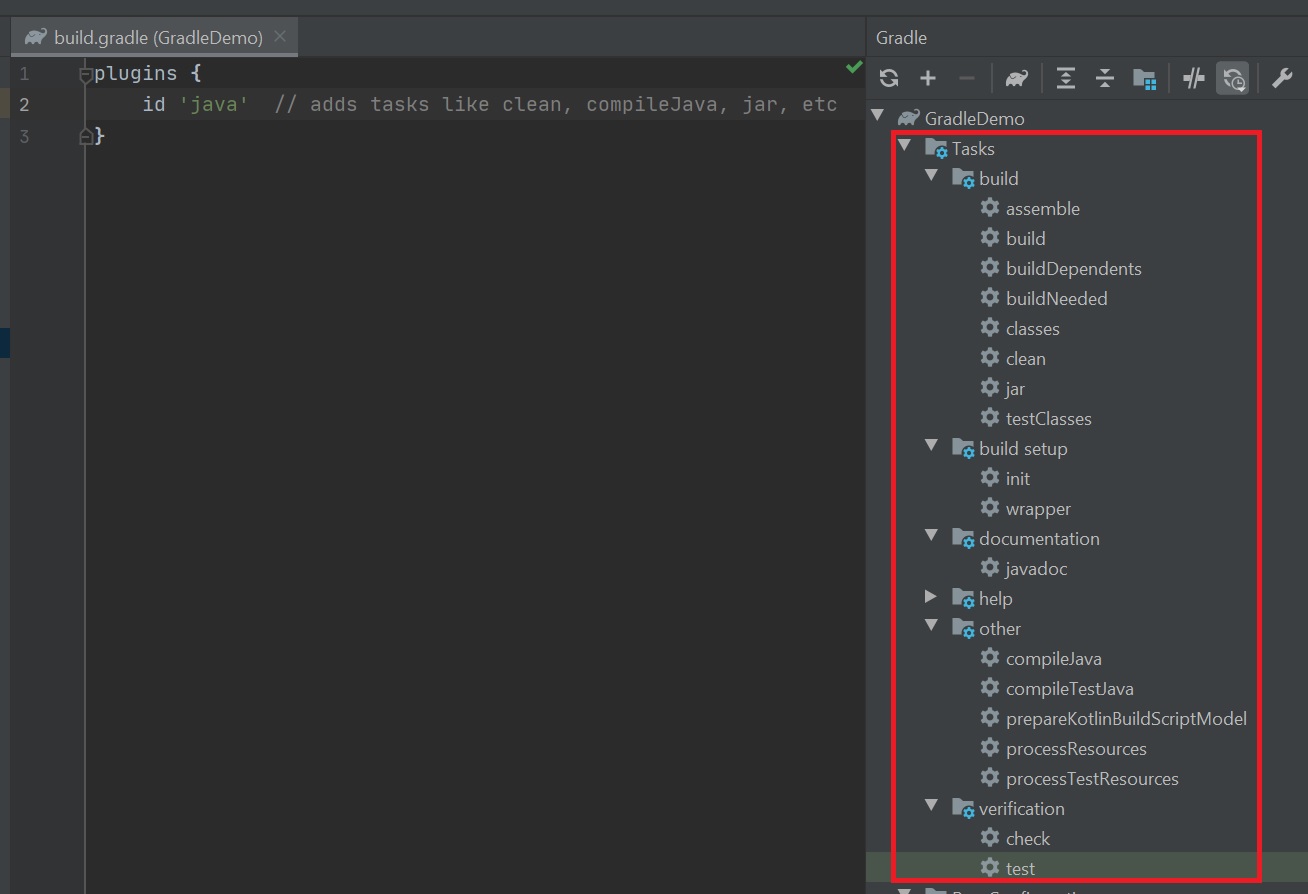
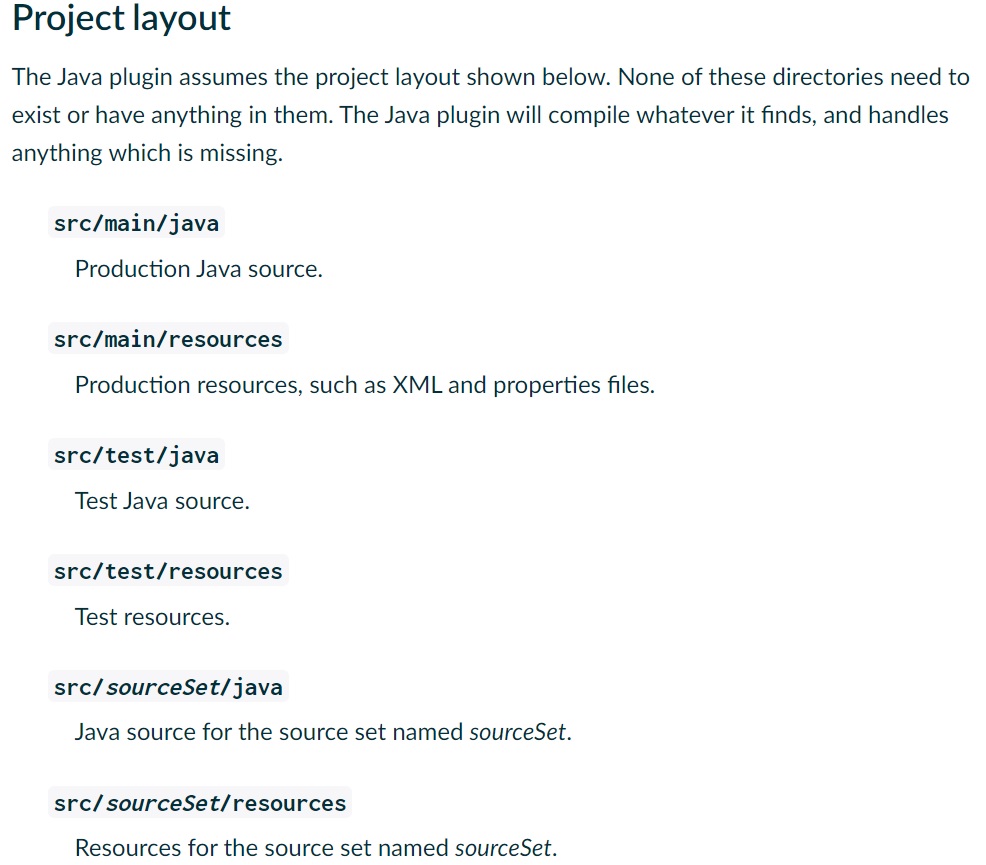
When you add the java plugin you can see the additional tasks (left-hand screenshot), like clean, build, jar and many more. Also the Java plugin also setups a default project layout which is the same as Mave (right-hand screenshot), this is a common layout for Java projects.
 |
 |
There are two types of dependencies direct and transitive
- direct - are need by the application, they are the ones you specify
- transitive - are dependencies of direct dependencies, if a direct dependency if dependent on some other package, this would be a transitive dependency.
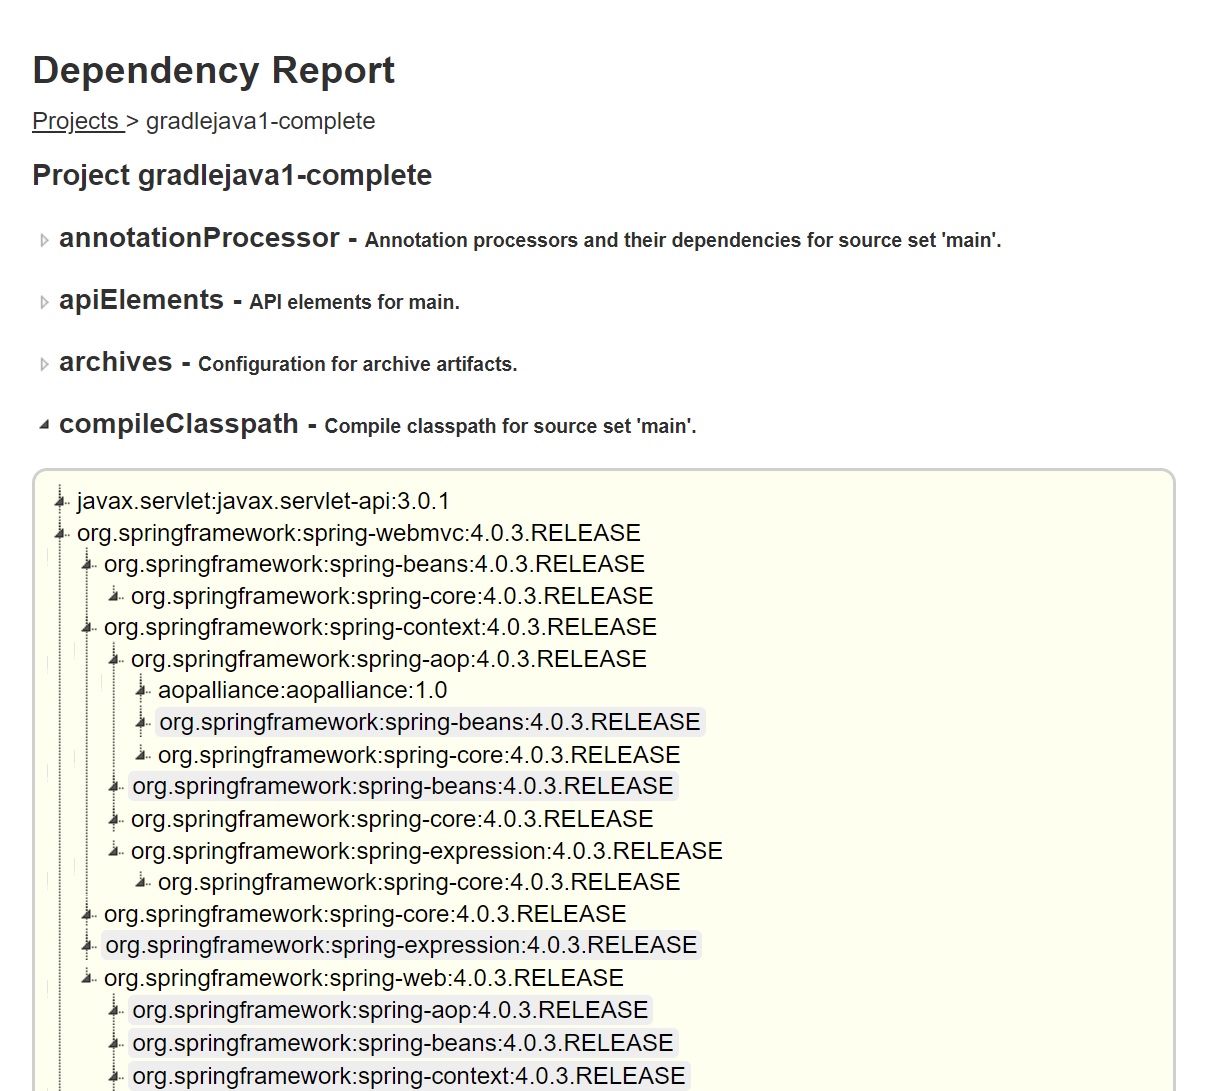
You can list all the dependencies of the project using the help->dependencies task

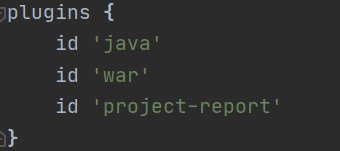
There is also a report pluin you can use
 |
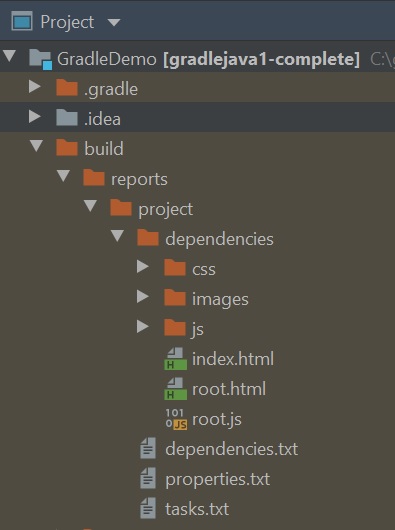 |
The reports look like something below