The front-end code can be separated from the back-end code, generally two sets of developers who specialize in either back-end or front-end code will work together on a project, for front-end development you need to have UI skills, a good understanding of HTML, Javascript/JQuery and a bit of an artist fair. There are a number of UI frameworks React and Angular being the most popular which make coding very easy and also have common standards which most companies buy into now. More and more companies are now switching to a back-end (API service) and front-end solution, this allows the company to easy switch out a stack if they find something thats better, plus if creating a API back-end this allows other companies to hookin and develope their own UI or simply use it as a API service.
So why React, it is fast, scalable and simple for you learn and use, plus it provides reusable components. The other benefit is that it works well with Redux which is a state container and thus a single source of truth, I will discuss Redux in detail later.
The client directory structure is below, again feel free to change this how you like, also remember the package.json file has already been configured to startup the client.

Below are some screen shots of the front-end, however I will focus more on React and Redux as UI is more of a personal choice and what one person might like my be different than someone else would like. Remember that all the front-end will do is call the API's on the back-end, so if React is not for you, you could use Angular instead.
 |
 |
To setup the client we use the npx command, npx allows you to run commands without having to install the command you want to run, the create-react-app command is a generator which can build skeleton applications, its kinda like the Spring Initializr in the Java world, it creates a directory structure, setups a package.json file and install's all the required packages, you can even start it as its has some basic configuration.
Next we need some dependencies
| Client dependencies | npm i axios react-router-dom redux react-redux redux-thunk redux-devtools-extension moment react-moment uuid axios - make http requests (could use fetch API) react-router-dom - react router redux - redux react-redux - react redux, hooks into redux redux-thunk - react middleware allows to make async requests in actions redux-devtools-extension - helps with making things communicate easier moment - date and time library react-moment - help in using above with react uuid - allows application to create uuid's |
In order to save use some typing for example axios.get('http://localhost:5000......') we can use a proxy so that we don't have to specify the first part and only need to type axios.get('/api/users'), it cuts down on typing a little. Add the below to the client's package.json file, this is pointing to back-end server.
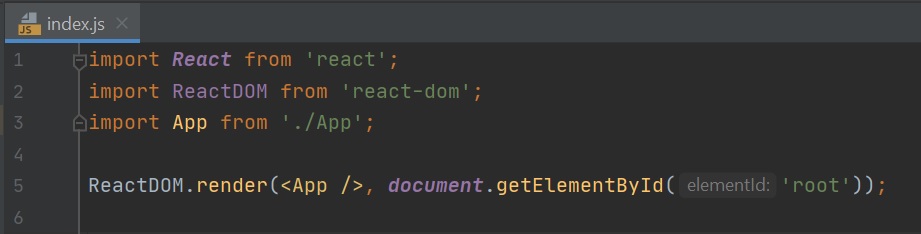
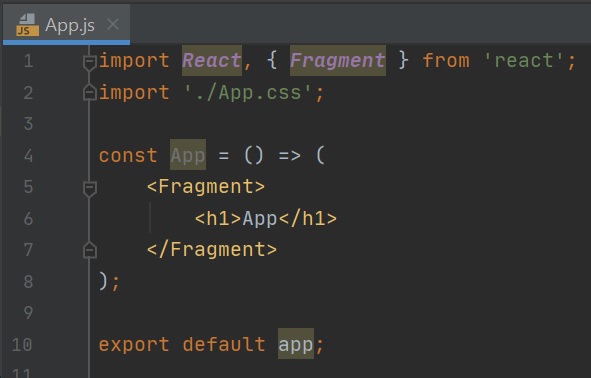
You can remove some of the boilerplate code, in both the index.js and app.js files, also we will use Fragments which allow you to add extra code without adding nodes to the DOM, for example the table data could be a fragment instead a table and thus that fragments could be swapped out with another fragment.
 |
 |
I am not getting into settting up any images or CSS as I am focusing on the react/redux part.
React Components are independent and reusable bits of code. They serve the same purpose as JavaScript functions, but work in isolation and return HTML code via a render function. Components come in two types, class components and function components, I will be using function components.
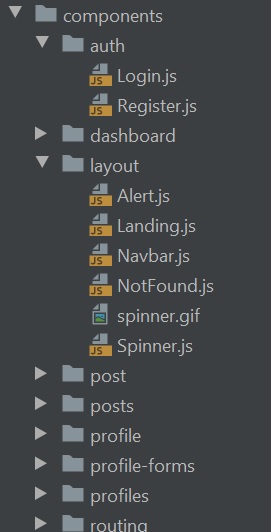
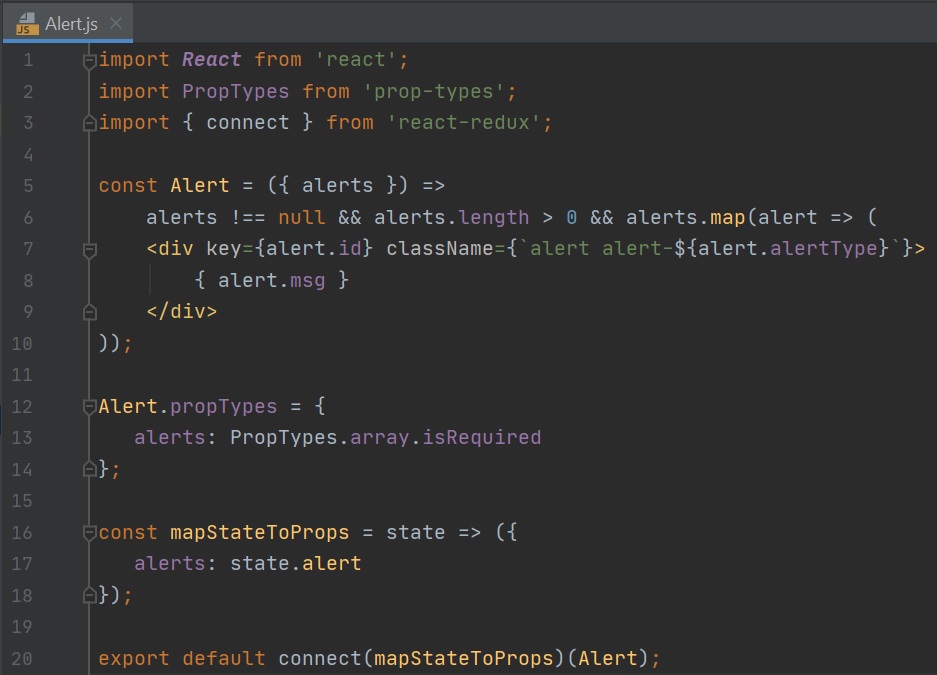
As there will be many components you are free to create a directory structure to contain them (left-handscreenshot), try and keep components small and to perform a specific function this would mean you can then reuse the component elsewhere, for example take the alert component below (ignore the code for the moment, right-hand screenshot), this can be used in many different form, login, register components, a navbar would be another good example of a reuseable component as many other components could use this, in summary components reduce code.
 |
 |
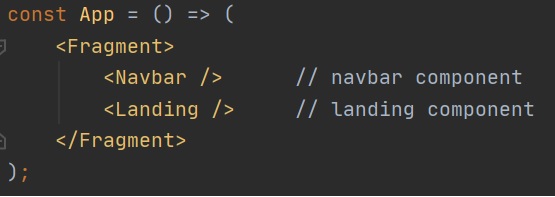
So once you have created a component how do you use it, once you have imported the component (left-hand screenshot) you can use them in the fragment as per below (right-hand screenshot), however we will come back to this later as we will see how to implement redux and state data.
 |
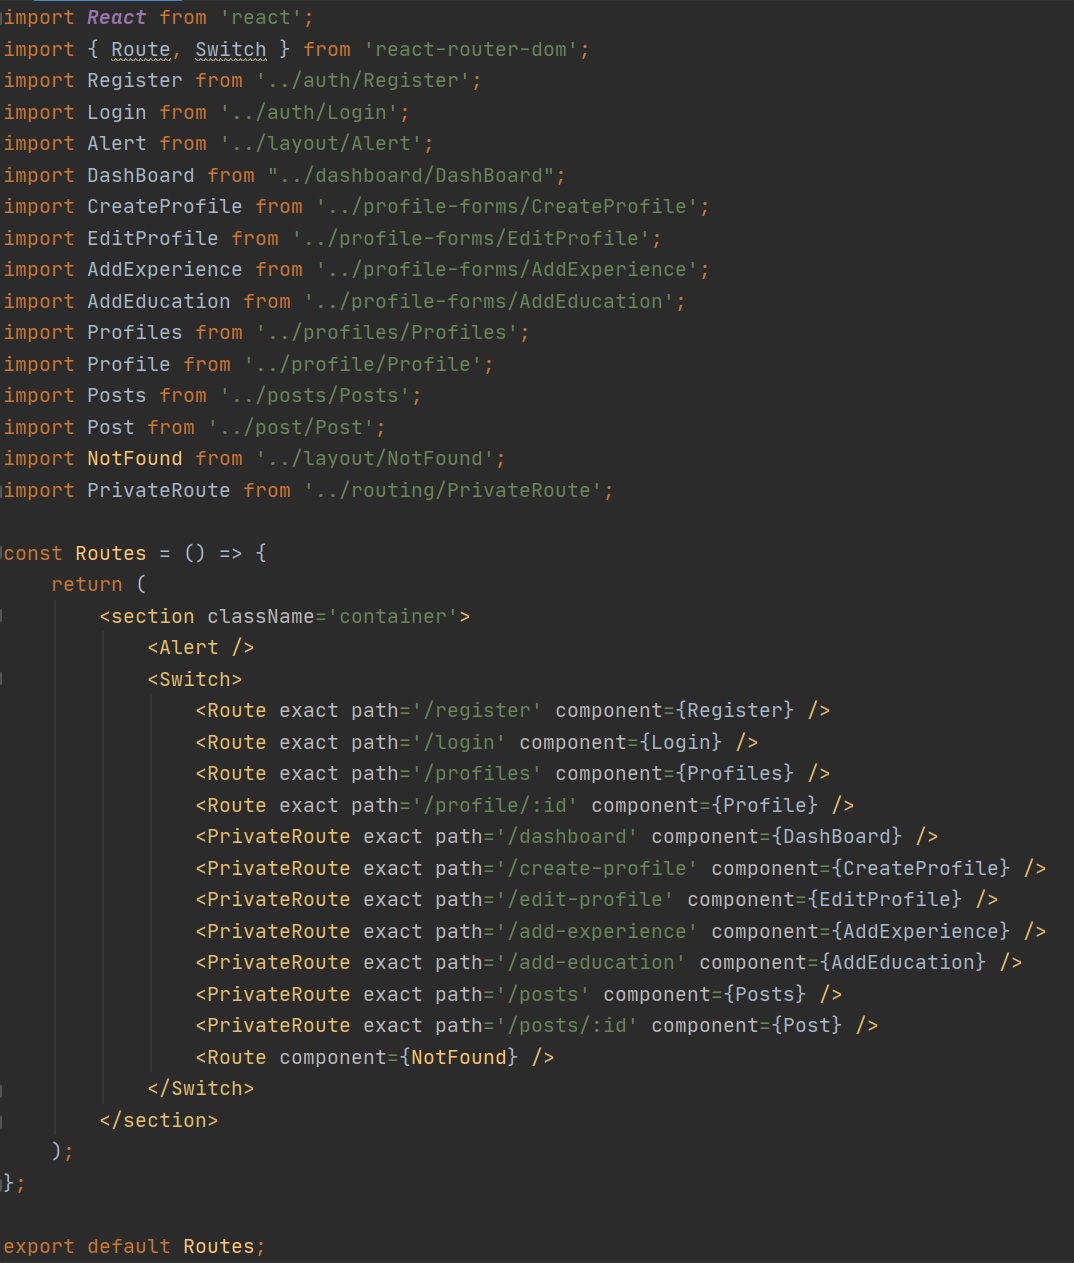
We create a routing file (left-hand screenshot) that will map to various components, we wrap the whole thing in a container, add an Alert component, then warp everything in switch which is a router matcher which searches through its children Route elements to find one whose path matches the current URL. When it finds one, it renders that Route> and ignores all others. This means that you should put Routes with more specific (typically longer) paths before less-specific ones. We also add a default route at the bottom to use a NotFopund component. We pull the whole file in app.js.
 |
 |
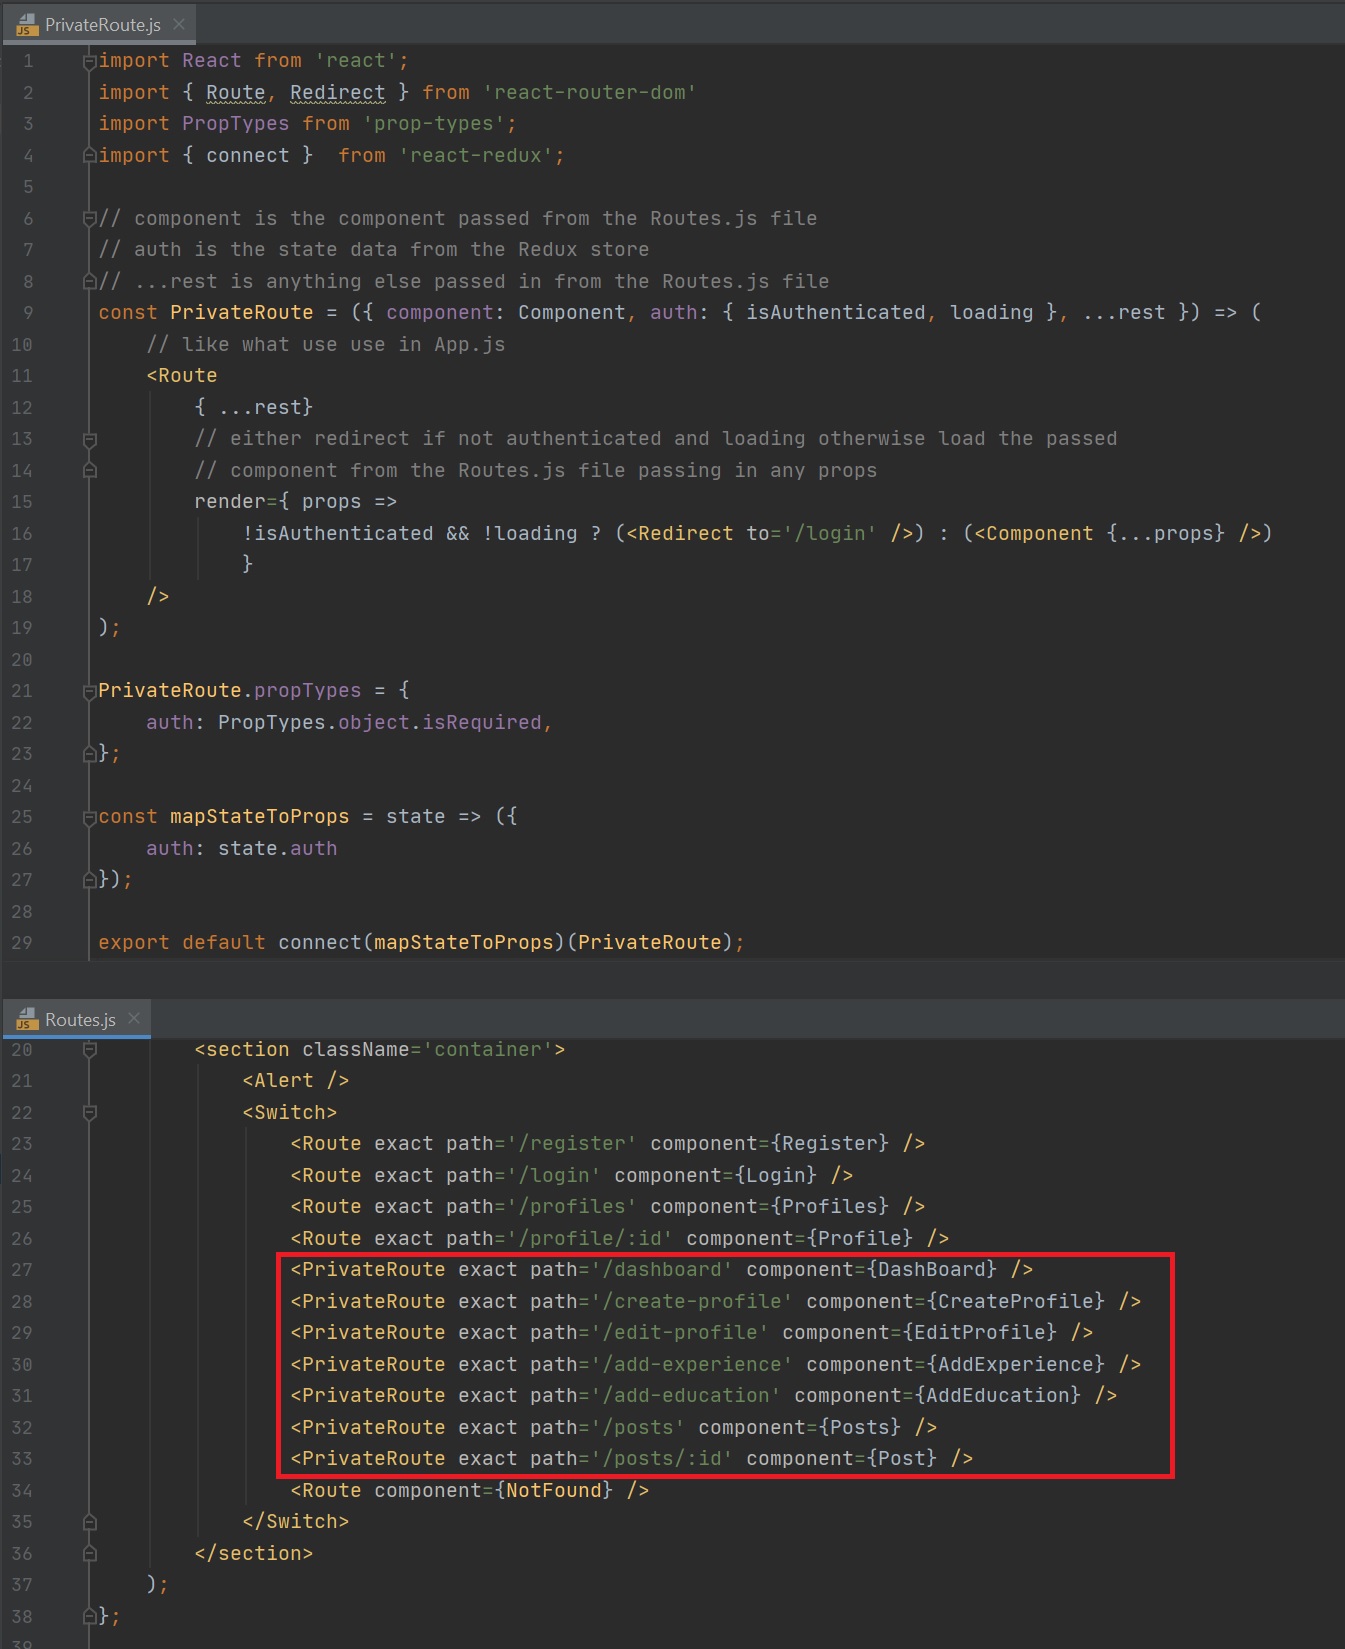
You probably noticed the privateRoutes above which is a protected route, from the Routes.js file we call the privateRoute passing a component (dashBoard, CreateProfile, EditProfile, etc), in the privateRoute we connect to the Redux store and map the auth prop, in the PrivateRoute function we take in the passed component (from Routes.js), we destructure the auth prop and the ...rest takes everything else. We then use a Route (like in App.js) to render the page to either redirect to the login page or load the passed component (DashBoard, CreateProfile, EditProfile, etc) based on if the user is isAuthenticated and the page is not loading.
Like many rendering engines there are many elements that you can use that are converted into a HTML element (declarative), react uses Link and thus we can replace the <a href...> tags as per below, notice that you need to import Link from react-router-dom.
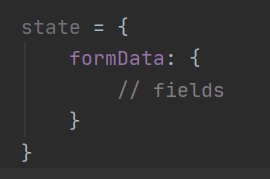
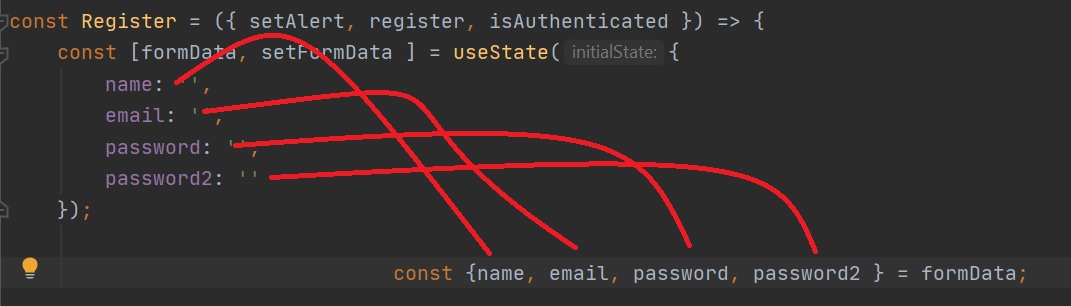
When creating forms we can use react's useState which is a State Hook, Hooks are functions that let you “hook into” React state and lifecycle features from function components. First you need to import in, then you need to create some constants, formData is a object with all the field values and setFormdata which is a function to update our state data, the useState function is similar to having a class called state with formData that contains the fields as per below (left-hand screesnhot). The fields are name, email, password and password2, the initial state is that they are all empty as per the screenshots of Register.js below. We then destructor the formData into constants name, email, password and password2, this is like local variables matching the state object fields of the same name (right-hand screenshot).
 |
 |
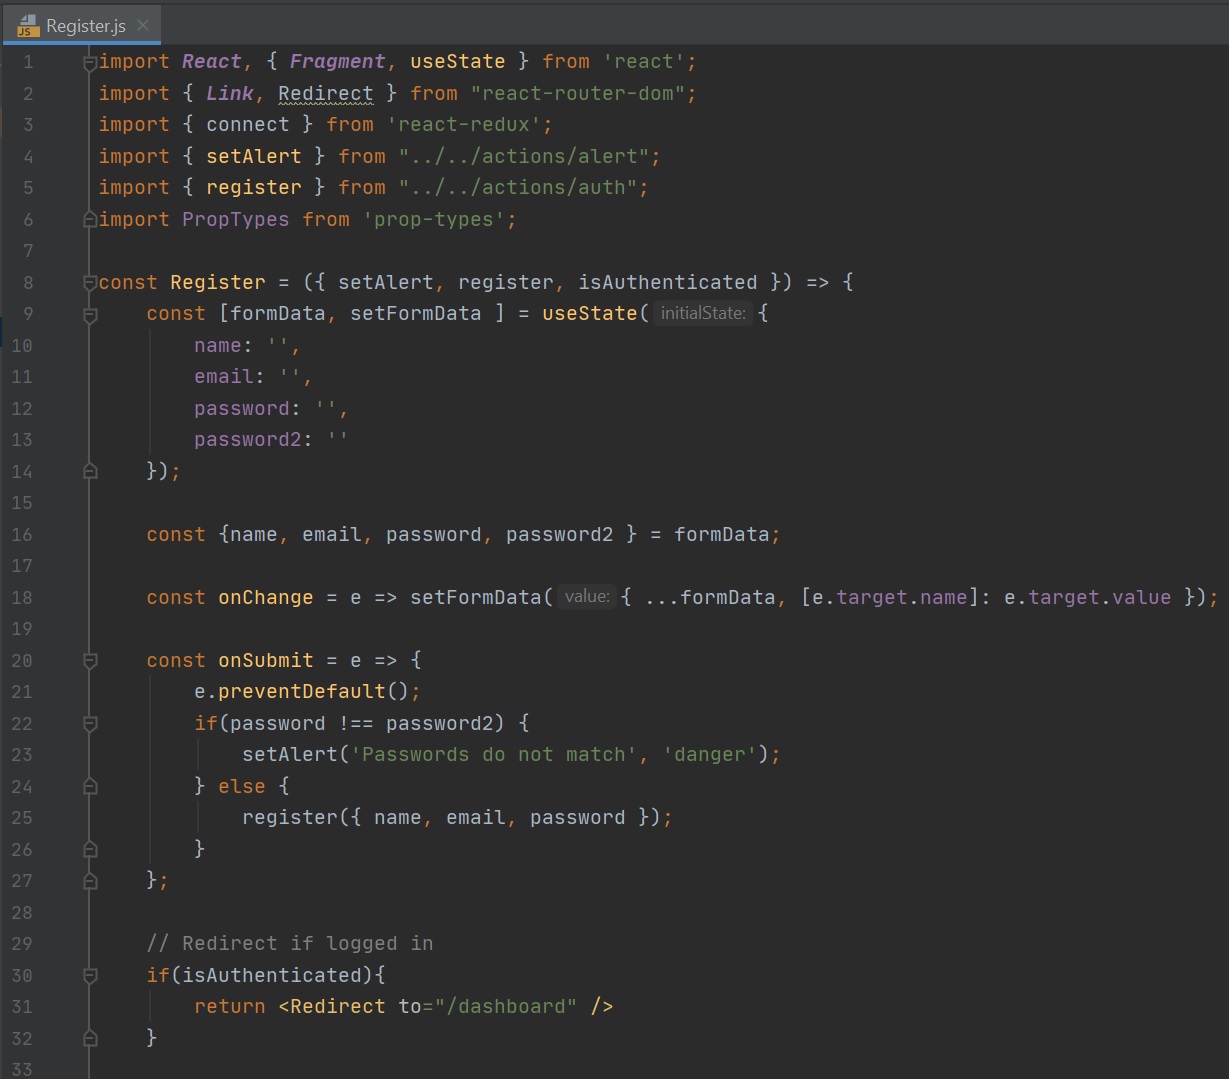
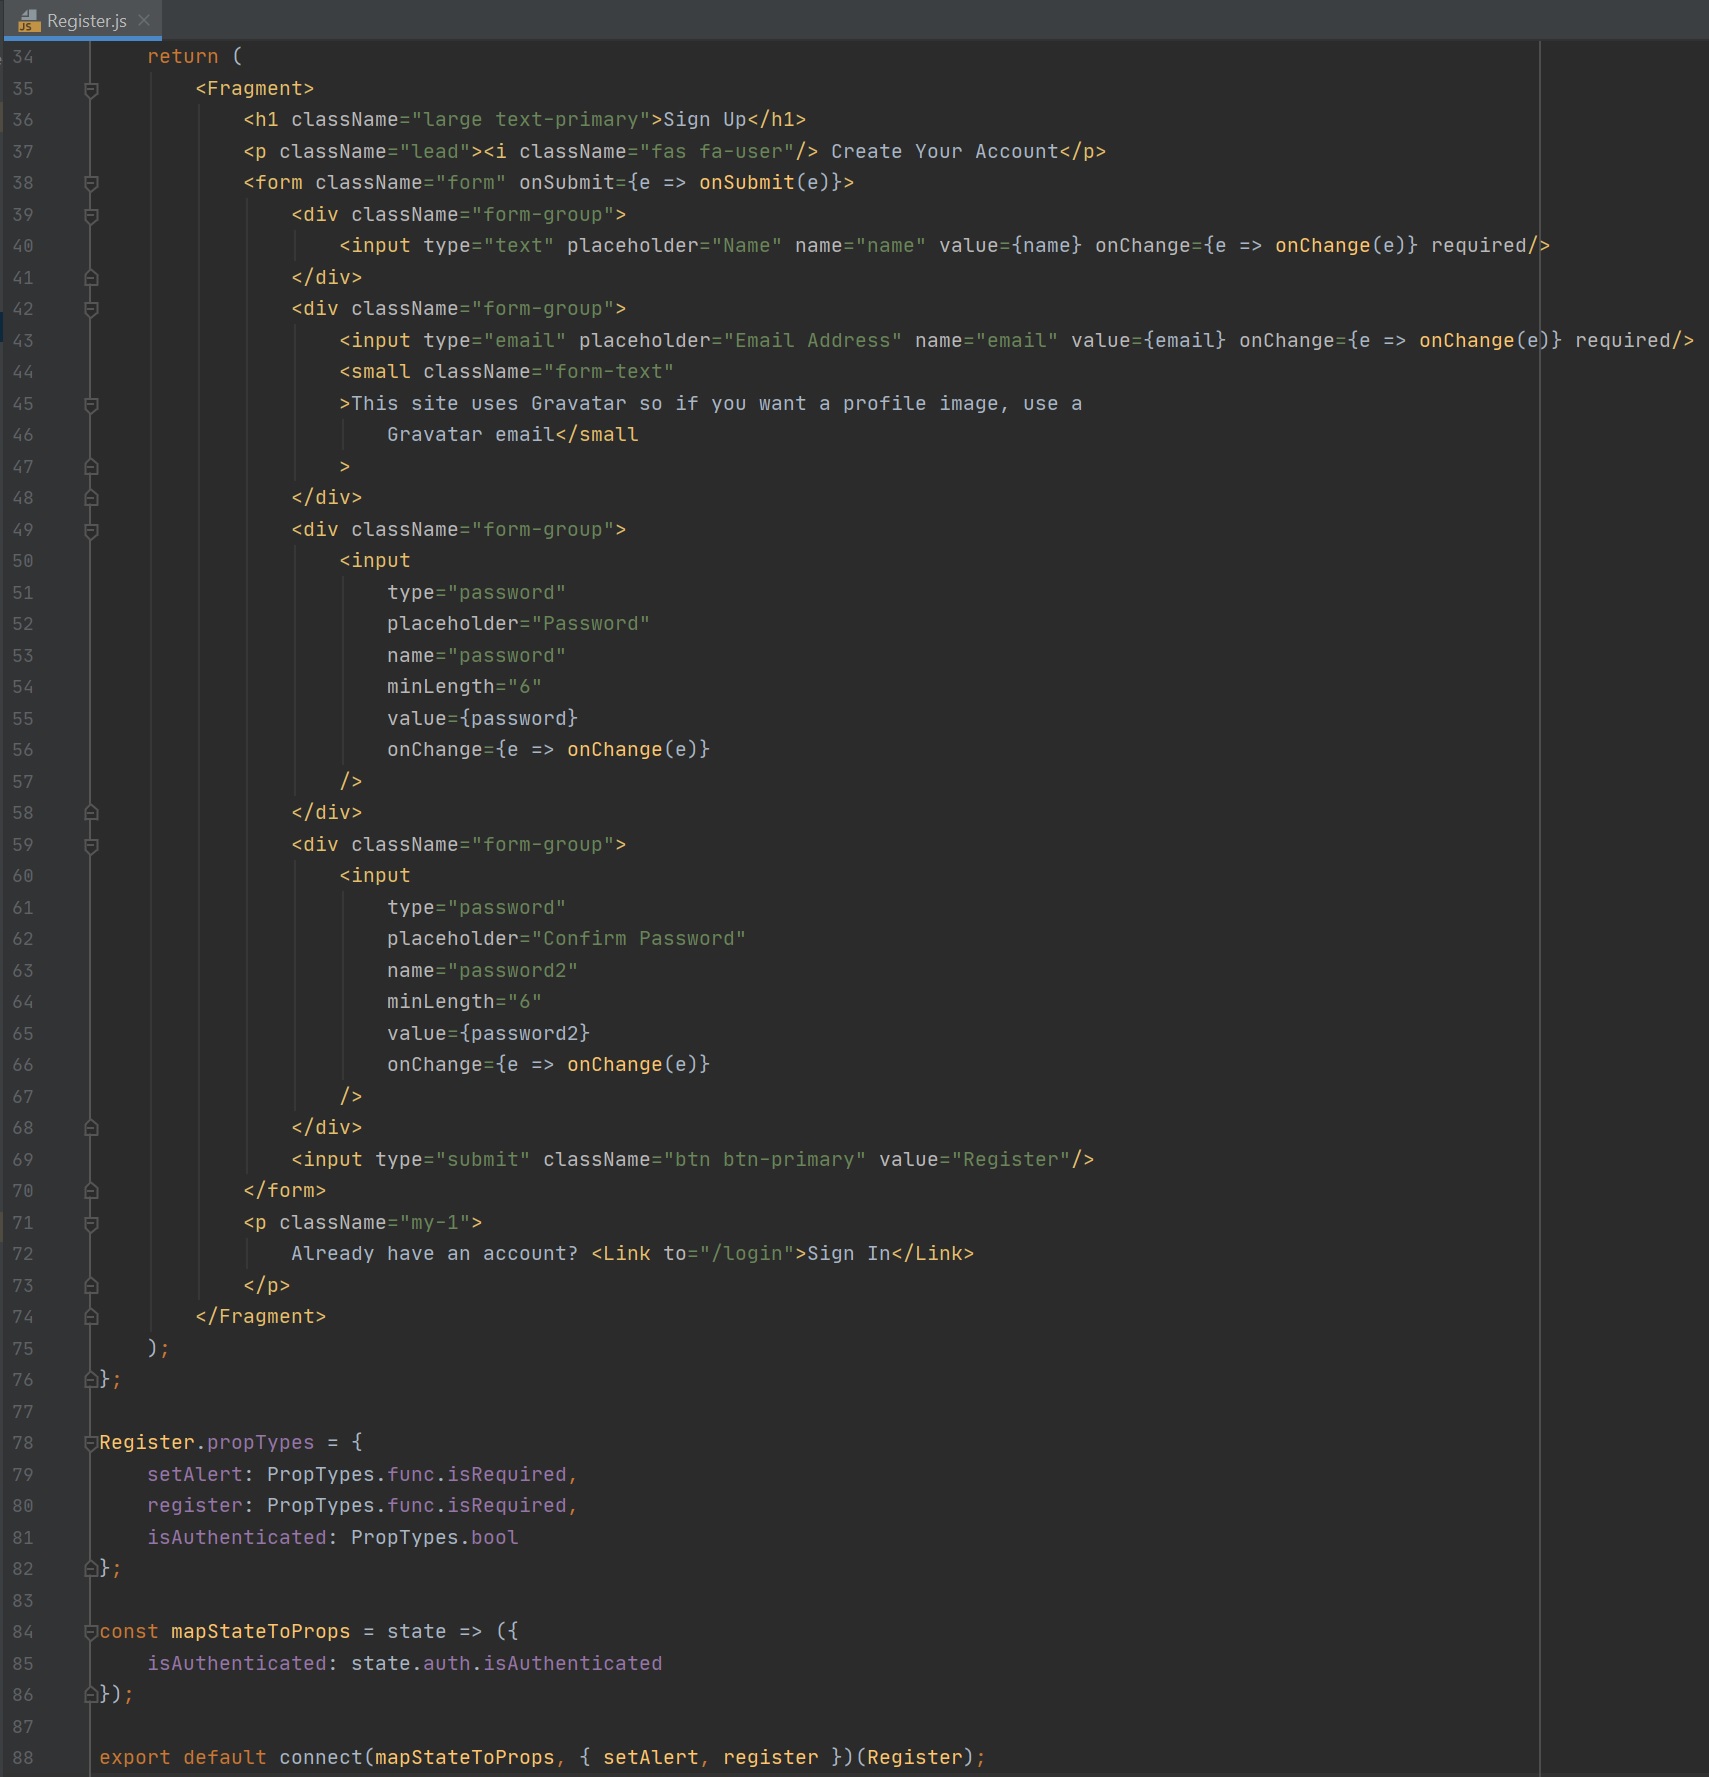
To reflect what is typed into the browser form fields into the state object (setFormData) we use a onChange function, There is also a function to check that password and password2 match (see full Register.js code below).

Register.js full file.
 |
 |
First we need to understand some terminology
- Redux Store - holds the whole state tree of your application
- State - it usually refers to the single state value that is managed by the store and returned by getState()
- Types - can be defined as constants and are used by both actions and reducers use types, they should have a meaningful name like SET_ALERT, REMOVE_ALERT, etc.
- Action - An action is a plain object that represents an intention to change the state. Actions communicate with reducers which then change the state data in the Redux store. Any data, whether from UI events, network callbacks, or other sources such as WebSockets needs to eventually be dispatched as actions. Actions must have a type field that indicates the type of action being performed.
- Reducer - A reducer (also called a reducing function) is a function that accepts the state and an action. Reducers calculate a new state given the previous state and an action.
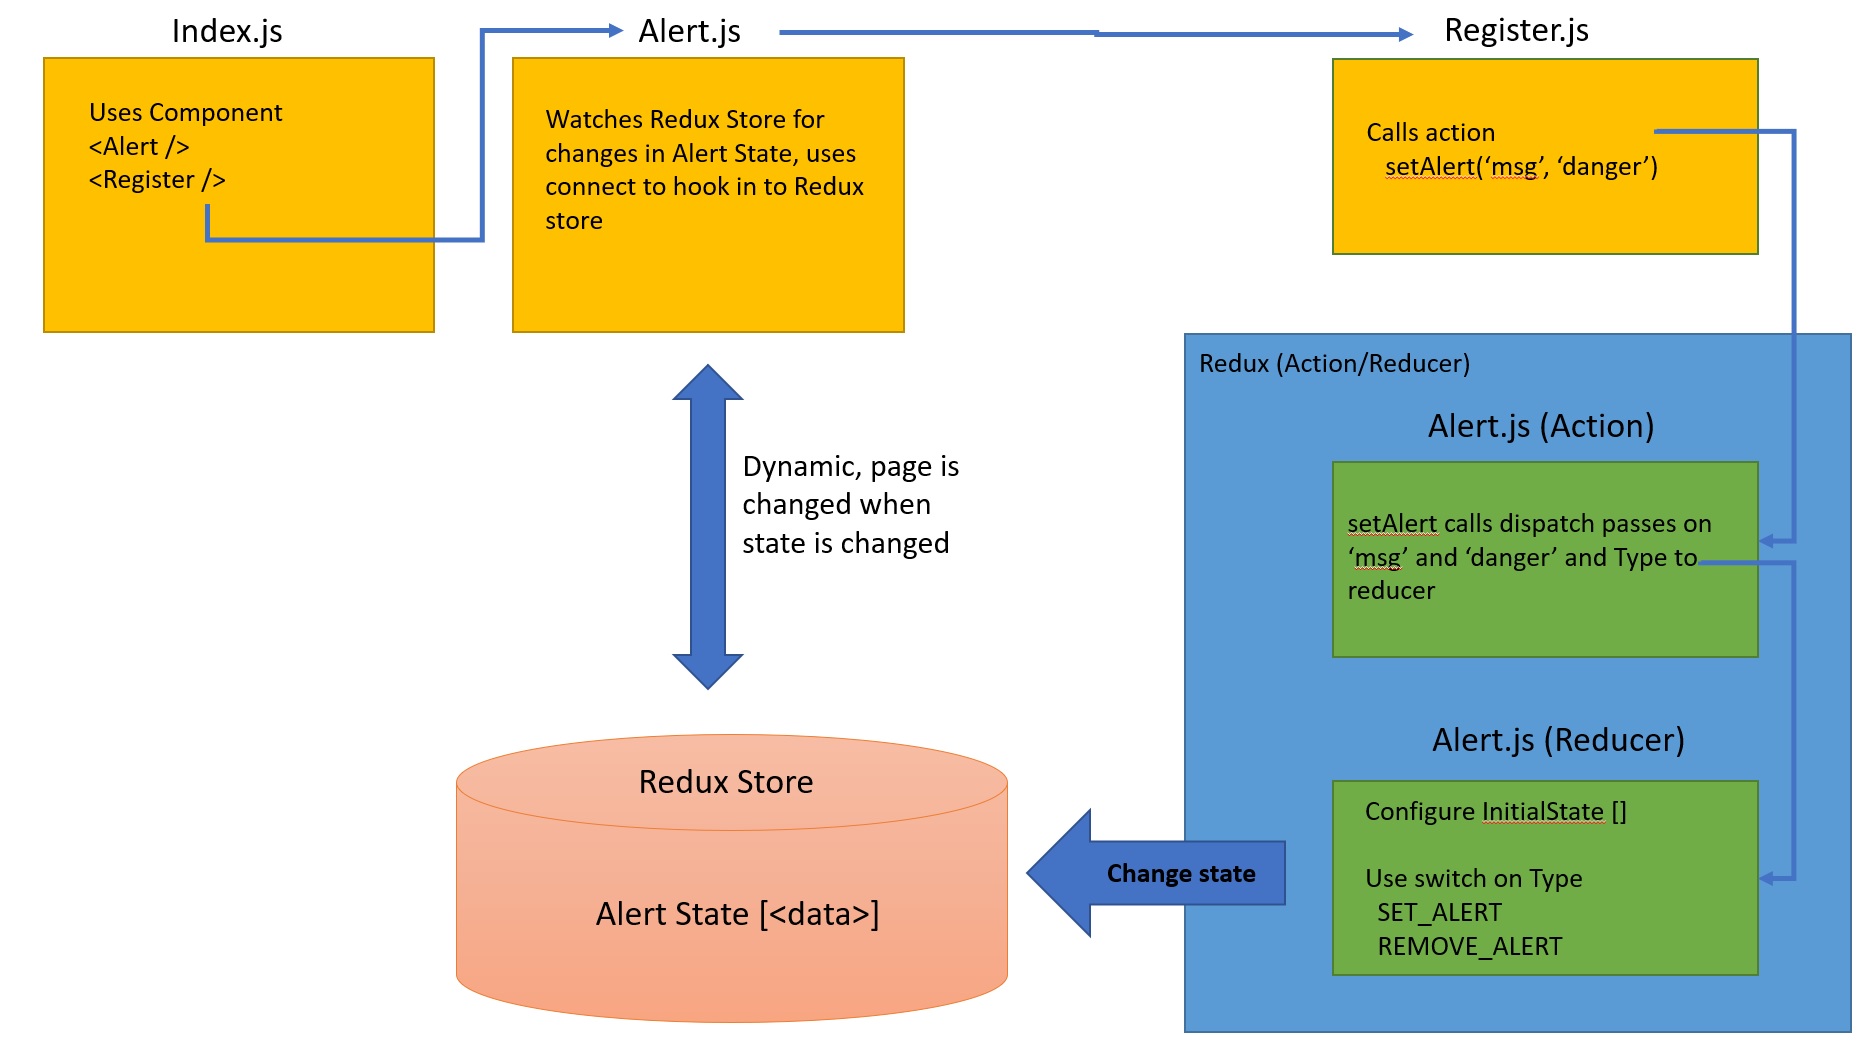
I will try and explain how redux works using the below diagram, we have a index.js file that uses two components, Alert (Alert.js) and Register (Register.js), the alert component uses connect to hook into the Redux store and watches the alert state data, When a someone registers and they enter a password mismatch, it triggers a Redux Alert action (alert.js), it passes a message and the text danger to the action then uses dispatch to call the reducer passing an alert type (SET_ALERT) and a payload (payload contains the message, the text danger (alertType) and an id), the reducer has already configured the initialState of the Alert in the Redux store (initial state is a blank array), the reducer checks the alert Type (SET_ALERT) that was set using a switch statement and changes the alert state data in the Redux store, this is then picked in the Alert.js component and the page is then changed. Now that you have an understanding how Redux works lets look at the code.
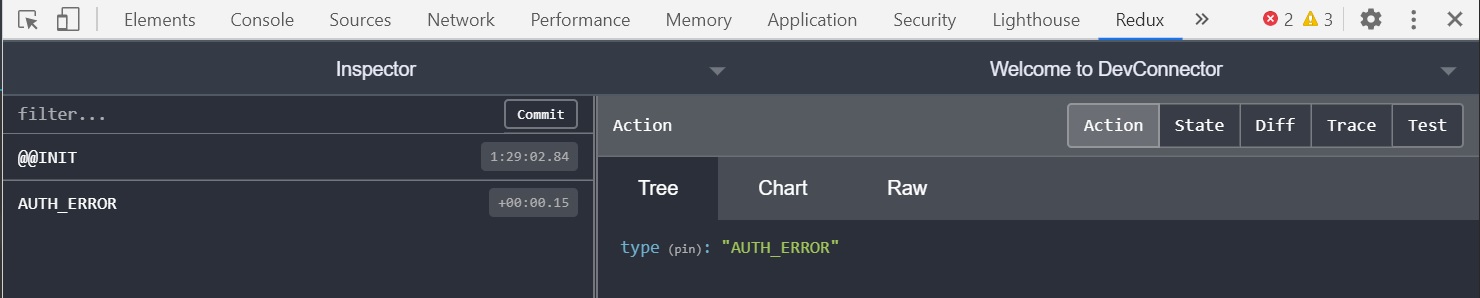
By installing the ReduxDev Tools into Chrome and using the composeWithDevTools it allows us to view the Redux store, we can see the actions, state, the difference of state which is very handy for learning and debugging. In the top screenshot you can see what actions have been called, in the bottom screenshot you can see the whole Redux store tree.
  |
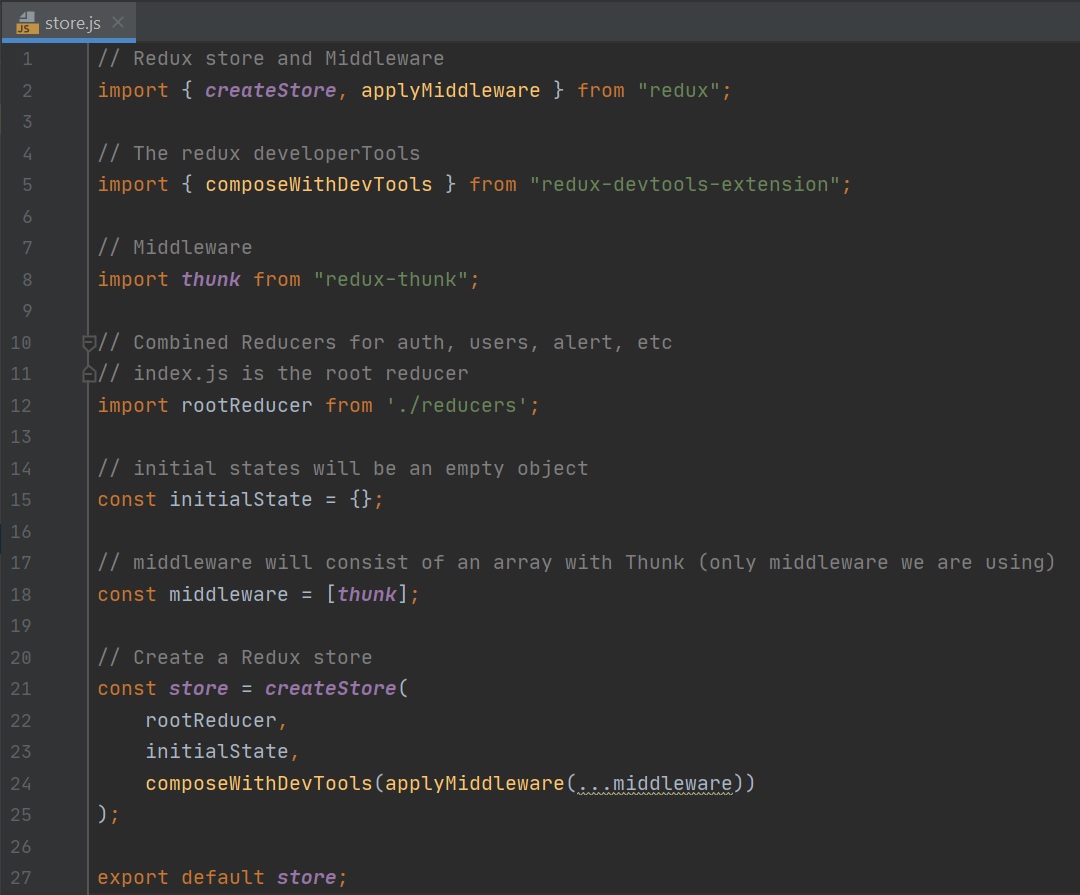
First we start by creating a Redux store, to do this we create a file called store.js as seen below (left-hand screenshot), this is a common setup and once setup you should not need to touch it again, I have added comments to explain the file however notice the rootReducer which points to the reducers directory it will use the index.js to load all the reducers (see below). Then we need to bring in the Redux store into the application by updating the app.js file (right-hand screenshot).
 |
 |
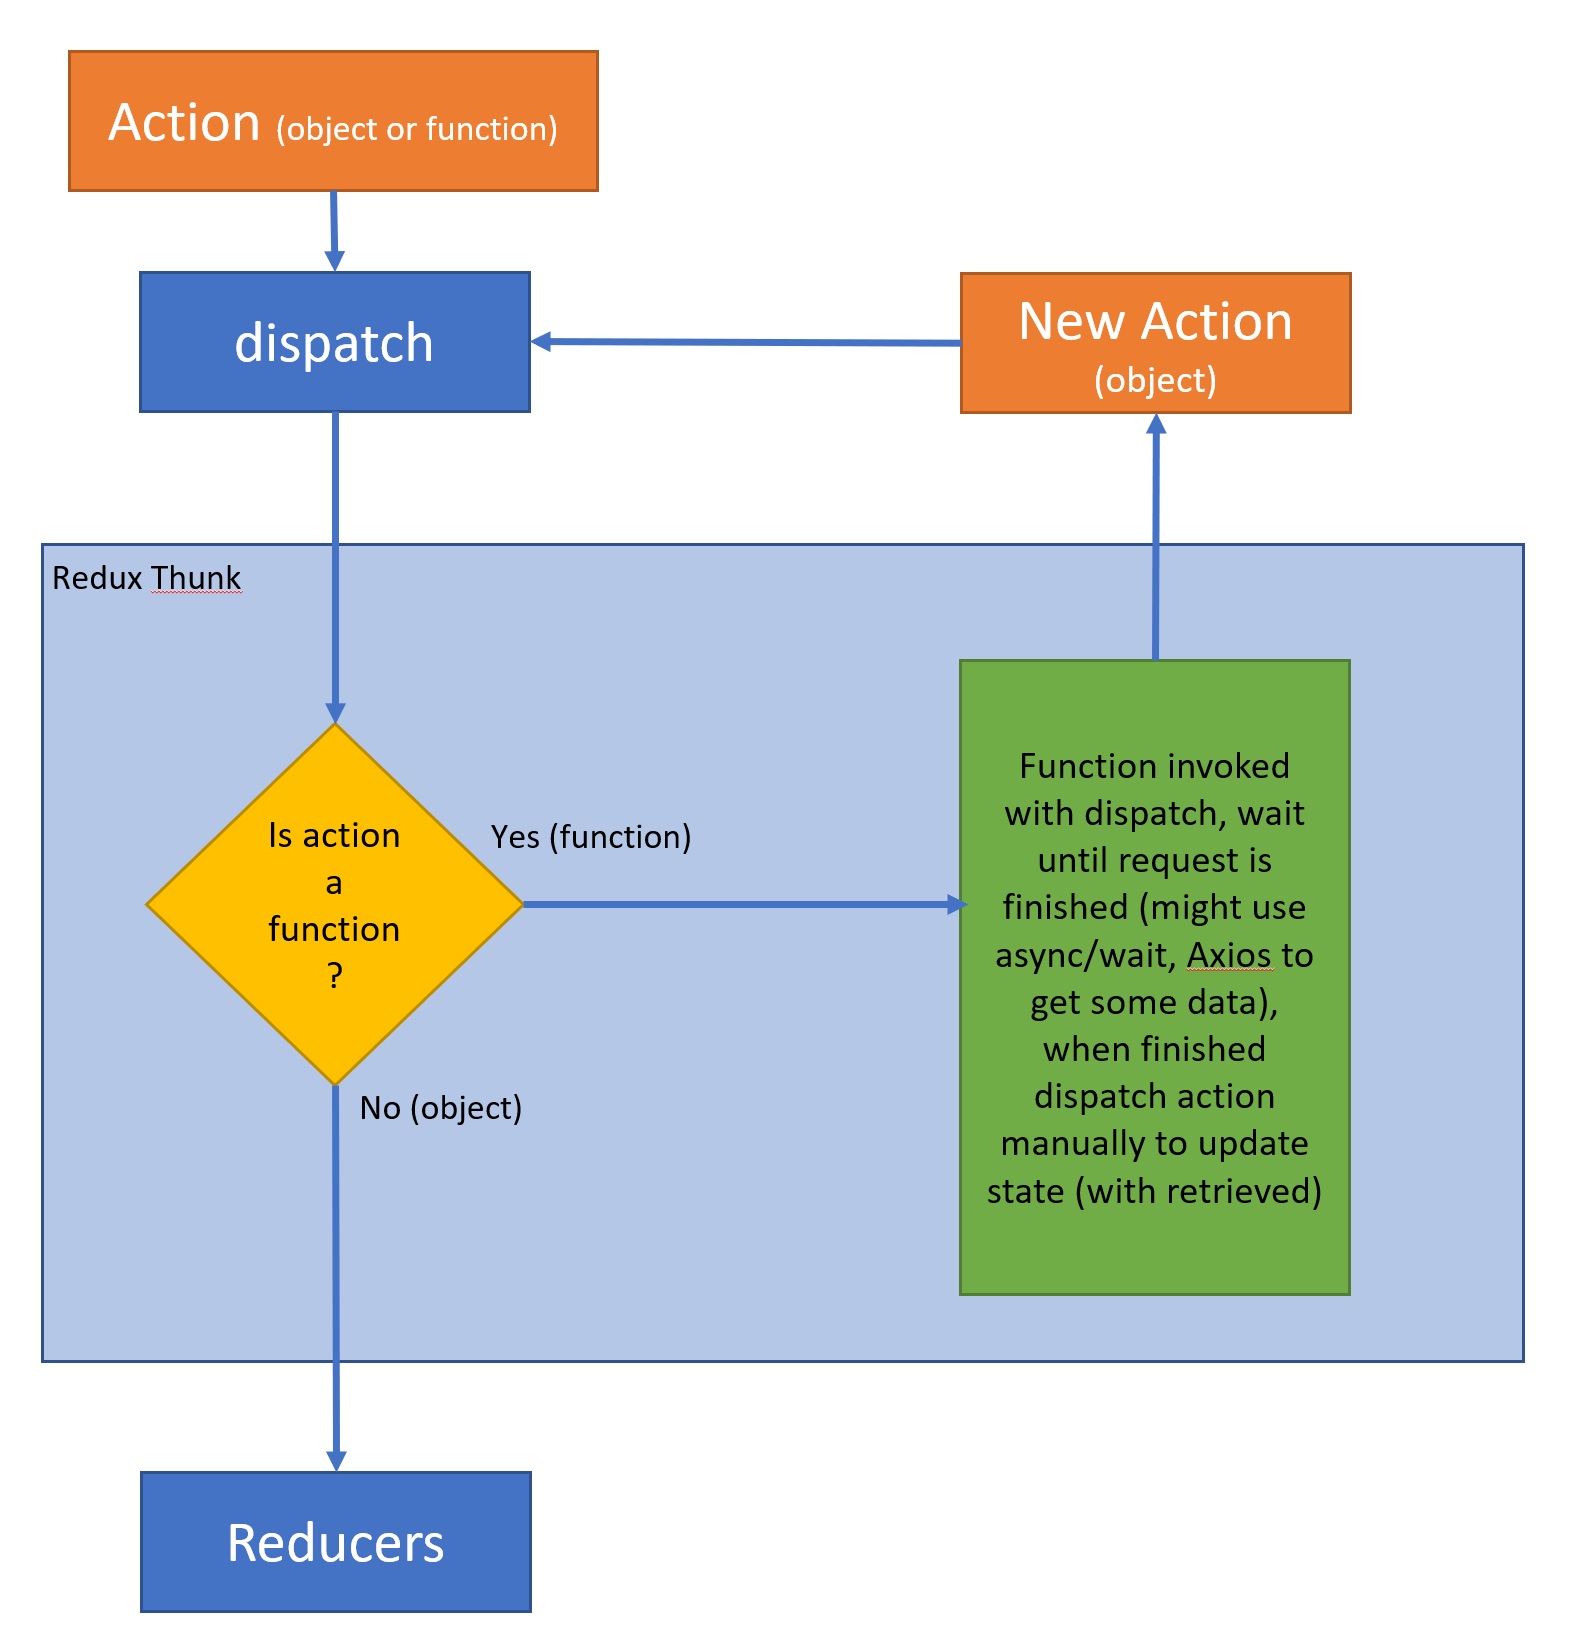
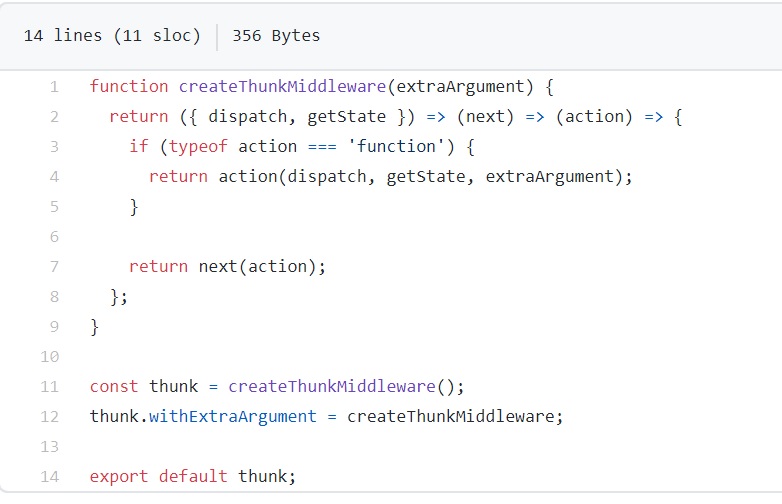
Before we move on I just want to talk about the middleware Thunk, all that Thunk does is if you pass it a function it will invoke that function using dispatch, it will wait until any requests are finished (for example you might use async/await using Axios to get some data from the back-end), once the data has been retrieved, it then call dispatch again passing the updated object, if its an object it simply passes it to the reducer as per the left-hand screesnhot so that the state can be updated, in fact Thunk is a mere 14 lines of code as seen in the right-hand screesnhot.
 |
 |
As we have many reducers we create a central file for them called index.js file, this saves having to add each one to the store.js file above, this file is pulled in by the store.js file and the import of rootReducer, which I mentioned above.

We create a types.js file which has all the type constants that will be used by the reducers and actions. There constants are centralized which means we have only one place to change anything, they use meaningful names to reflect and action type, for example SET_ALERT or REMOVE_ALERT, etc.

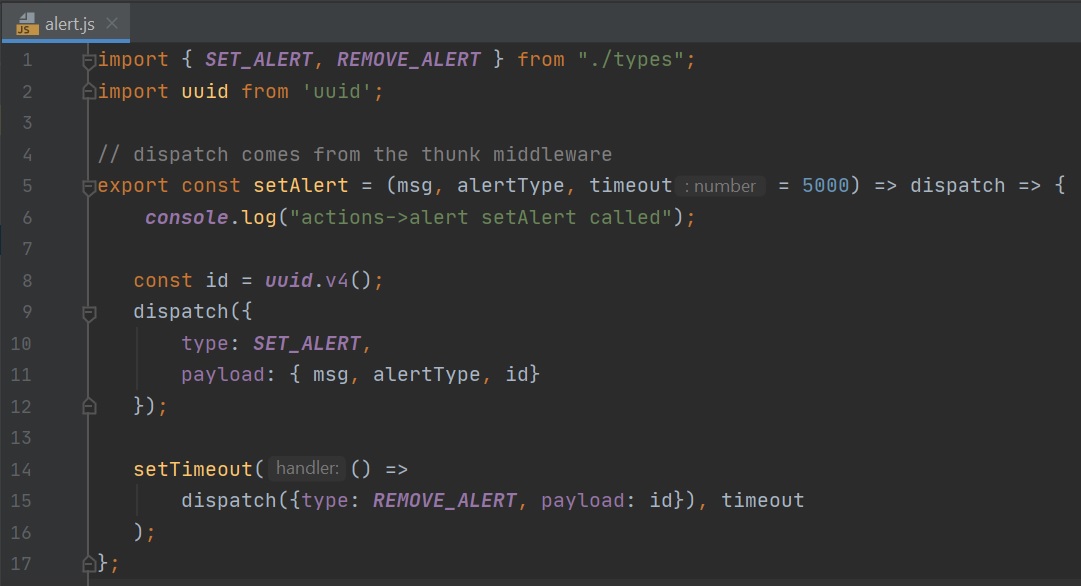
Action files are called by the Component UI's, they are required to perform some task, like set an alert or remove an alert, using the alert action as an example (left-hand screenshot) we pull in the types (types.js), we then create a function called setAlert (this function is what the UI components call), in order to dispatch multiple action types, we can use the dispatch function (thunk middleware), we can pass in the message and the alert type and a timeout value. We then call the reducer setting the type which could be SET_ALERT or REMOVE_ALERT and we also send the payload (which consists of the msg, alertType and the id).
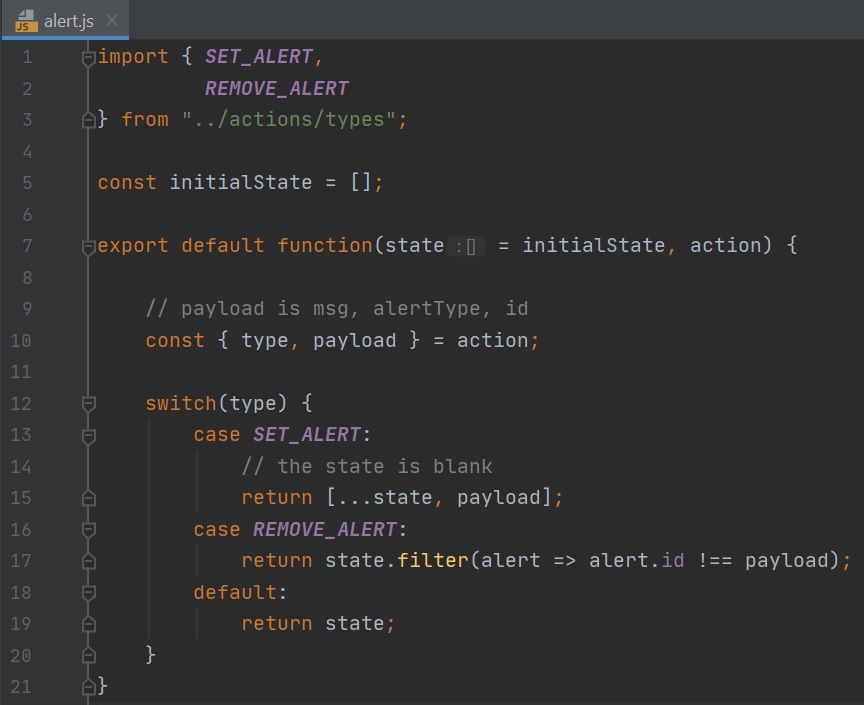
The alert reducer is a simple one (right-hand screenshot), its a function that takes in some state (initial state is a blank array) and an action, this is dispatched from an actions file, we will change the State of an alert which then will be reflected in the web UI component. We bring in the types from our types.js file, we then destruct the action object (type and payload), the default function takes in the initalState and an action, which contains a type which is what is evaluated (switch statement in the reducer):
- SET_ALERT - we use the spread operator to expanded the state object and add anything that we need it, in this case we add the payload.
- REMOVE_ALERT - we filter the state for a specific alert
- default - simply return the state
| Action | Reducer |
|---|---|
 |
 |
Carrying on from above the alert's initial state is an empty array (left-hand screenshot), then the reducer updates the state with the msg, alertType and the id (right-hand screenshot), we can see this using the Redux devtools in Chrome.
| Initial State | After SET_ALERT |
|---|---|
 |
 |
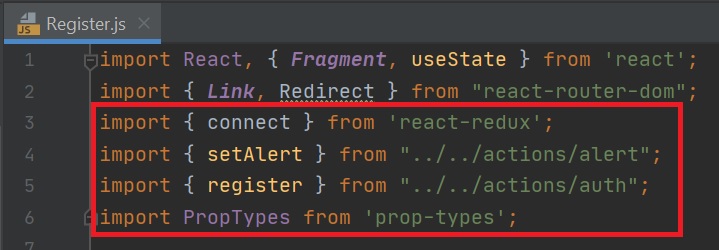
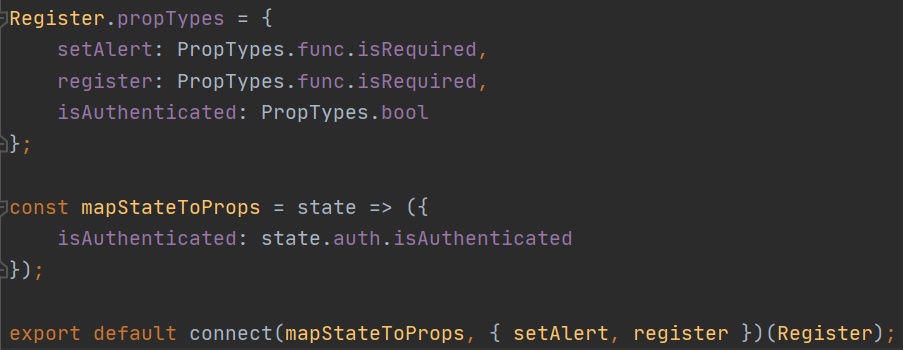
We can now use this action (setAlert) anywhere in our application, using the registering of a user example and thus using register.js we import connect that allows us to connect to redux, we import the action setAlert and the propTypes (left-handscreenshot). The configuration in register.js (right-hand screenshot) we first export connect which takes in two parameters, the first being any state that you wish to map, the second is the object with any actions that you want to use (setAlert and Register), next we create the propTypes object and states that selAlert and registered are required functions (IDE shortcut ptfr - see below for more information) and that isAuthenticated a boolean type (IDE shortcut ptb). If you notice the connect has some strange syntax its connect(...)(...) which basically means that a function will be returned and we immediately call it.
 |
 |
In order to bring in the setAlert, register and isAuthenticated we can destructure them and pass them in as a parameter as per below
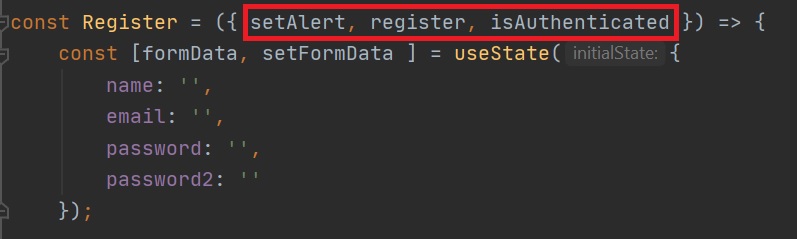
Now we can use the setAlert, which will pass in a message to our action, plus the alert type of danger

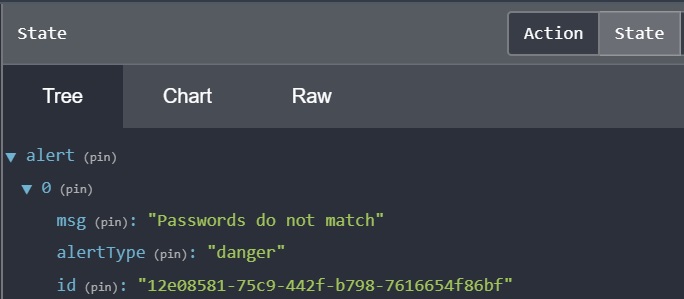
So putting it all together, if we then try to register with a password that does not match, we can see the action of type SET_ALERT, the msg and the alert types (danger used by CSS) and the id in the ReduxDevTools as per below

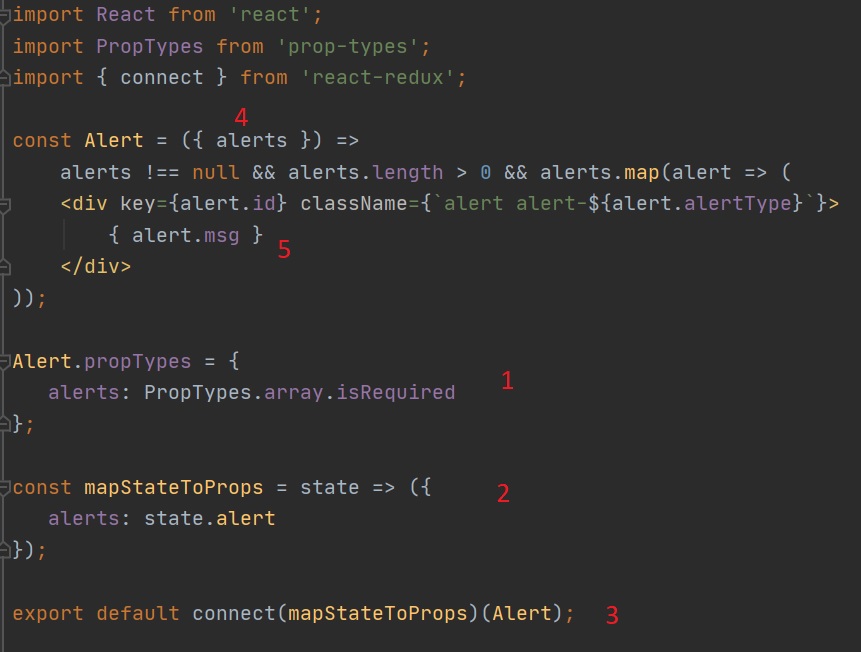
To summarize what is going on in the Alerts.js component
- 1. We create the Alert.propTypes adding alerts IDE shortcut (ptar - propType array required)
- 2. We then map the propType alerts to the state.Alerts in mapStateToProps
- 3. we get the state from connect (use connect to get Redux state), this watches the state
- 4. we can then pass alerts propType to the Alert function, first parameter is the state, second paramete is actions
- 5. we can use propType in Alert Function, we use a map to use the id, alertType and msg, not we change the alertType to danger for example.
A number of IDE's have react shortcuts that automatically generate boiler code, for example you can type rafcp and the code in the right-hand screenshot is automatically generated, check your IDE to see if it has these types of shortcuts.
 |
 |
To summarize the whole thing using the above alert
- 1. We start the application which loads the app.js file, we load the landing component Landing.js (left-hand screenshot)
- 2. We click on register and that loads the register component (Register.js) using the routes component Routes.js (right-hand screenshot), notice the <Alert /> which calls the Alert component above, as the alert is null nothing is added
- 3. We fill out the form and mismatch the password to cause an error, its the Register component thats sets off the alert (setAlert) which creates the action (passing the msg, alertype (danger) and the id) is then dispatched to the reducer which updates the redux store.
- 4. The component which is connected to the store (watching the store) is then updated with the store data and thus an alert state has been added which is picked up the Alert component and thus display the alert <div>
- 5. The setAlert has a timeout and when the timeout is reached a setTimeout is called and resets the alert to REMOVE_ALERT, again we dispatch to the reducer which changes the state data filtering out the payload for that specific id, this is then picked by the connected Alert component (removing it) from the Register component.
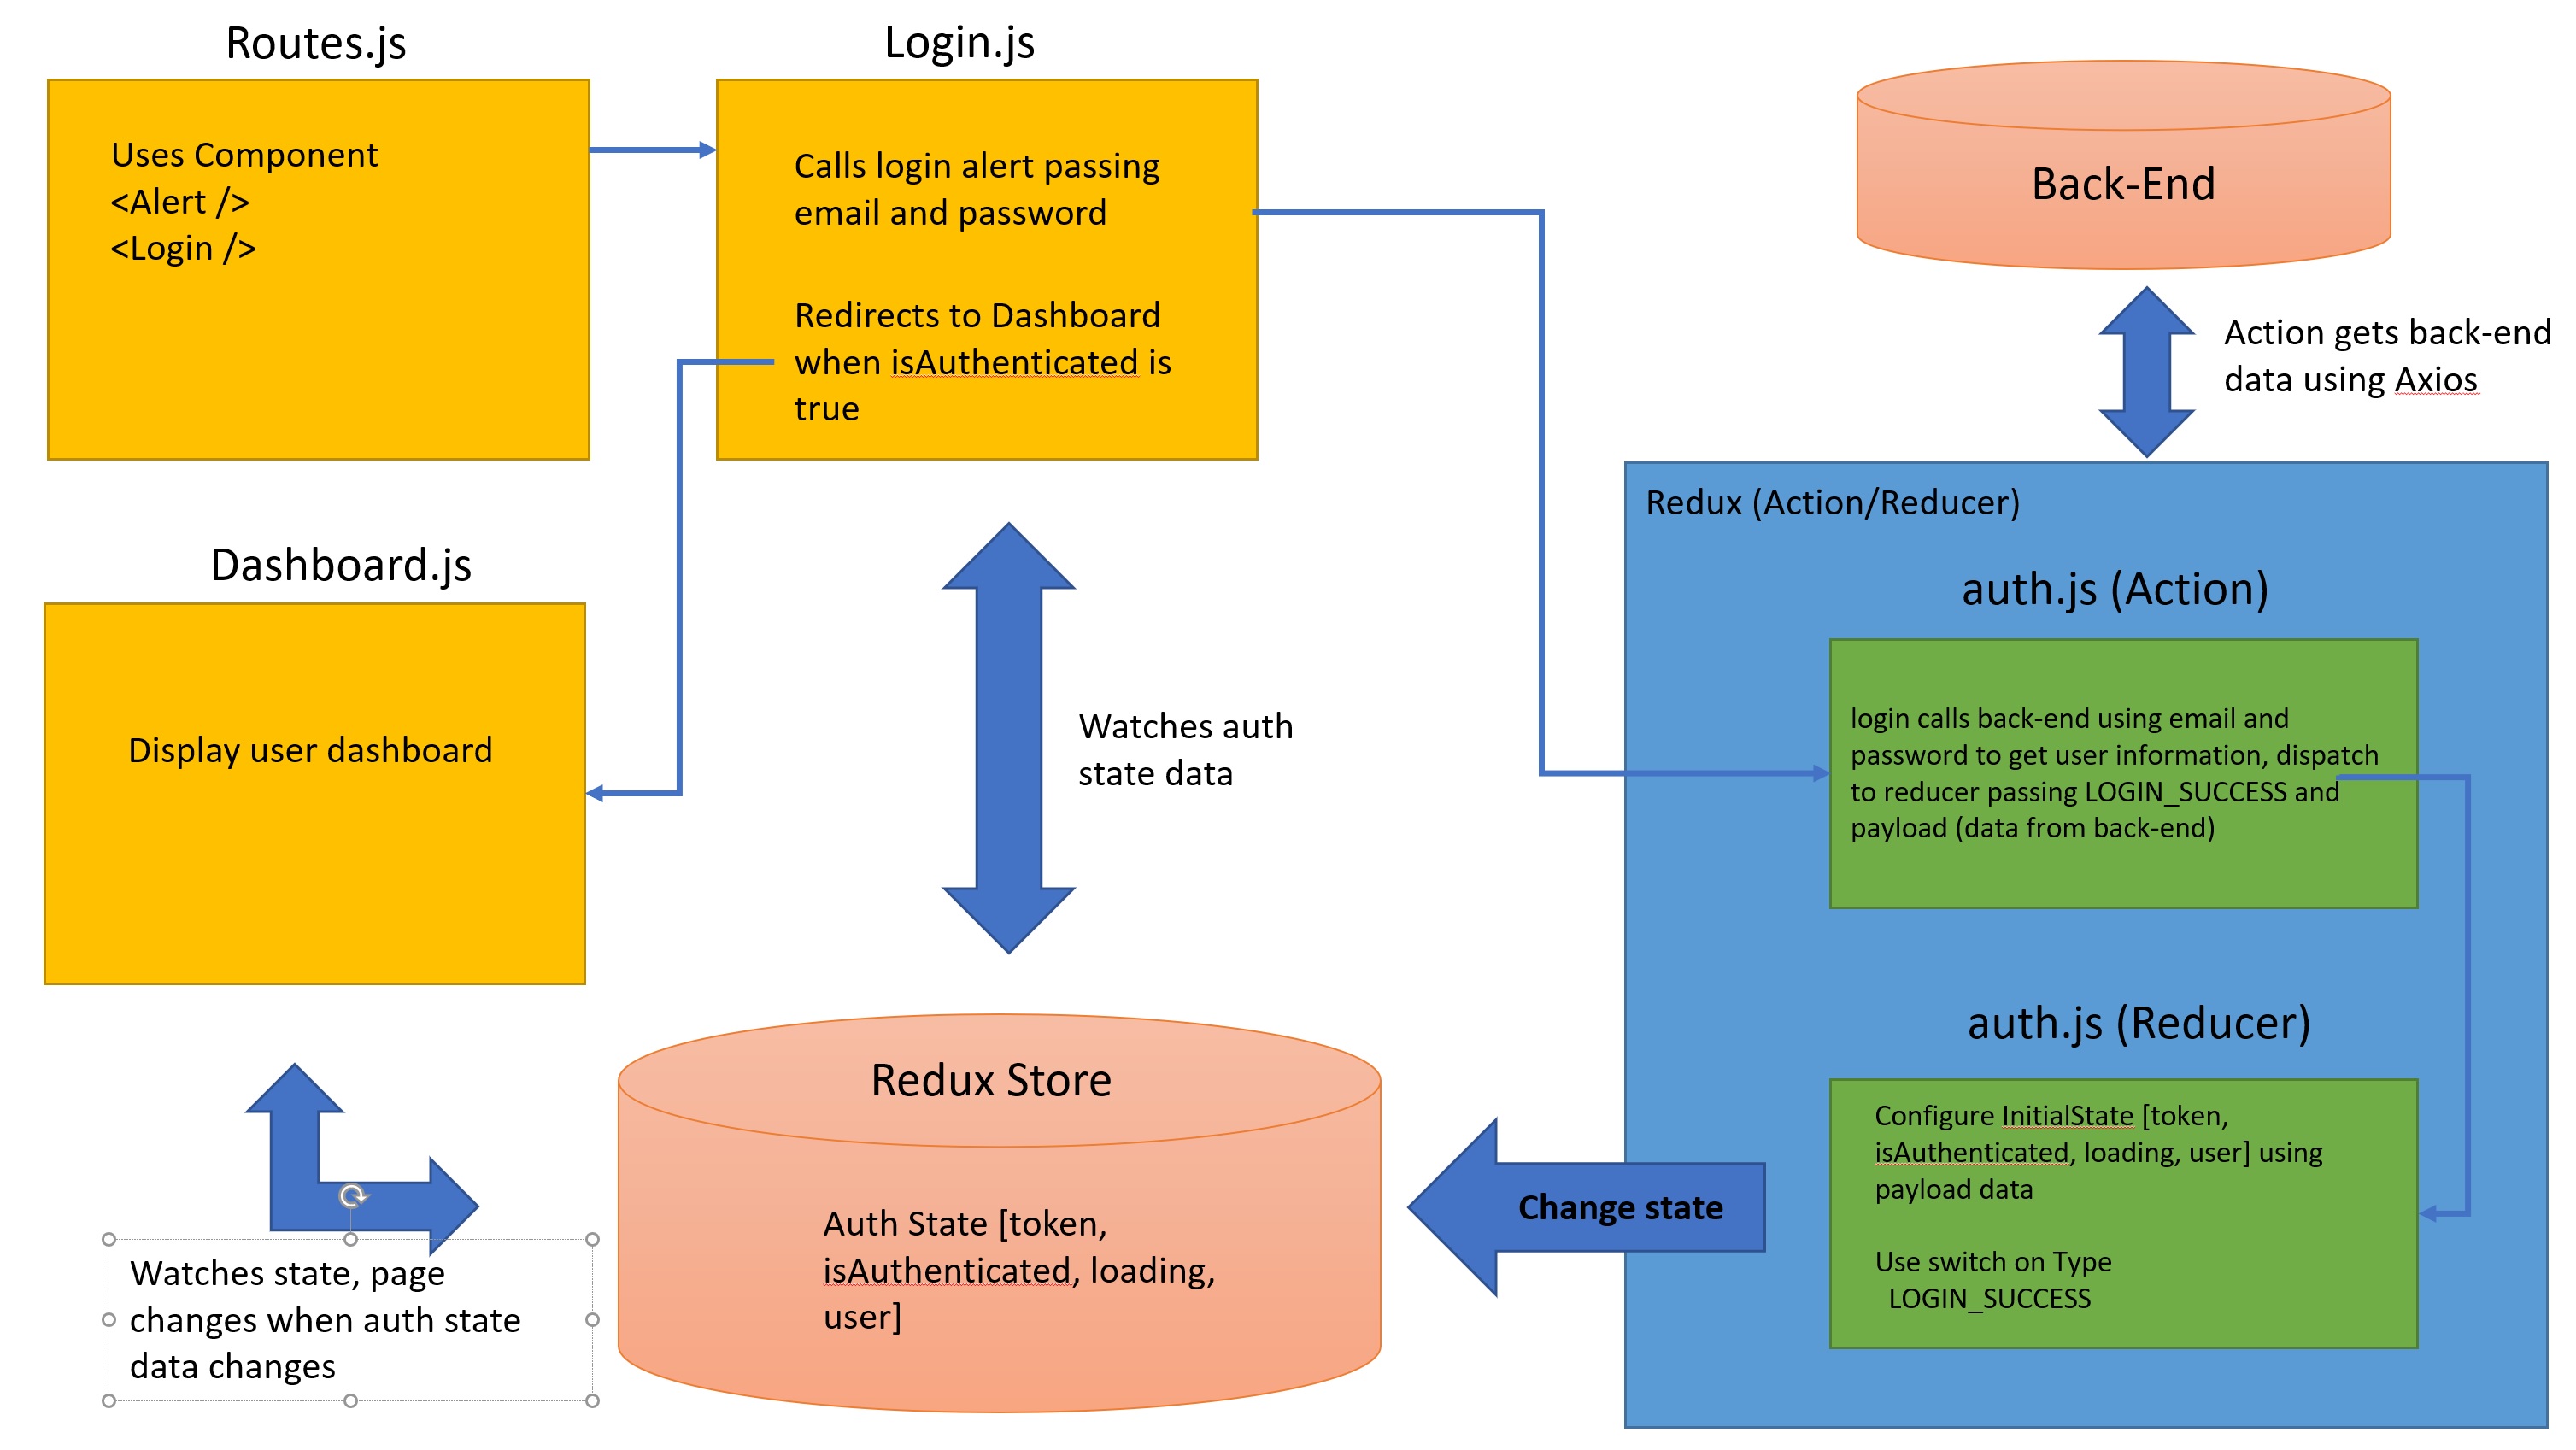
Now lets look at a more complex example, to summarize
- 1. User is directed to the login page via the routes component
- 2. User logs in which then calls a action called login passing an email and password
- 3. The auth.login action accesses the back-end to retrieve the users data (uses Axios), this retrieved data is then dispatched to the reducer auth.login
- 4. The reduce now changes the state data, isAuthenticated is changed to true and adds the user data from the back-end
- 5. Login component sees the change (isAuthenticated is true) and redirects to the Dashboard
- 6. Dashboard components loads and also hooks into the Redux store to use the auth state data, to personalize the Dashboard.
As you can see web pages changes based on the state data, you can personalize pages, add additonal navbar options if logged in (like a logout button), you can add to or clear localstorage and many more. Hopefully you now understand how to use Redux and how powerful it is, I have covered the basics and there is so much more which I will leave you to the Redux documentation.
The above section I detailed on how Redux interacts with Express/Node, below are some tips that you can use to help with an application.
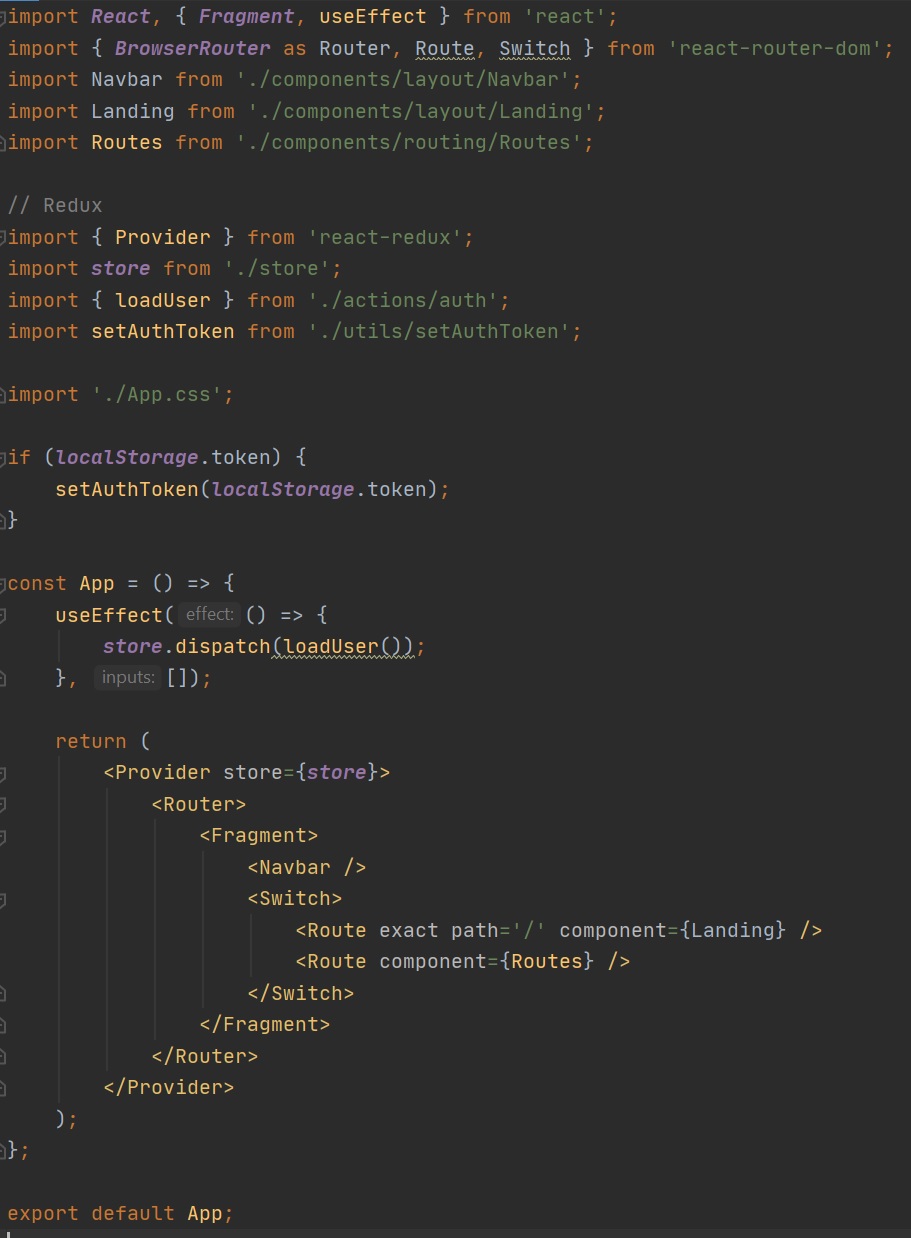
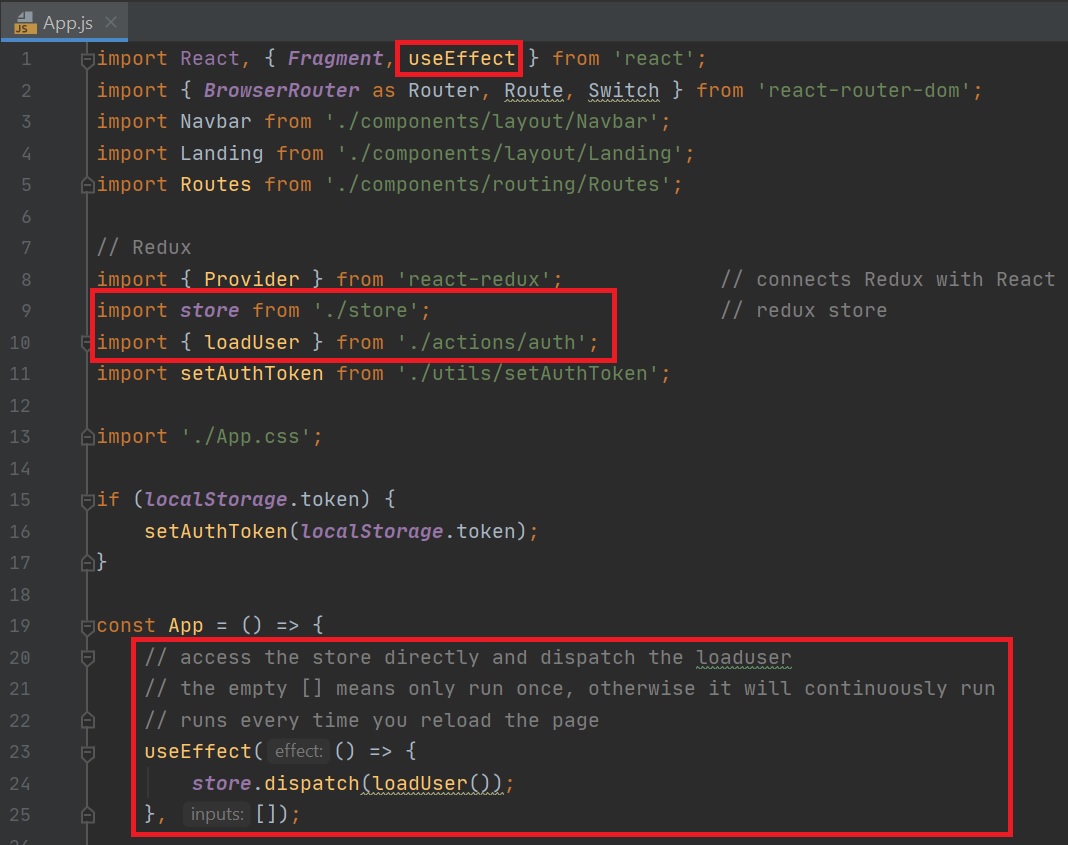
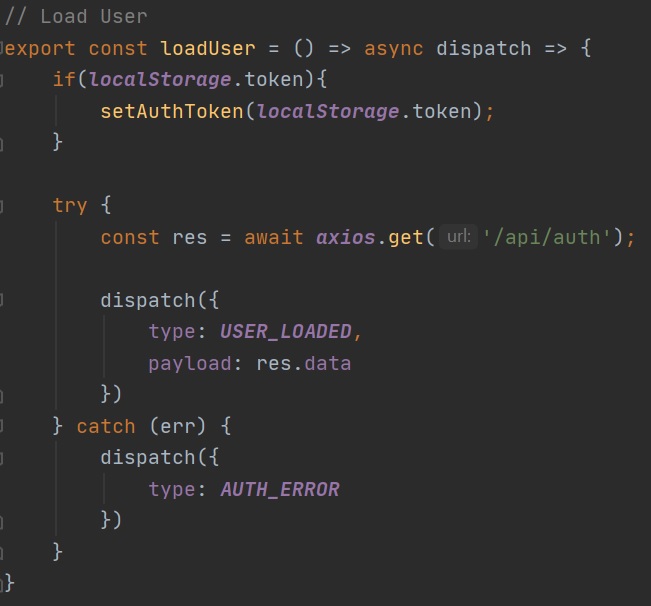
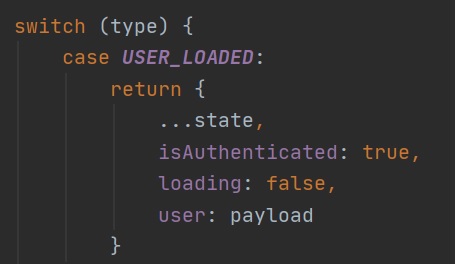
You can access the Redux store directory by using the UseEffect, using the store.dispatch and passing an action, in the below example we have imported the useEffect from react, the store and the loadUser action, the useEffect takes two arguments, the effect in our case the loadUser action and the input of an empty array which cause the useEffect to run only once. So why use one, when a page is refreshed the action (middle-hand screenshot) will be triggered, this get rertrieves data from the back-end, then sent to the reducer which updates the state data and the web page looking at the store see any changes and applies them to the page. Also it does not need that the same user is updating the state data, for an example perhaps an administrator updates the users state data telling the user that his/her bill is due, a notice could appear on the page while the user is still logged in.
 |
 |
 |
Reducers can update the same store with the same values, for example the auth reducer below, REGISTER_FAIL, AUTH_ERROR, LOGIN_FAIL, LOGOUT and ACCOUNT_DELETED all set the state to the same values and remove the token from localstorage, likewise REGISTER_SUCCESS and LOGIN_SUCCESS sett he same values in the store and the localstorage. This is code reuse and can help to keep the code simple and small. See below Mern and Redux tips regarding how to update state.

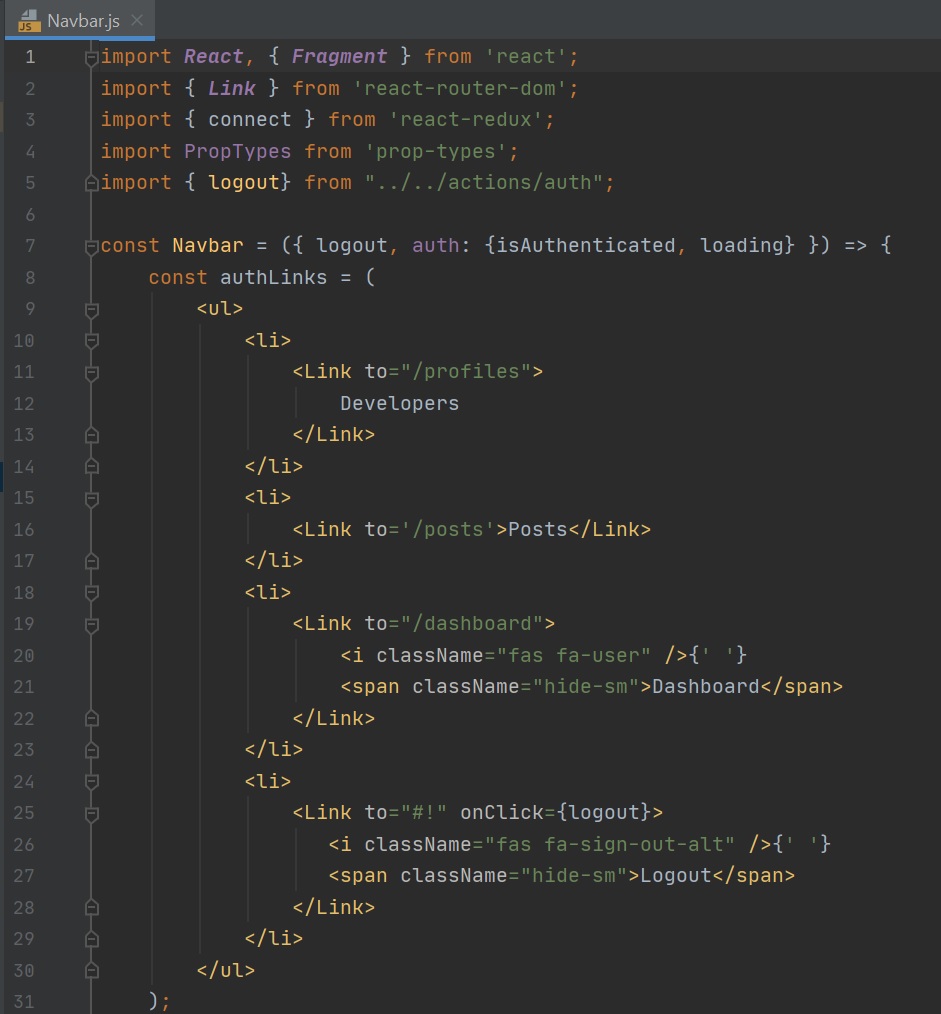
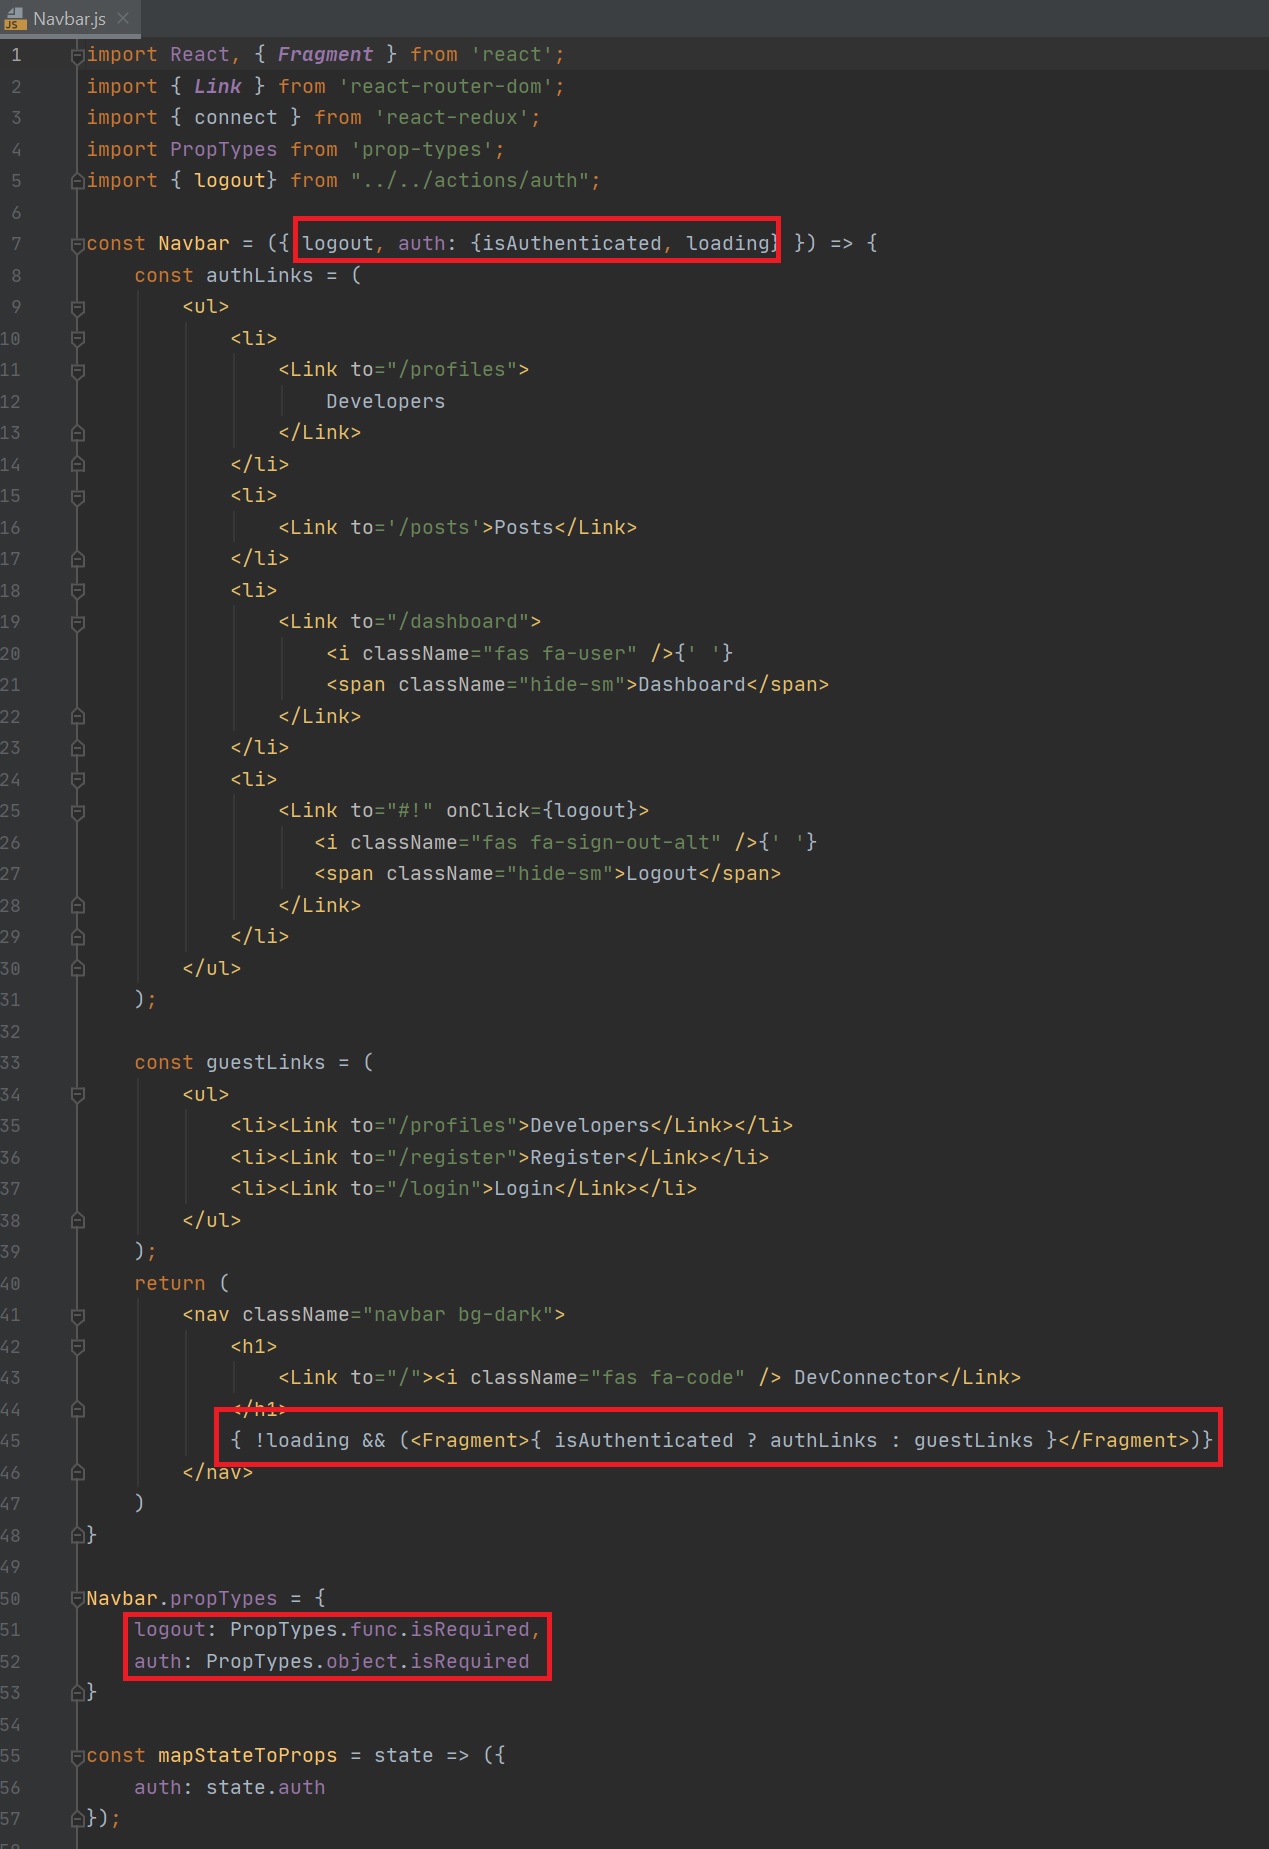
Lets look at an example of using state data to change the dynamics of a page, the navbar components pulls in the state data as props at the bottom of page, we use the props in the Navbar function (we destructure auth into isAuthenticated and loading), we create two different types of navbar authLinks and guestLinks, depending on the loading and the isAuthenticated state data a different set of links are displayed, pretty cool.
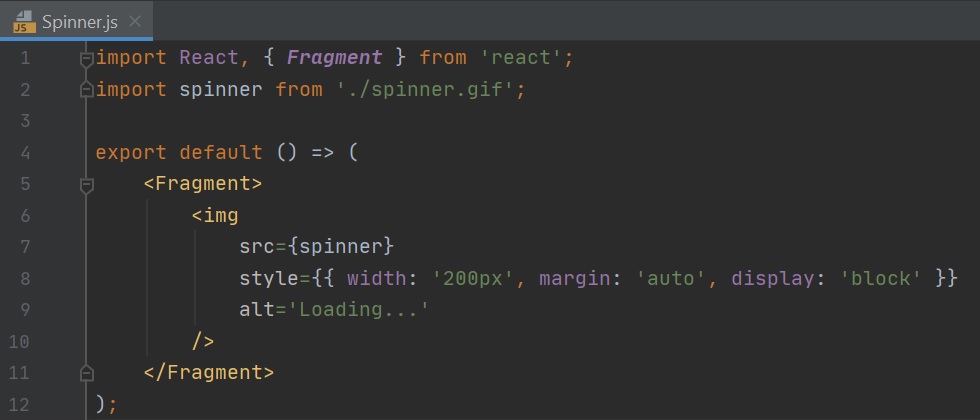
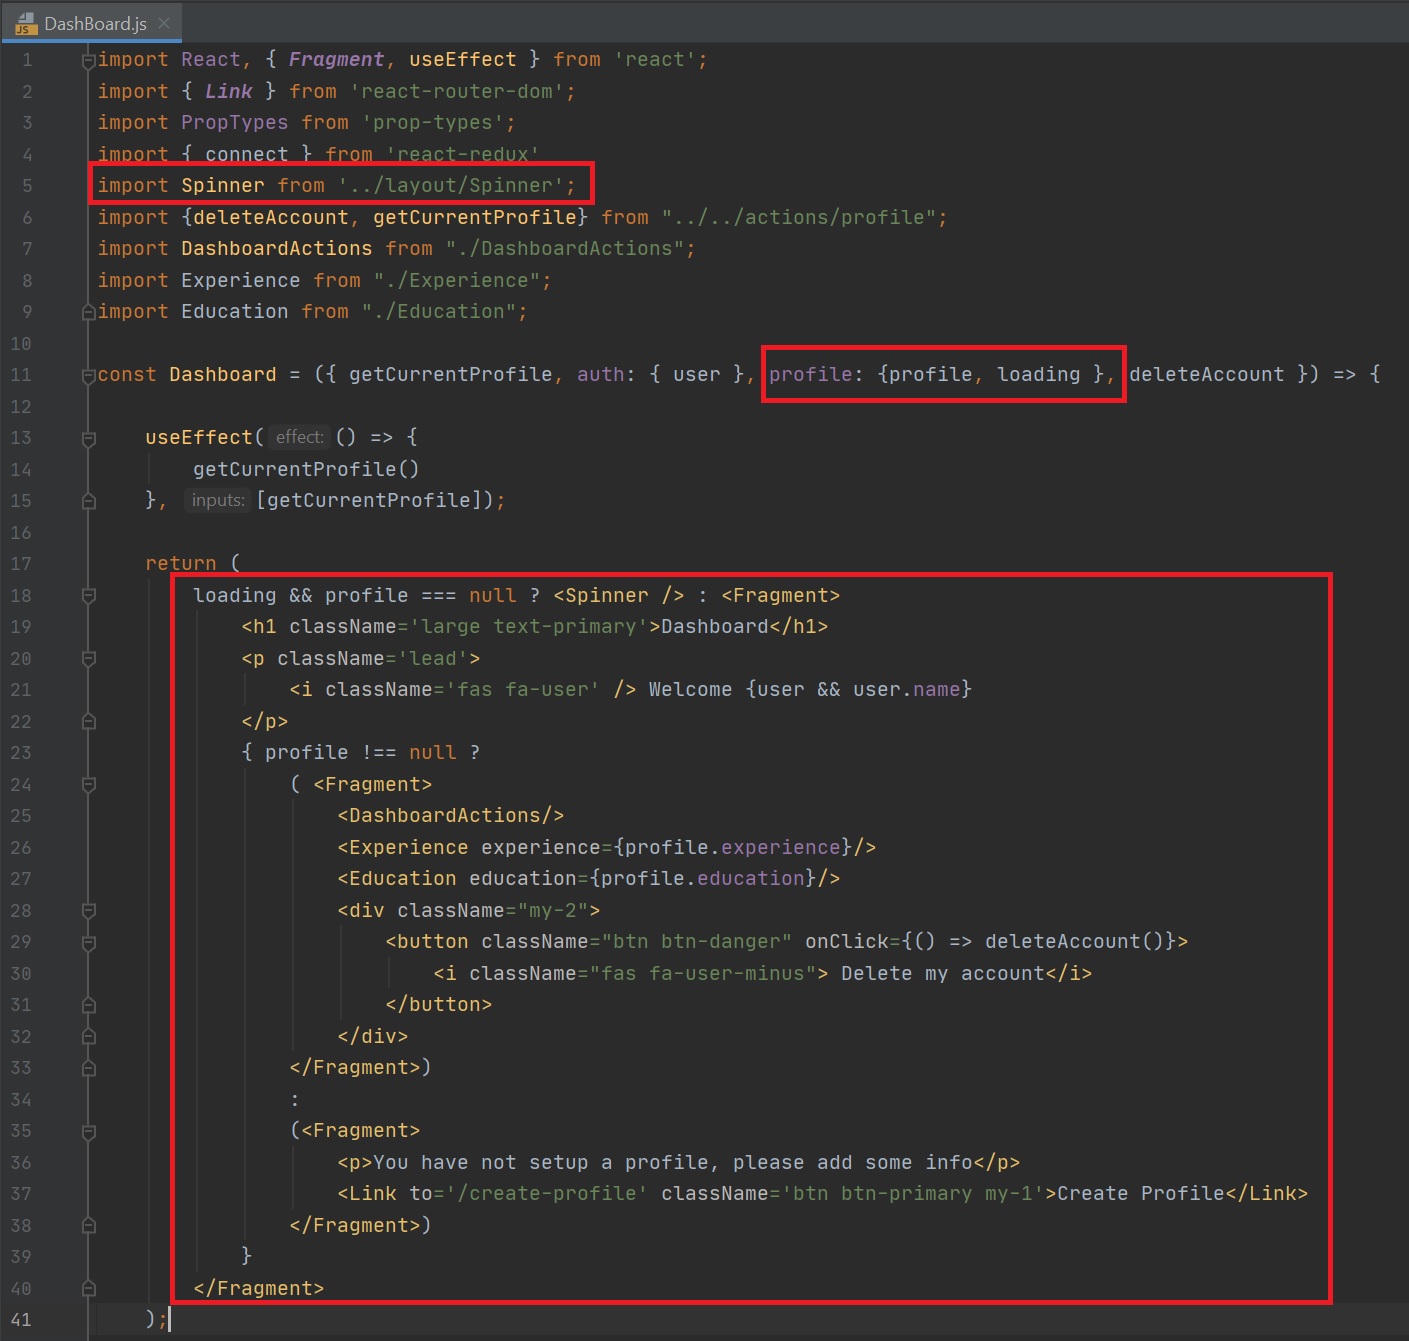
Below is an example of using a graphical spinner but it can be any type of graphic, we create a spinner component (left-hand screenshot) which is basically a fragment that has a normal HTML image (nothing special), we import the spinner into the Dashboard component, map the profile state to a profile prop, then we either use the spinner or a another fragment based on if the loading is not true and profile is not null.
 |
 |
With many programming languages there are manyw ay to do the same thing, I have used standard HTML form code as per below, but you can use Redux Form which takes advantage of reduxForm reducers reduxForm and <Field /> components

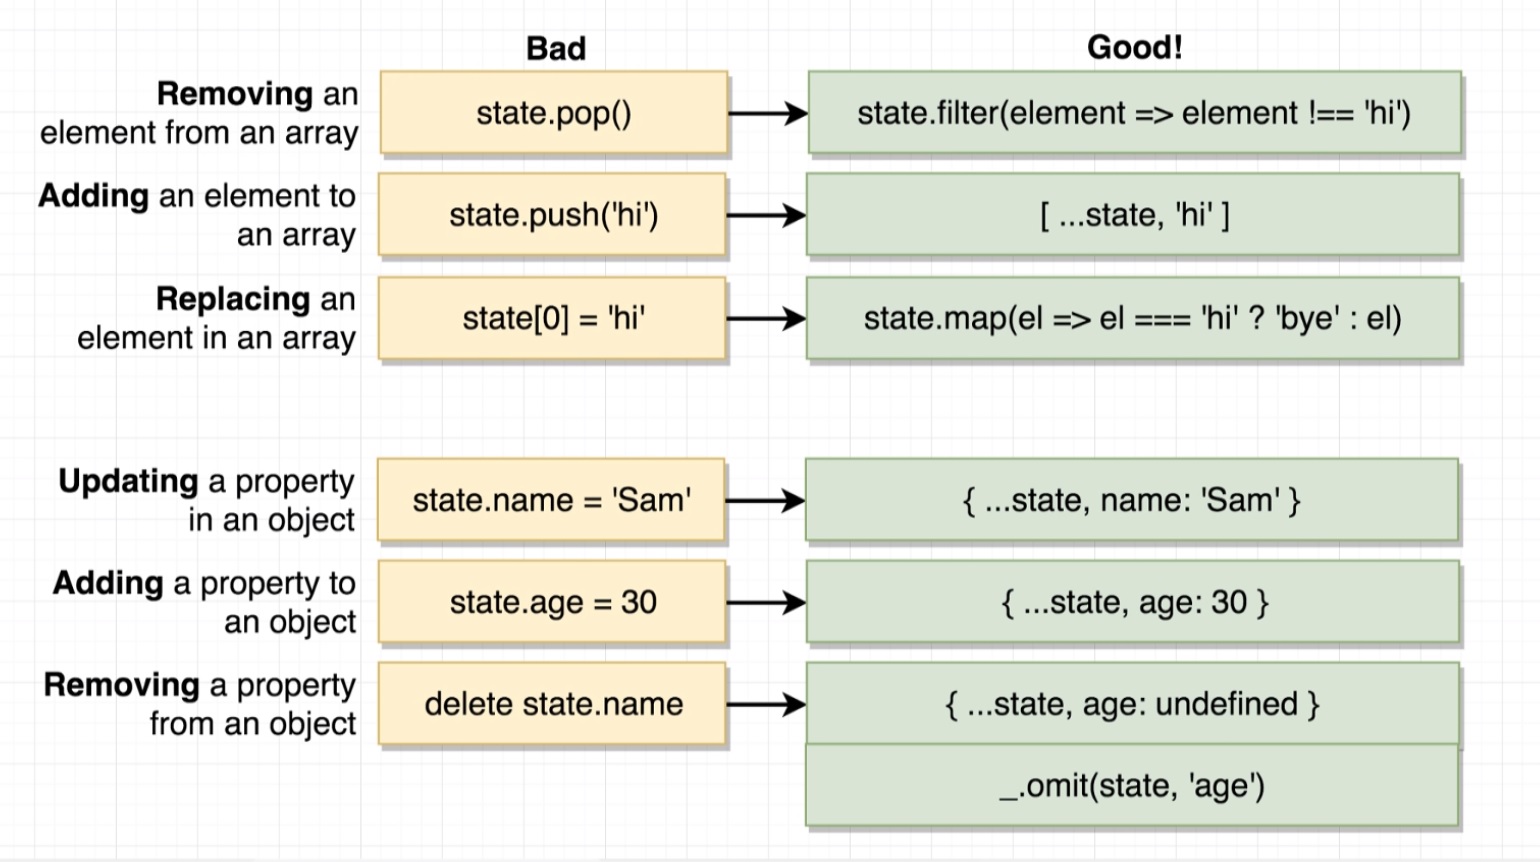
It is entirely possible to access the state object as this could be an array, object, string, etc, however you need to avoid doing this, the reason is that you need to create a new object updating what you need too and return that new object, in order to do this you can make use of the spread operator, map, _omit, etc. In the lefthand screenshot we see the alert.js reducer using these methods (spread operator, filter), on the right-hand screenshot is a table on what code you should use when updating the state.
 |
 |