Spring offers security features to protect your application, this means that users will need to authenticate in order to see their own profile or cart and based on the role other features of the application that are protected. Out of the box security is turned off by default, once security is turned on however we have many features to play around with which is what I will be discussing in this section. Again this is not a blow by blow but a cheatsheet to get you up and running using Spring security.
In this section I will cover Spring Security basics and will walk through how filters, authentication manager and providers help in protecting web pages of your site, also I will touch on Cross-Site Request Forgery (CSRF) and Cross-Origin Resource Sharing (CORS).
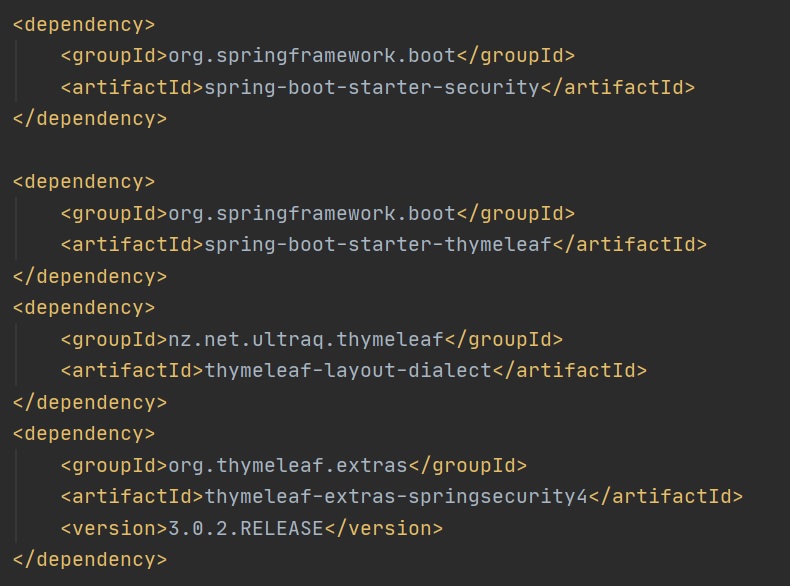
To implement Spring Security we have to include some dependencies, one for the Spring security the other which is more related to using security with thymeleaf (thymeleaf-extras-springsecurity4) and will cover later, an example of this can be seen below
Once you pull in the security dependencies and start your application you will notice a generated security password (left-hand screenshot) will be created (this changes each time you start spring), if you request a URL you are prompted for a username and password by the provided login page (right-hand screenshot), you can use the user username and the password that was provided.
 |
You can test using postman, however you need to convert the user and password (in this case 46fb5c26-80ce-443c-8d81-e9b7df5707c0) into base64 and pass it as a header called Authorization as per below

You can override the username/password in the application properties file as per below, once you do this you will no longer get the auto-generated password in the console

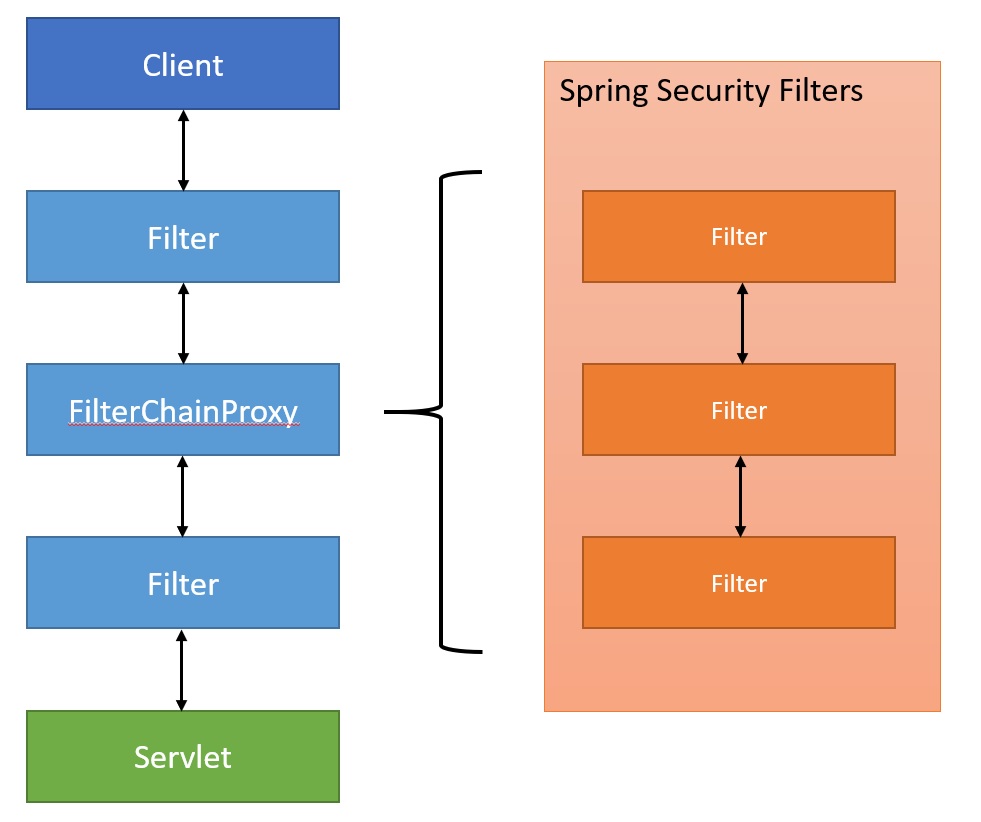
Before we get into the configuration and code lets discuss how Spring Security works, the diagram below is a high-level view of spring security, when a HTTP request hits your application the container decides which filters and which servlet apply to it based on the path of the request URI. At most one servlet can handle a single request, but filters form a chain, so they are ordered, a filter can also veto the rest of the chain if it so desires. All filters have access to the request and response headers which can be used to retrieve information (username, password, jwt token, etc) and add information (authorization information, jwt token). You can use the @Order annotation to order your filters, Spring Security filters are configured as a single filter in the chain and is FilterChainProxy (there is one more layer called DelegatingFilterProxy), however you have many spring security filters that also form a chain as per the diagram below each playing a special role. All the security filters implement the Filter interface and again have the option to veto the chain. You can also have specific URL's that a filter will be used with, for example you can have a filter that only will be actions if the URL is /login
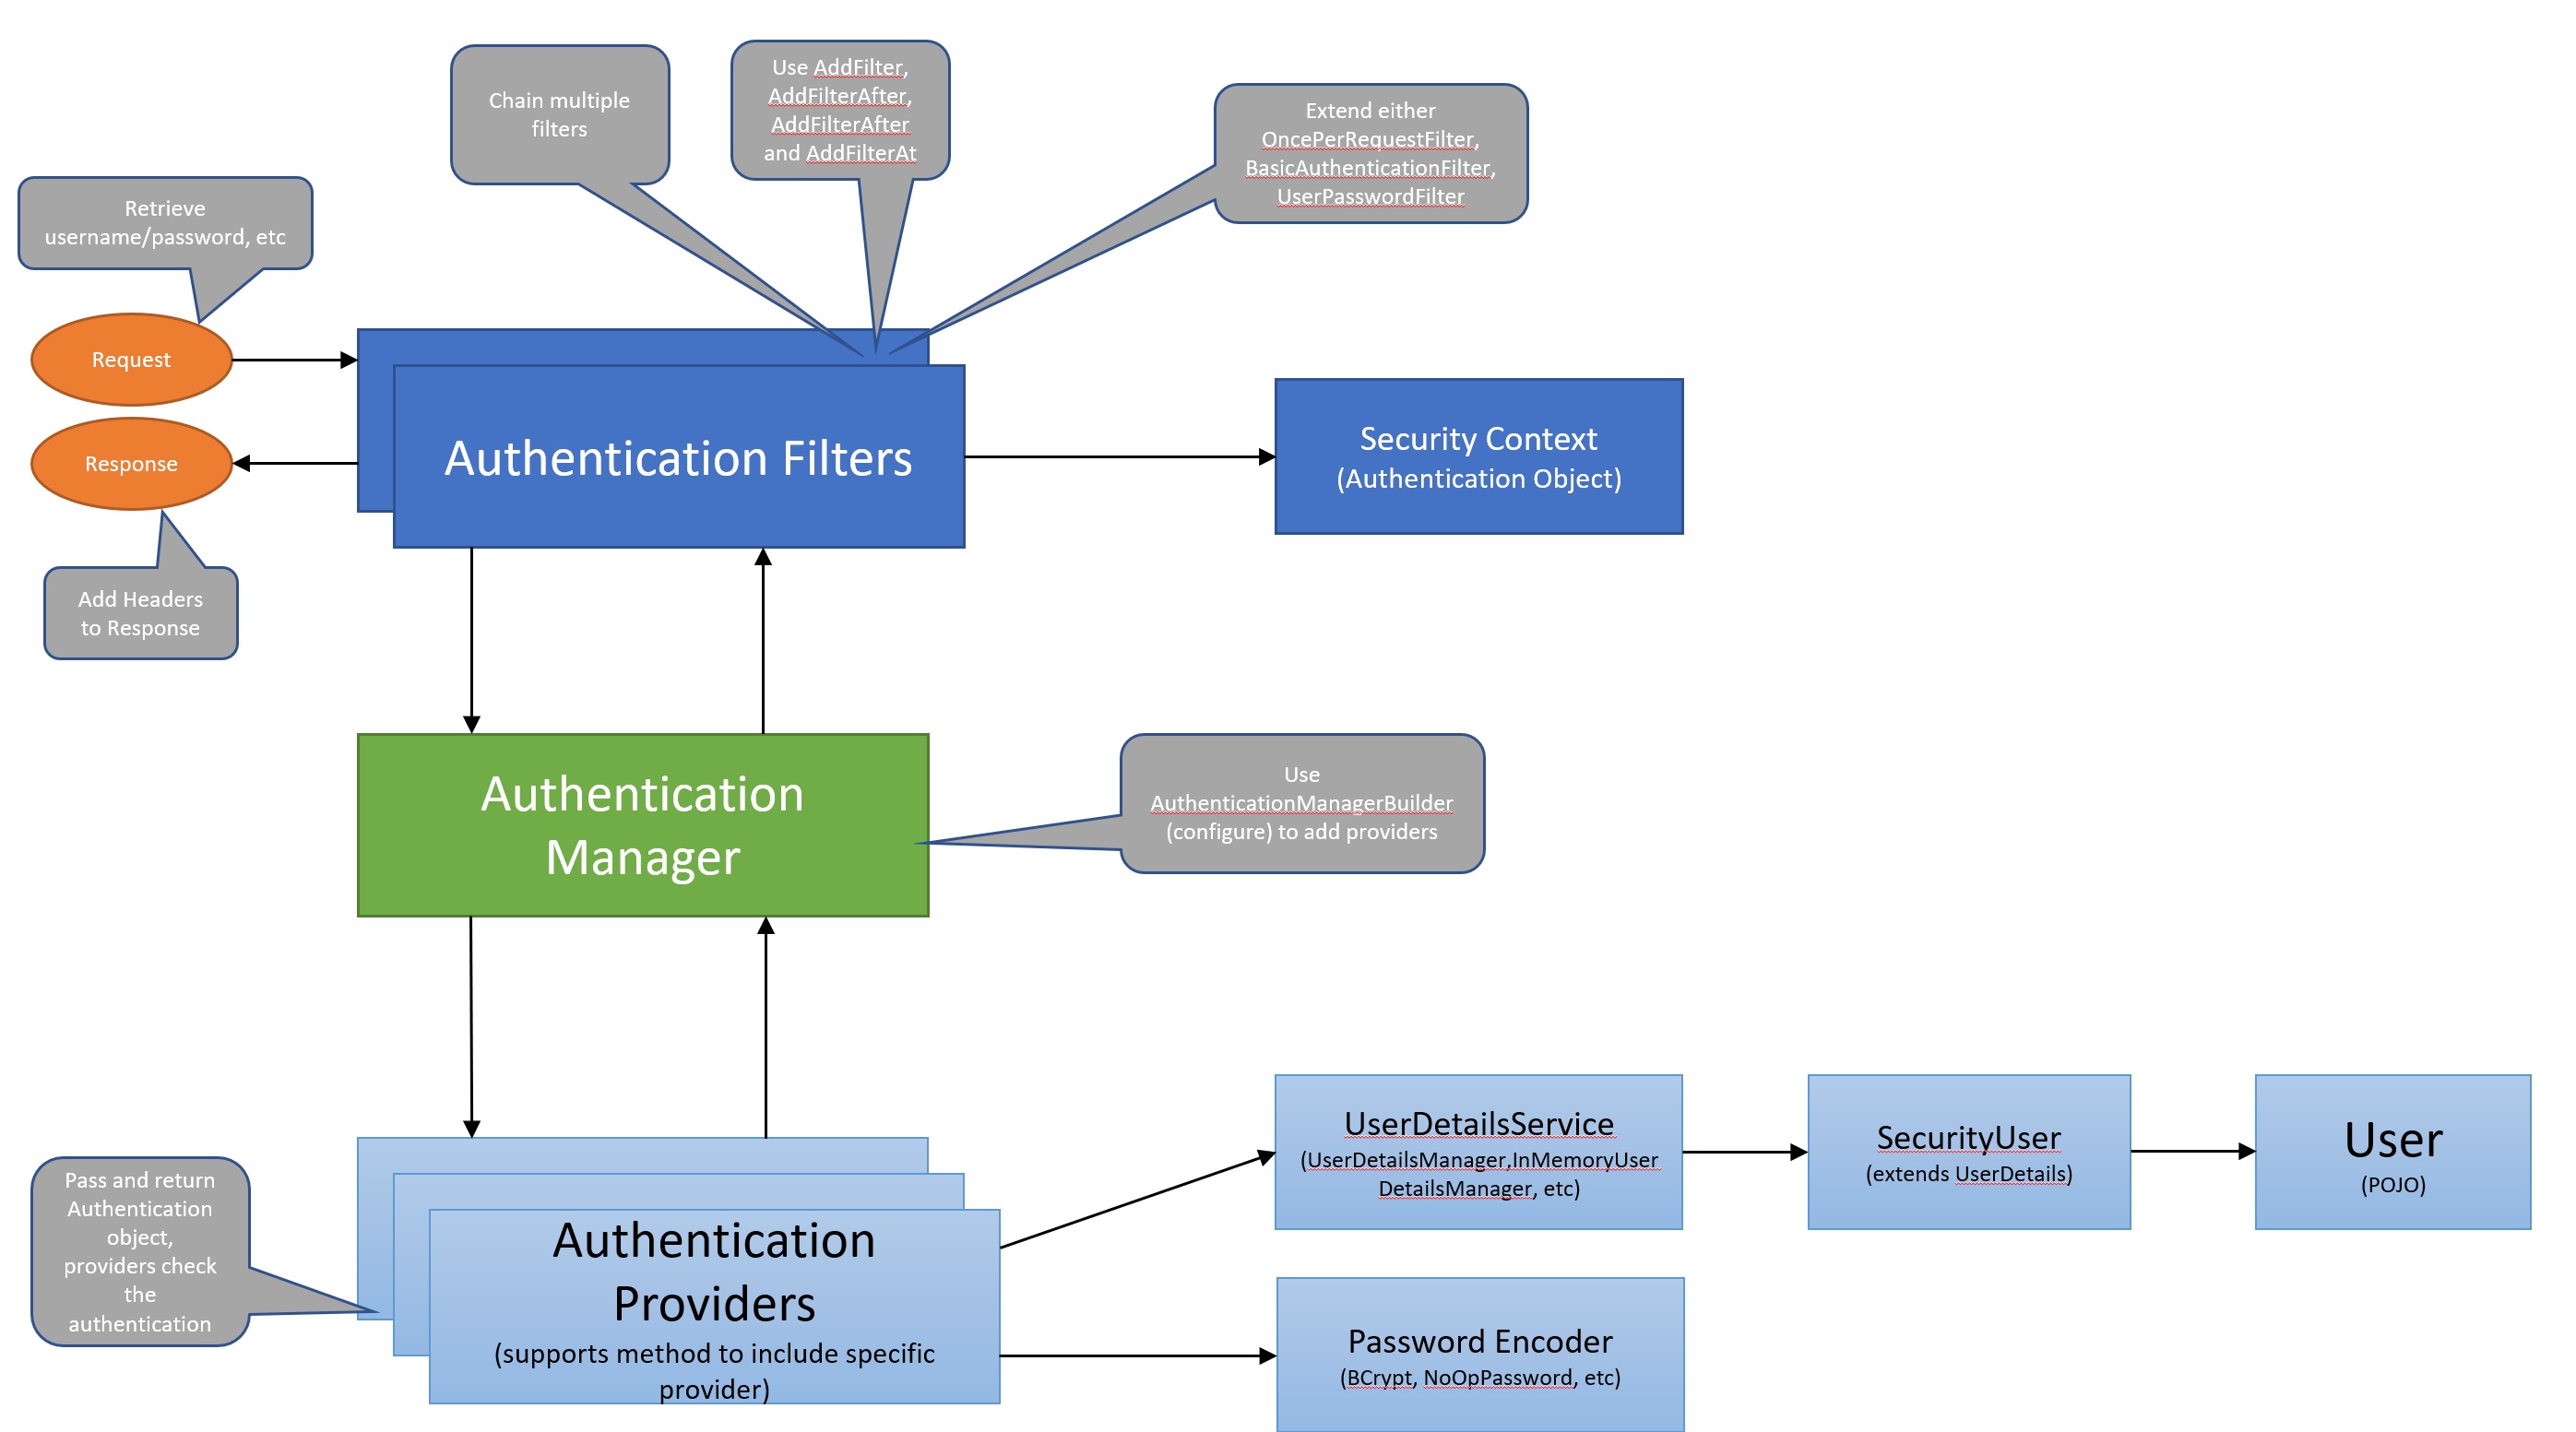
Next we take a look at the Authentication and Authorization part of Spring Security, you can create different types of filters which will be used to extract security information needed to authenticate (username/password, JWT token, etc), this information is then passed to the authentication manager which will have a number of providers that can authenticate the passed data, for example it checks that the username/password is correct, it does this using UserDetailService and PasswordEncoders, once authenticated it then travels back to the authentication manager and then back to the filter, the authentication object is then attached to the spring context which can then be used at the controller level. In summary we have the following
| Authentication Filters | each filter has a particular responsibility and filters are added or removed from the configuration depending on which services are required, they form a chain and can veto the rest of the chain. They can be configured to only action on a specific URL. The filter also attaches a authentication object to the spring context that can then be used by the controller or even passed on to the client as a cookie or header, etc. |
| Authentication Manager | attempts to authenticate the passed Authentication object, it does this by using a registered provider. It also returned the authentication object back to the filter. |
| Authentication Providers | performs authentication with the same contract as AuthenticationManager.authenticate(Authentication), it returns a fully populated Authentication object (including granted authorities) if successful and returns either null or throws a BadCredentialsException if NOT successful |
Cross-Site Request Forgery (CSRF)
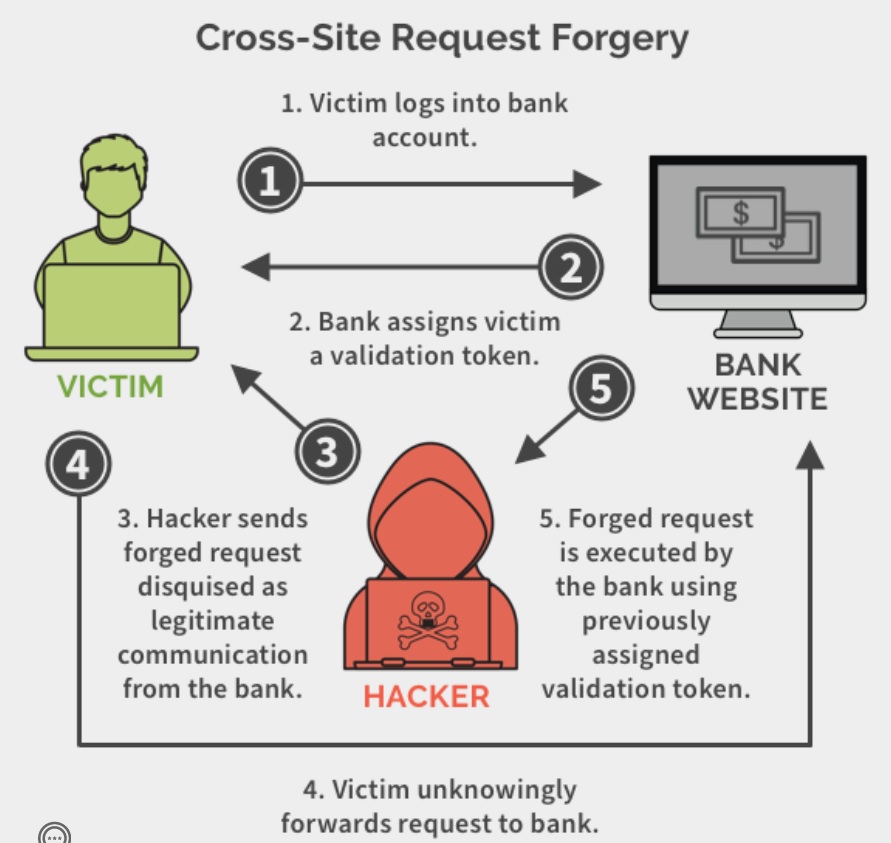
CSRF is also known as one-click attack or session riding, is a type of malicious exploit of a website where unauthorized commands are submitted from a user that the web application trusts, In a CSRF attack, an innocent end user is tricked by an attacker into submitting a web request that they did not intend. This may cause actions to be performed on the website that can include inadvertent client or server data leakage, change of session state, or manipulation of an end user's account, one way is the attcker uses an image link sent via email that points to a post request on the company's internal application, the users session data, or existing token can then be used to gain access.
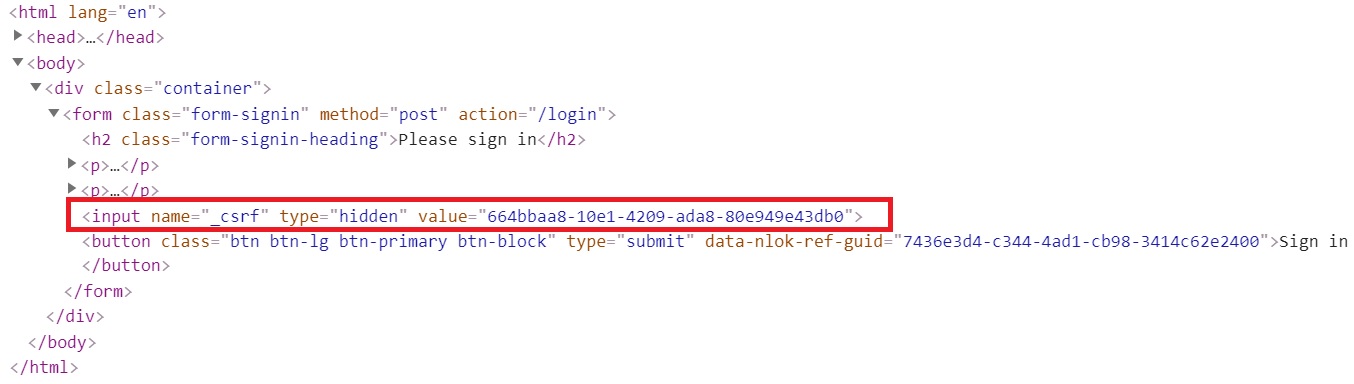
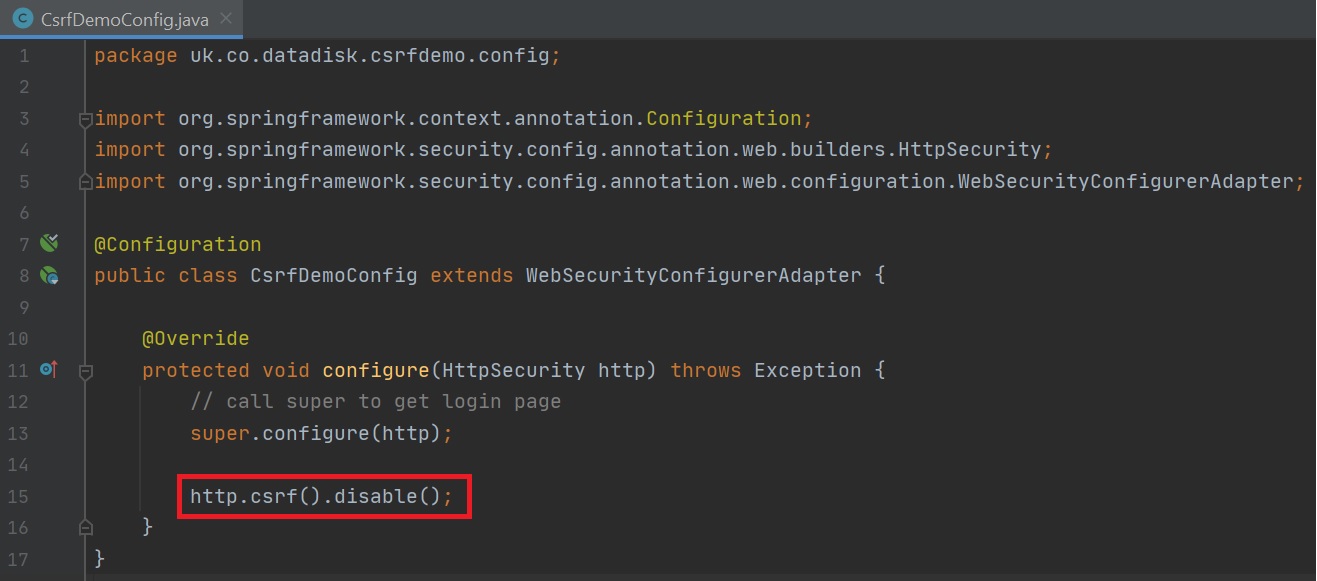
By default CSRF is enabled but you can turn it off while developing (right-hand screenshot) but you should not do this for a production site, you can see CSRF in action by looking at the default login page (left-hand screenshot), the form has a added input element which is of type hidden and has a name of _csrf, the value is a csrf token that can be validated when the form is submitted, this tells the application that the form was actually created by this Spring application and not a forged HTML page.
 |
 |
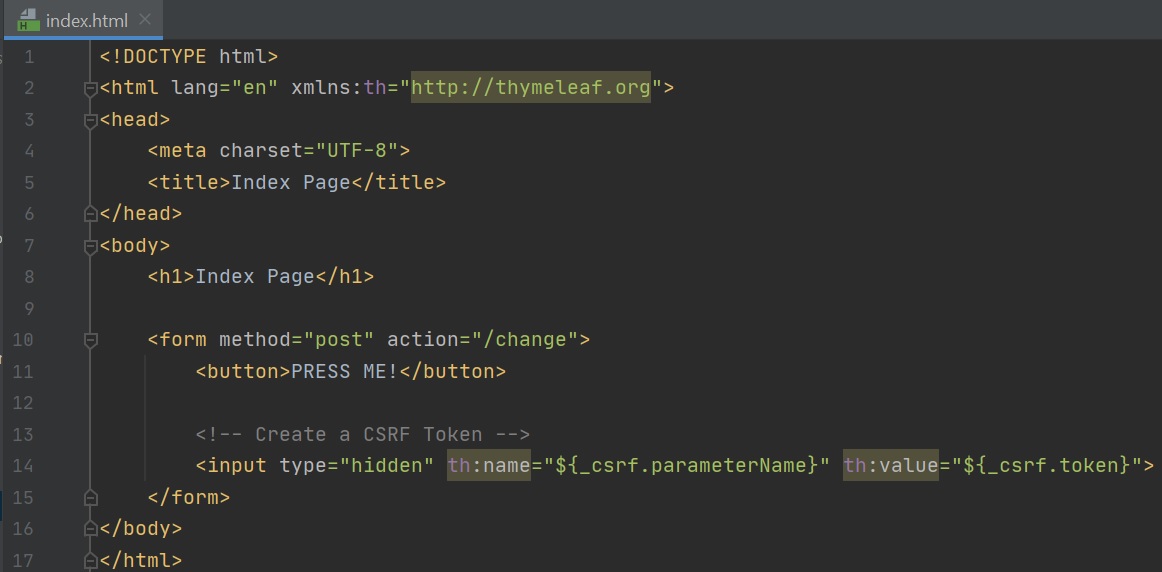
You have an option to create your own CSRF protection but you can incorporate Spring's CSRF protection, looking at the example below we use thymeleaf to add a CSRF token to the form and thus you no longer need to disable the CSRF protection.
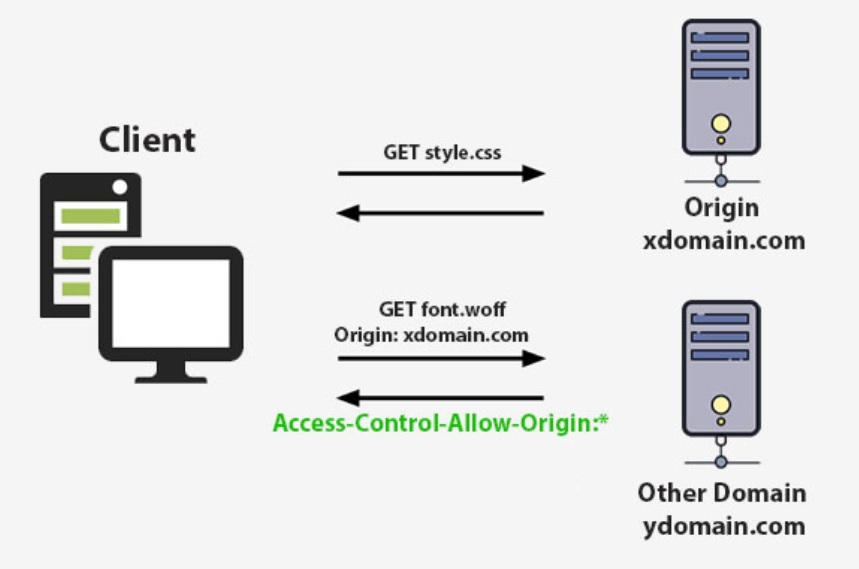
To get around the error you can supply a header called Access-Control-Allow-Origin and specify the others domains that you allow
Cross-Origin Resource Sharing (CORS)
CORS is a mechanism that allows restricted resources on a web page to be requested from another domain outside the domain from which the first resource was served, in the example below the client requests the style.css file and in that file is a request to get the font.woff from another domain and hence the browser will complain of a CORS error.
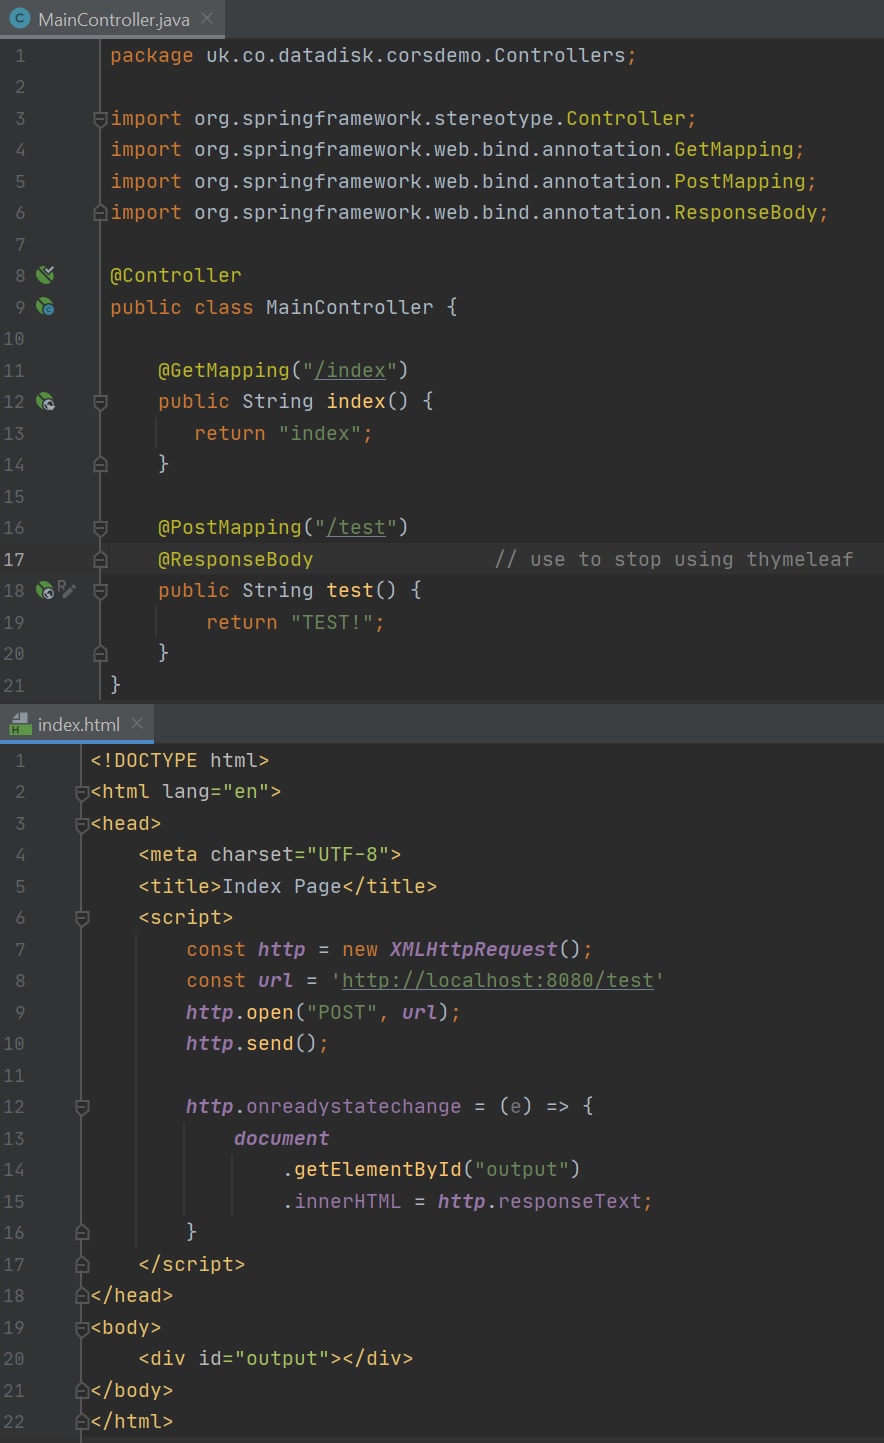
The below code sets up an example on how to produce a CORS error, the MainController is a simply controller and the index.html file has some javascript to call a POST request to the same application, the configuration file disabled CSRF and any authentication just so that we can demo CORS.
 |
 |
If you then type the URL http://127.0.0.1/index (different domain to the one in the Javascript code) you get a CORS error in your browser as per below, however one-point to note the method may have been called (depending on browser) even through you get a CORS error and nothing is displayed in the browser. This is an important note as CORS can only affect the response not the request in some browsers.

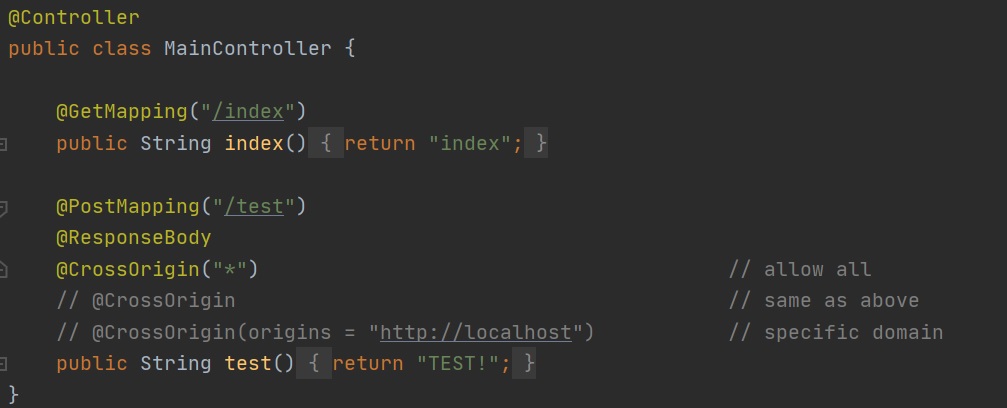
You can use the @CrossOrigin annotation (class or method) to add domains to be allowed (left-hand screenshot), looking at the @CrossOrigin annotation (right-hand screenshot) that some of the attributes have been deprecated, you also have a max age option.
 |
 |
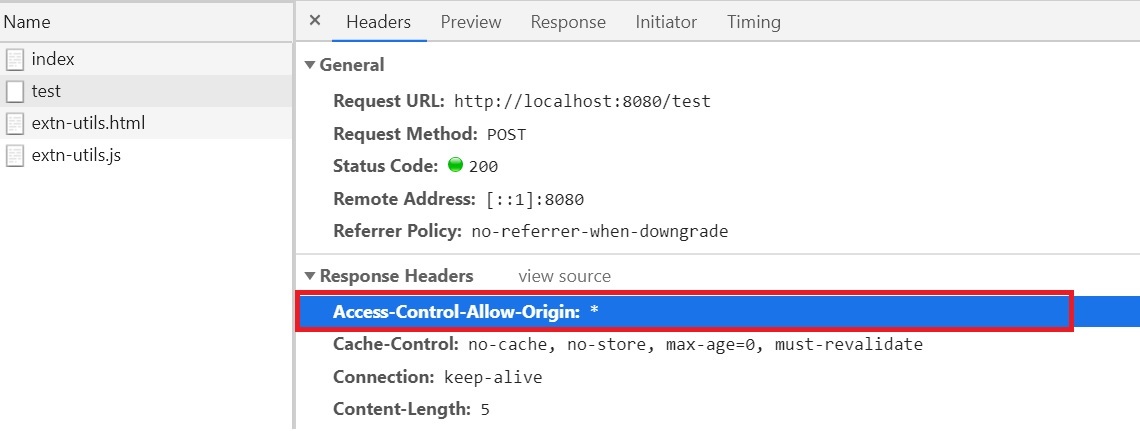
Now when you look at the browser you can see the Access-Control-Allow-Origins in the header to allow all.
The another option is to configure CORS in the the configuration file as per below

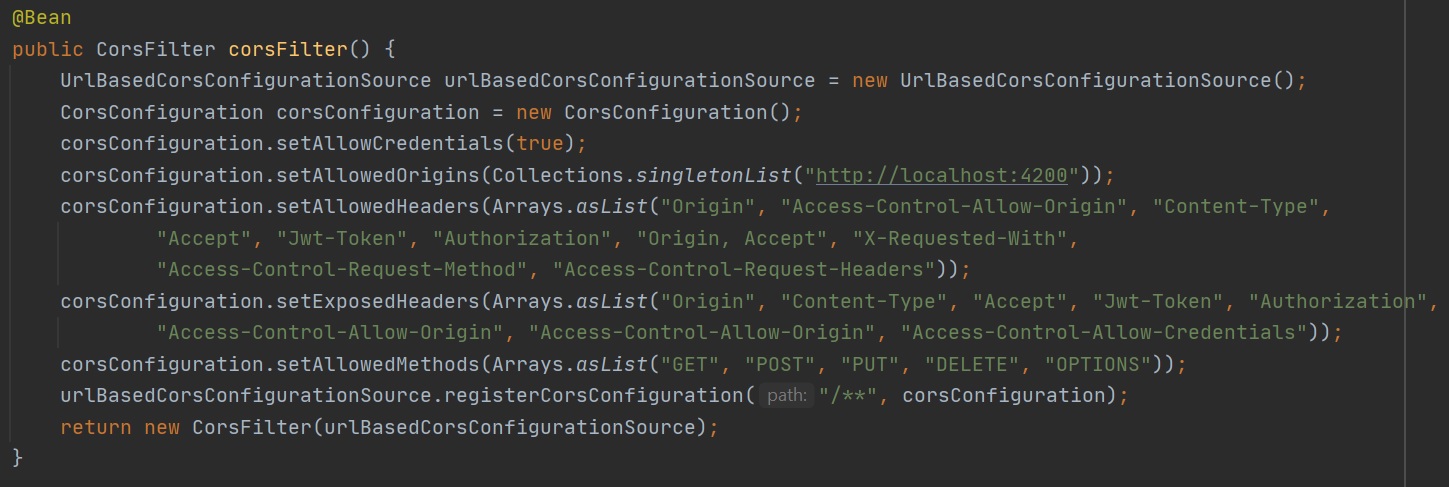
The yet another option is to create a Bean to configure CORS, in this example I also include options to expose headers which is normally required if passing back a token of some kind (JWT for example) to the client.
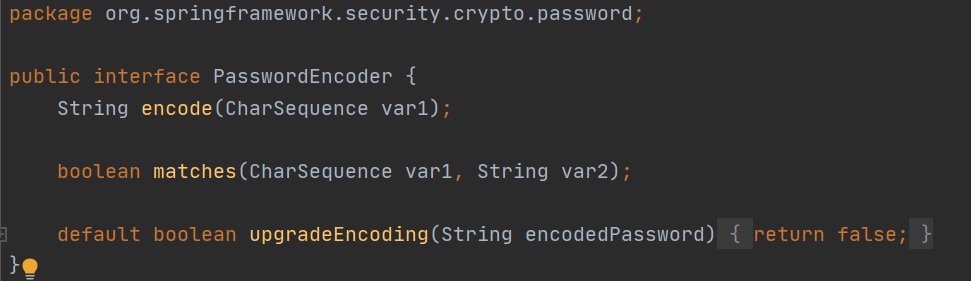
Spring Security provides us with out-of-the-box functionality when it comes to encoding passwords. Password encoder is an interface which is used through the authorization process, the interface provides two main methods called encode and matches which checks if your raw password matches the encoded password. By default spring uses BCrypt for password encoding.
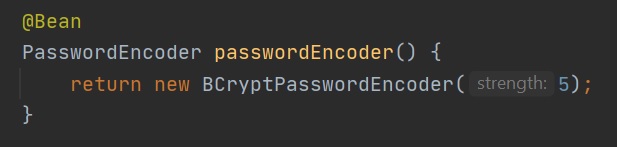
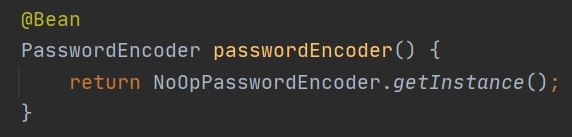
You are free to create your own password encoder bean which will override the default, the left-hand screenshot uses a BCryptPasswordEncoder of a strength of 5 (the higher the better but will take longer to create), sometimes while developing you might want to use a plain text password in the right-hand screenshot we use the NoOpPasswordEncoder
 |
 |
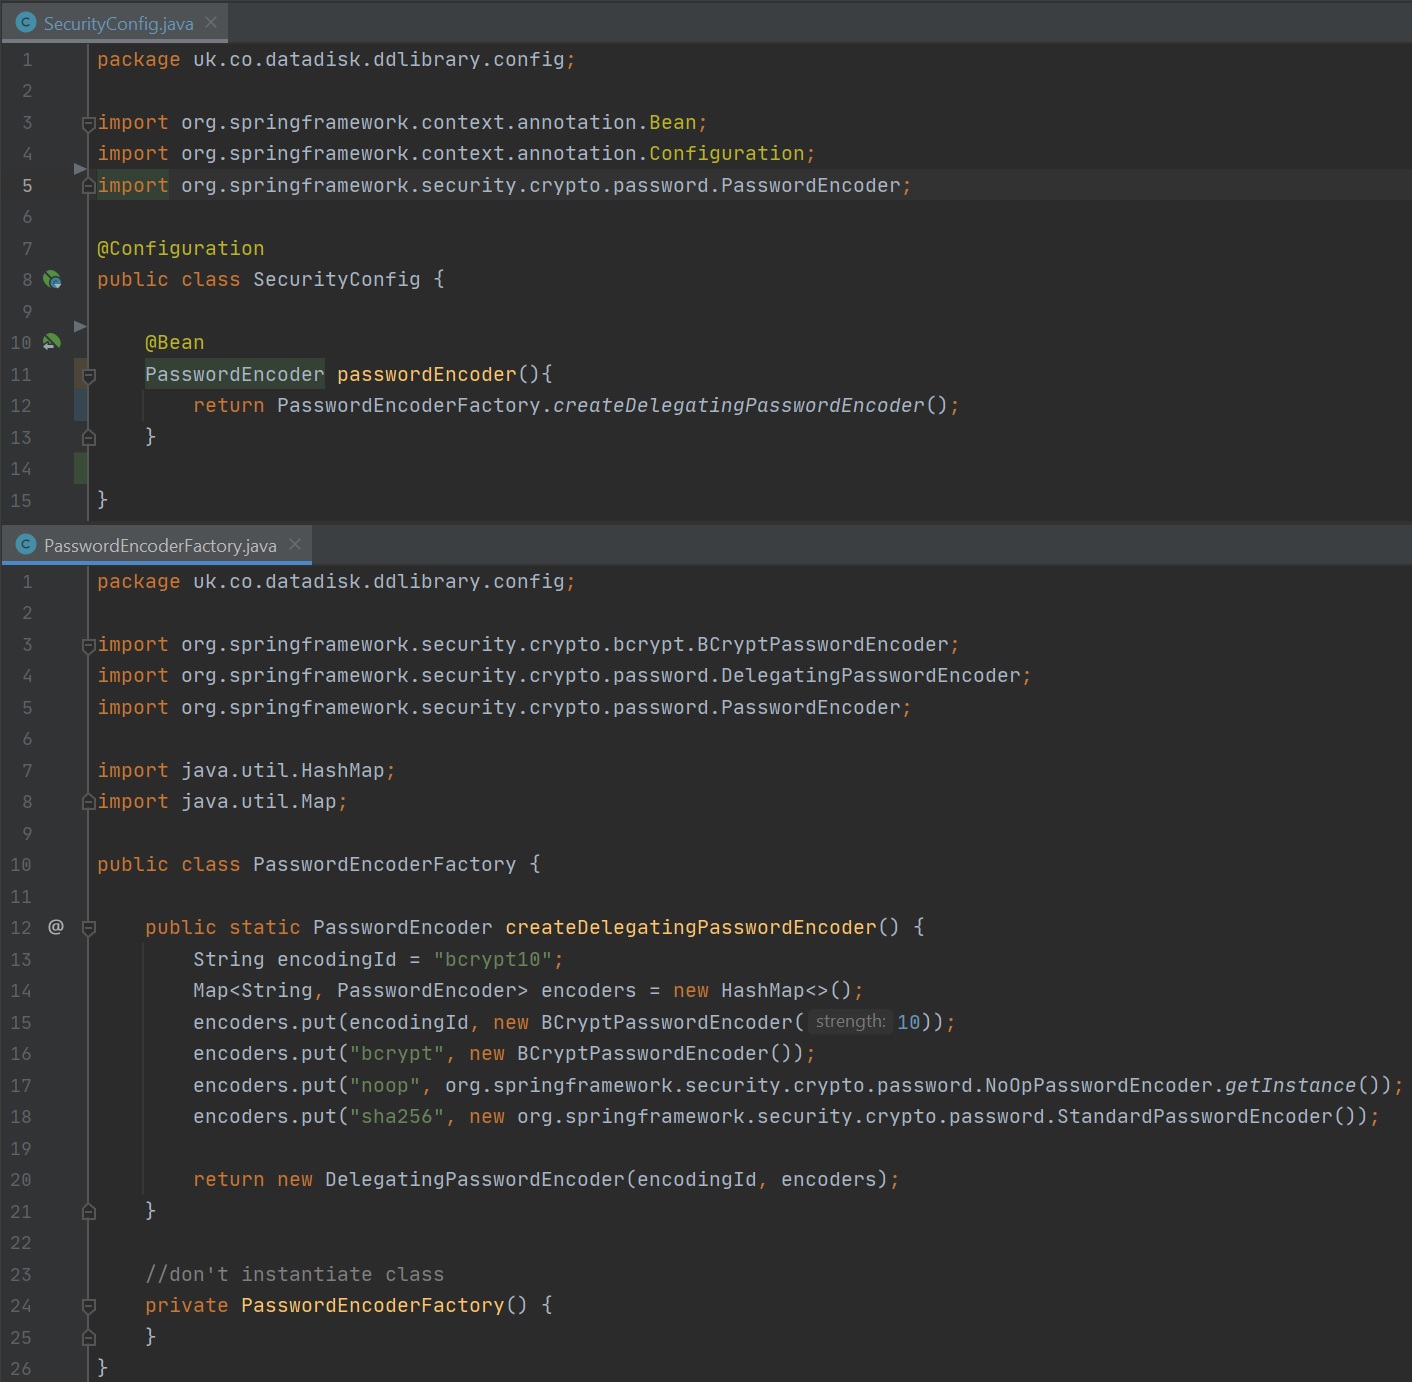
You can even use a password encoder factory as per below
Spring security filters (or plain filters) allow the application to filter requests to perform an action on either a specific URL, or before/after a specific existing filter. You can create a filter by extending one of the already existing classes or interfaces
| AuthenticationFilter, BasicAuthenticationFilter, OncePerRequestFilter and Filter (interface) |
many filters in this section extend or implement each other, for example the BasicAuthenticationFilter extends OncePerRequestFilter, depending on your needs you choose which one you require, each one offers different methods that you can override to give you access to a particular feature.  |
| UsernamePasswordAuthenticationFilter, AbstractAuthenticationProcessingFilter |
the UsernamePasswordAuthenmticationFilter is springs default username/password filter which deals with username/password authentication.  |
Below is a very simple example of a filter extending the OncePerRequestFilter, as mentioned above all filters are part of a chain and you can either veto the chain or move onto the next filter in the chain (chain.doFilter() method). You also have methods that you can use to to only use the filter on specific URl's.

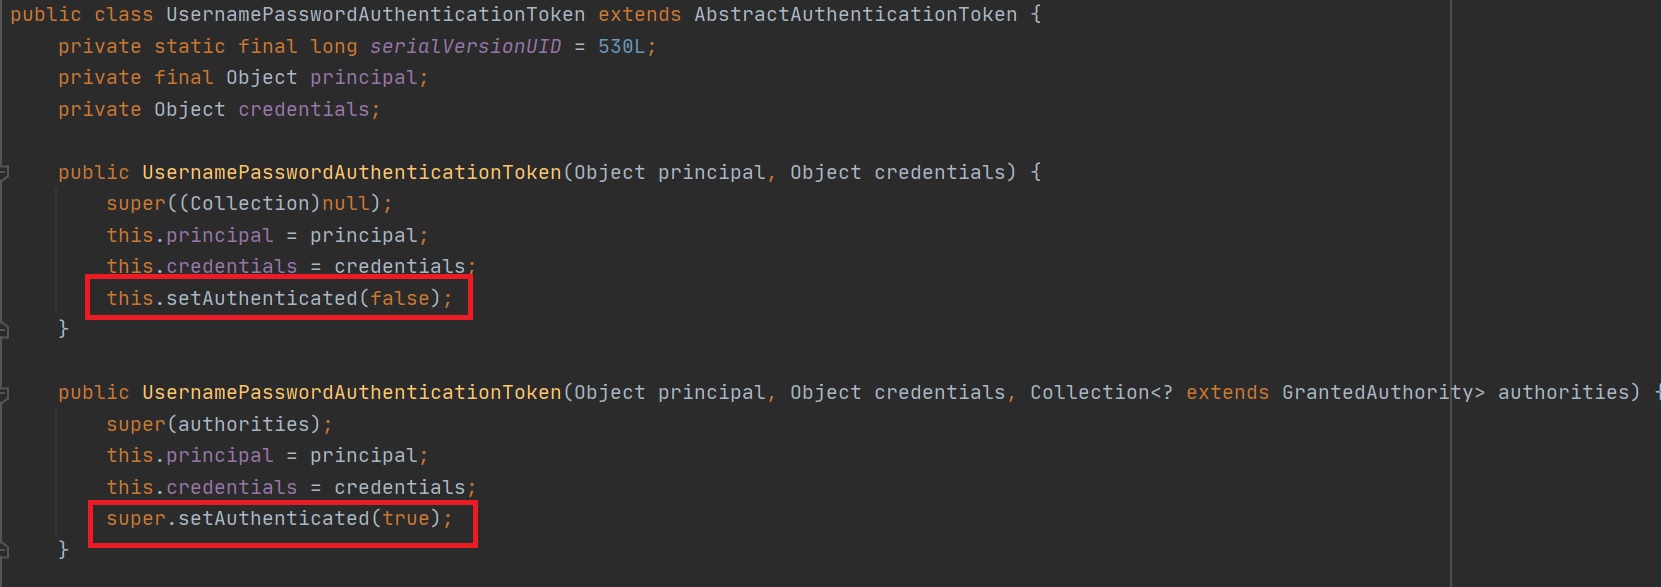
The purpose of a authentication filter is to extract authentication credentials and pass them to a authentication manager which in turns uses a provider to check the authentation, in the below example we extract authentication information from the request, we use our own UsernamePasswordAuthenticationToken (authentication object - seen below) to capture the authentication details, this is then passed to the authentication manager, the manager will either return a authenticated object, null or throw a BadCredentialsException.

Extending the UsernamePasswordAuthenticationToken we have to override two methods, the first contains the principle (username) and the credentials (password), the second although not obvious is a authenticated object (right-hand screenshot).
 |
 |
I also mentioned in the introduction that you can also add a authenticated object to the Security Context that then can be used in the controller (right-hand screenshot), an example of this is in the left-hand screenshot.
 |
 |
To wire in the filters we have a few choices
- addFilter - adds a filter that must be an instance of or extend one of the filters provided by Spring Security
- addFilterBefore - adds a filter before the position of the specified filter class
- addFilterAfter - adds a filter after the position of the specified filter class
- addFilterAt - adds a filter at the location of the specified filter class
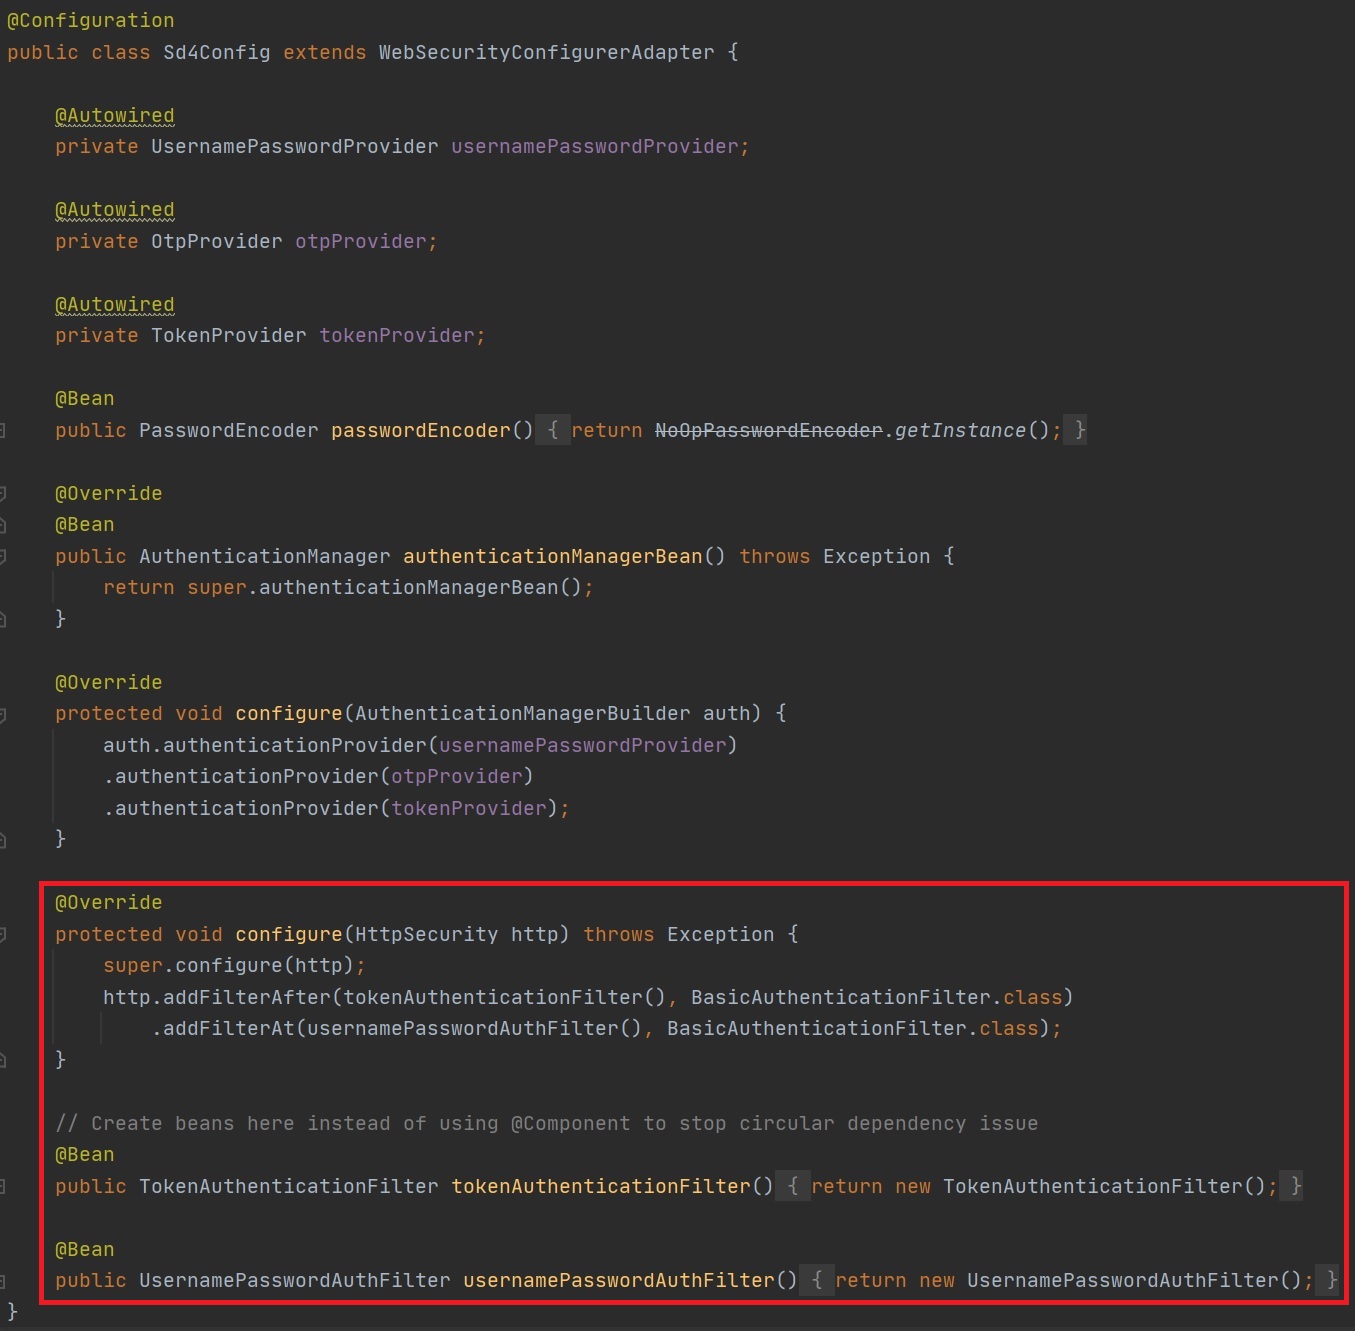
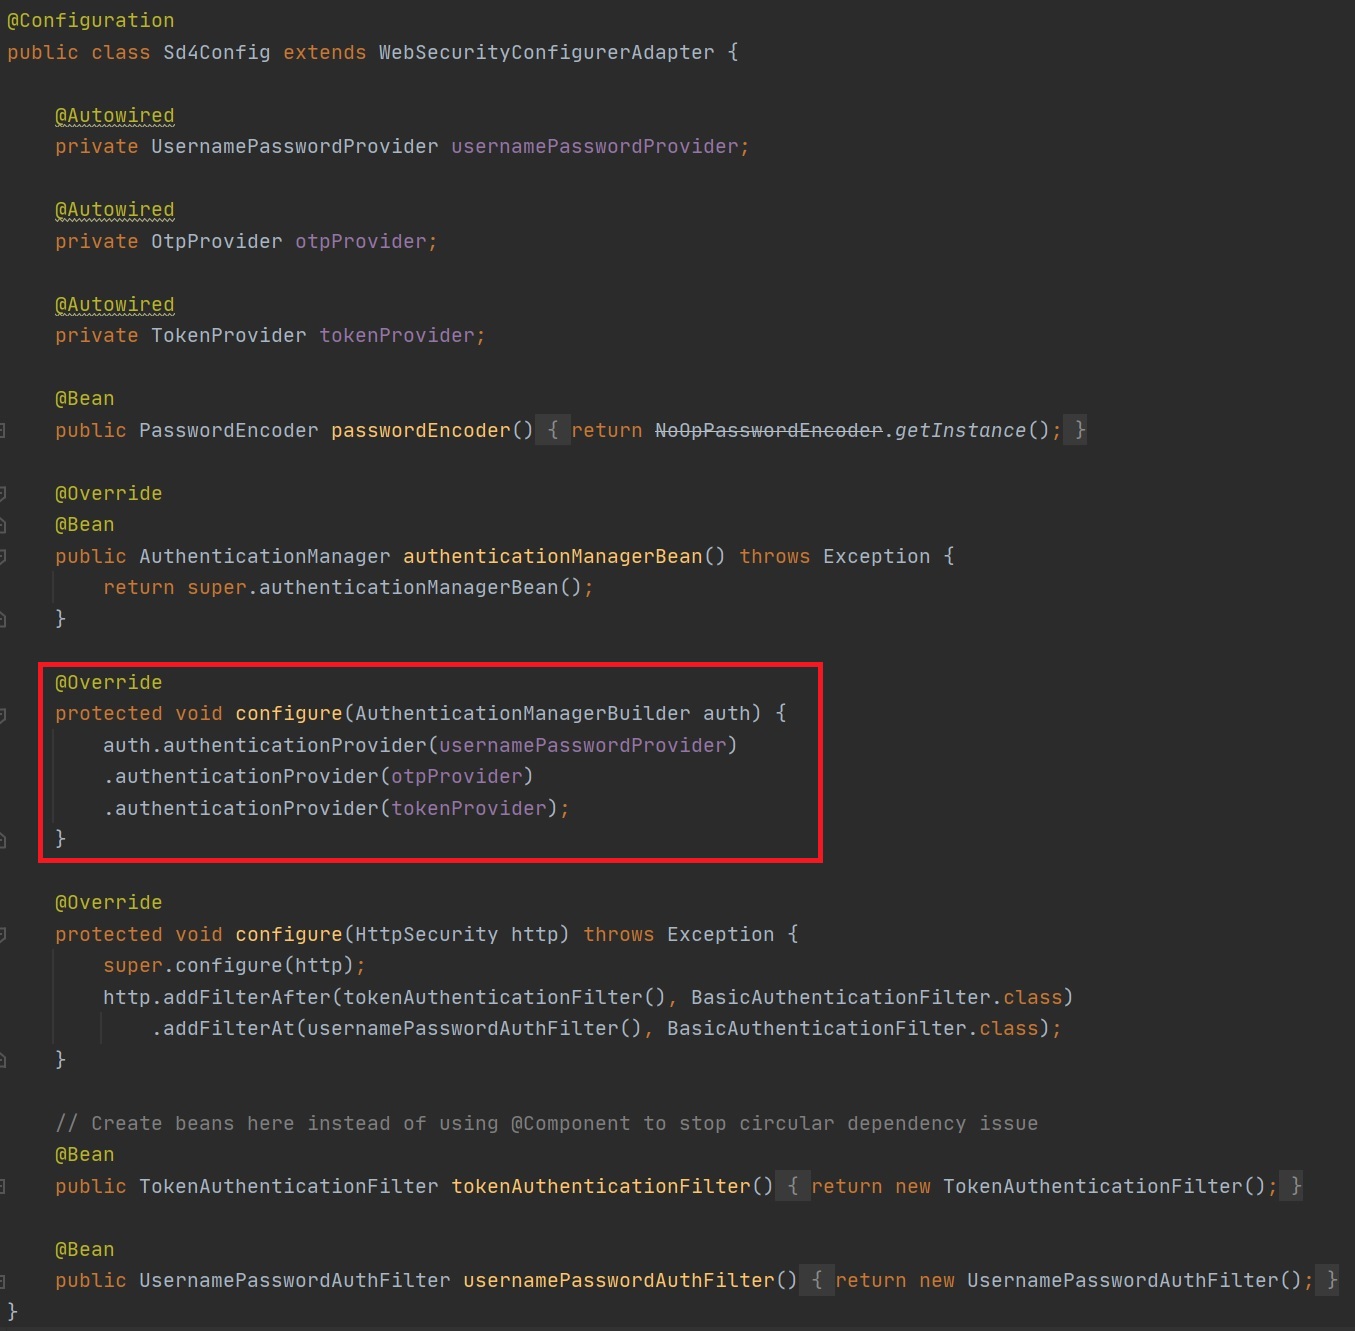
You can see in the below example i add some filters in a specific order. Also if you get a circular dependency issue instead of using the @Component annotation on the filter class you can configure them as a bean inside the configuration file instead.
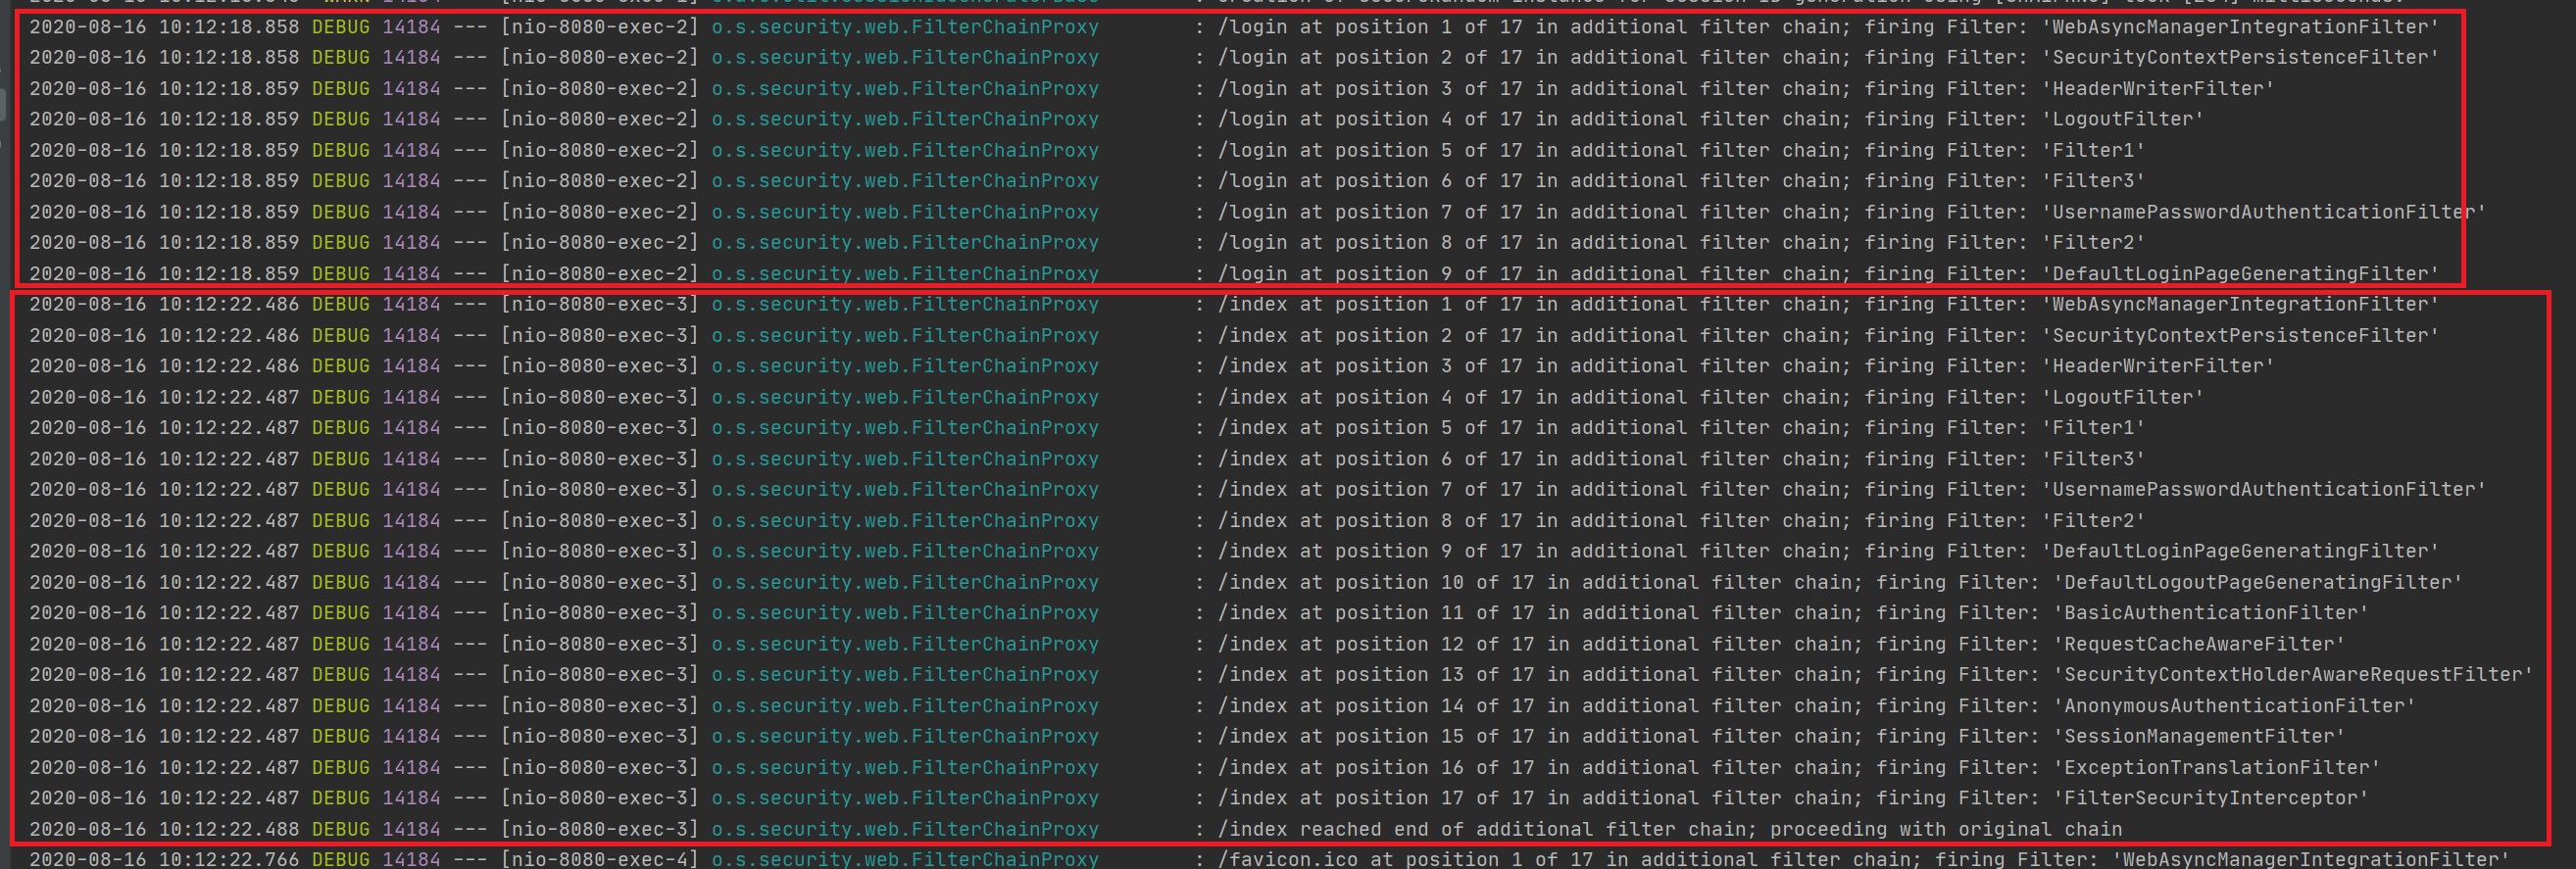
You can view the Spring Security filter chain (FilterChainProxy) and its order by setting the logging to debug in the application properties file (left-hand screenshot), then we you access the chain debug information will be displayed, depending on how the filters are configured some URL's may havbe different filters that it will use, however looking at the right-hand screenshot you can see that Spring Security already has a number of preconfigured security filters, you can also see my own custom ones as well (filter1, filter2 and filter 3).
 |
 |
To summarize filters retrieve authentication credentials and pass them on to the authentication manager, they either receive a authenticated object or which can be attached to the security context.
Authentication Manager and Providers
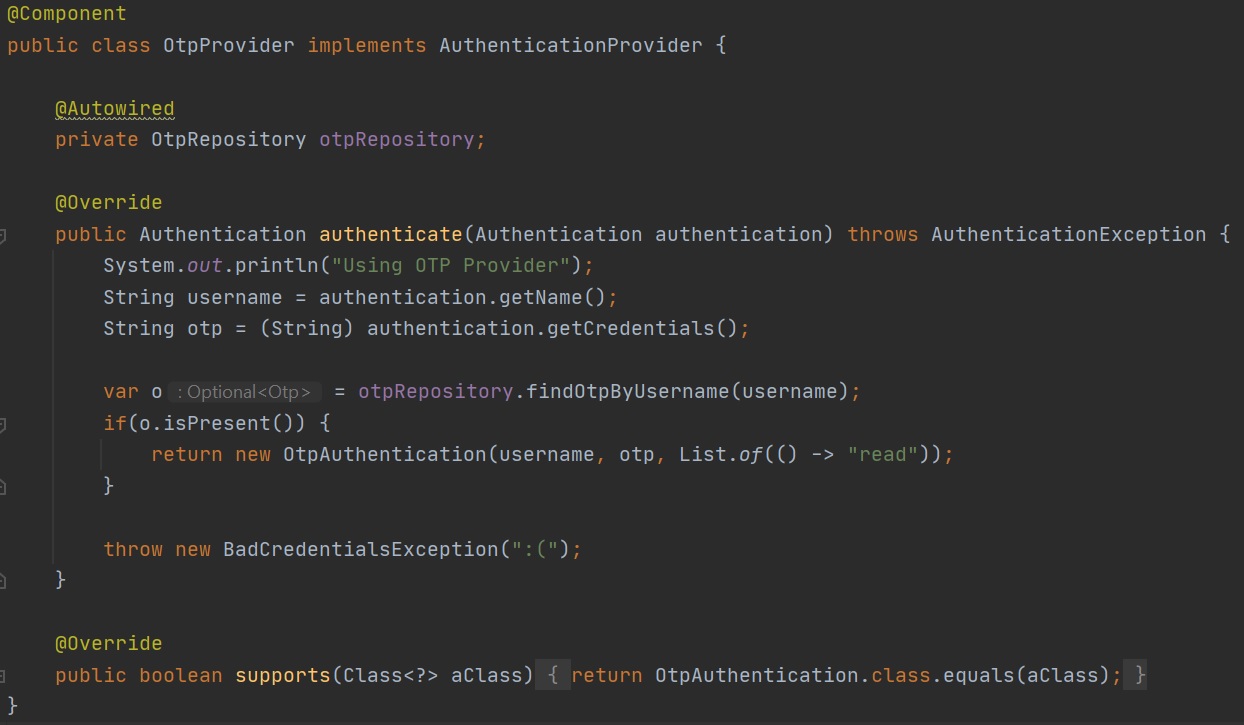
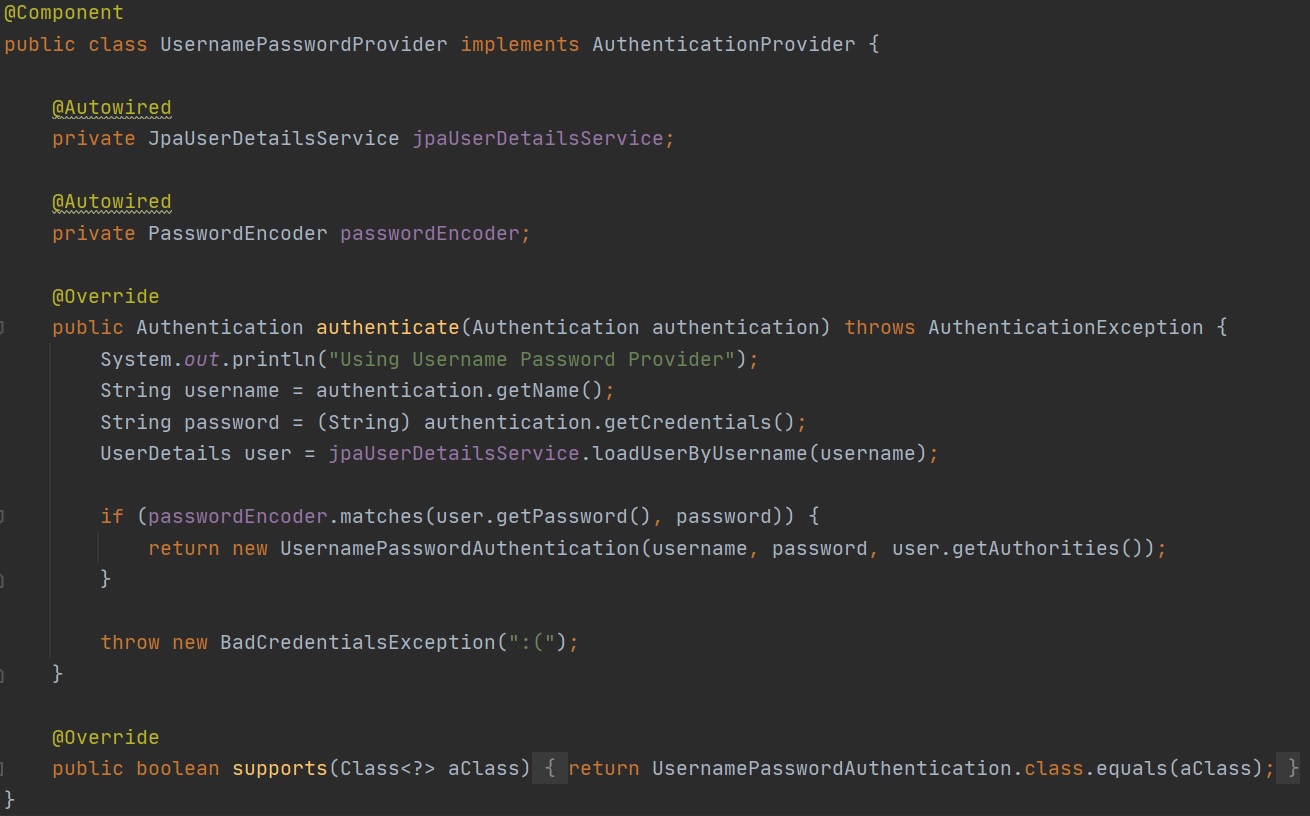
Now we have dicussed authentication filters we move onto the authentication manager and providers, first I will discuss providers which is the authentication implementation, we override the authenticate method which receives the authentication object we passed from the filters, this method is used to check the credentials and as mentioned above with either return a authenticated object or in this case throw a BadCredentialsException (which can then be handled). The supports method is used to register the type of authentication this filter handles, in this case a OtpAuthentation object. You can many providers that handle different types of Authentication classes.
The last piece of the puzzle is that we need to wire in the providers with the authentication manager and we do this in the security configuration file as seen below.
To summarize we use the authentication manager to get to the providers which have been registered, the provider will support a specific type of authentication.
UserDetailsService, UserDetails and Users
There are times when you want to use a in memory list of users to try things out, there are many ways to achieve that same outcome, I have multiple examples in the code below (ignore errors as some code is repetitive)
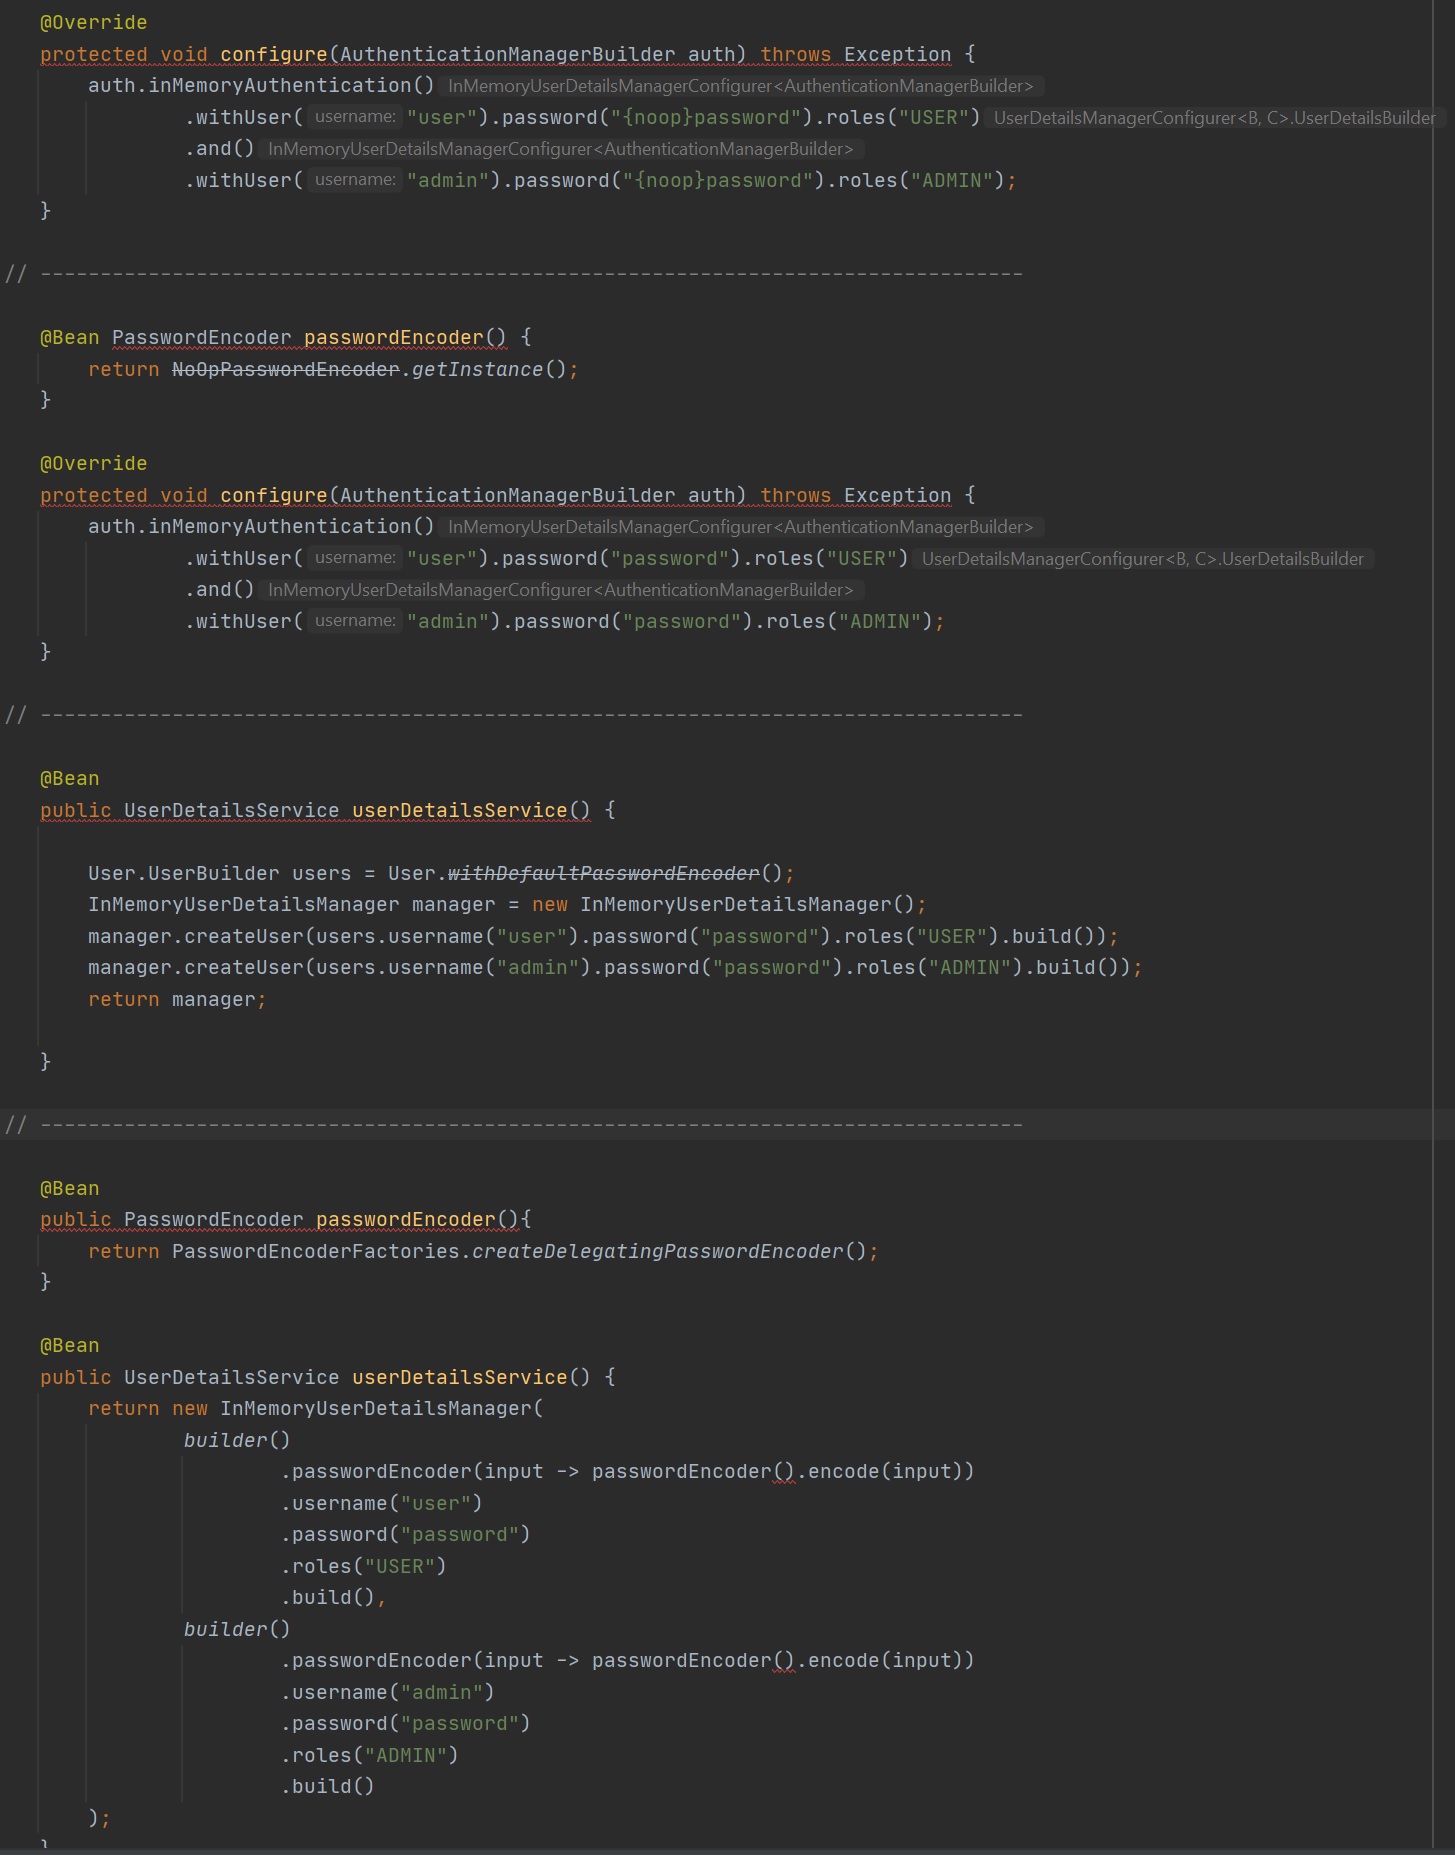
You might have noticed that a couple of the examples above use the UserDetailsService which is overridden using the in memory manager to populate a few users, so when authenticating spring will use this UserDetailsService to retrieve the user details. However you can also override this service when using a database, in the below example we implement the UserDetailsService and override the loadByUsername method, we wire in the User repository, all this service does is either return a optiona User or throw a UsernameNotFoundException. The User repository is configured to access a database.

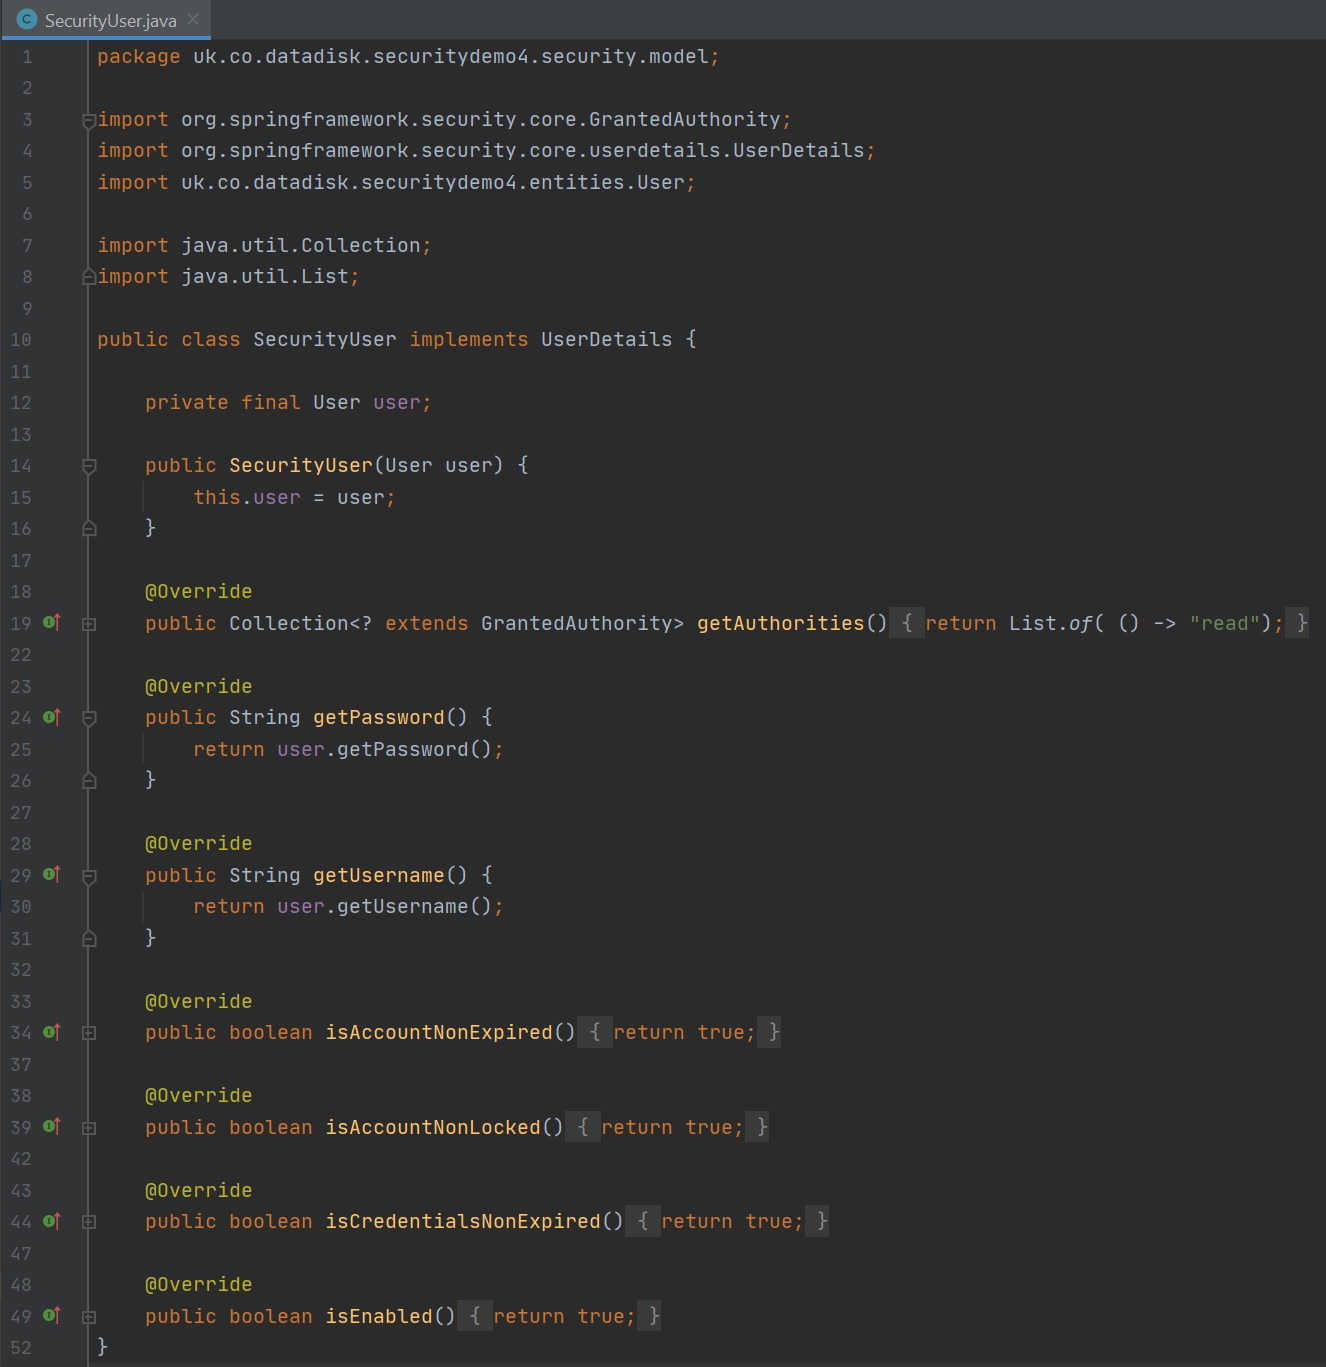
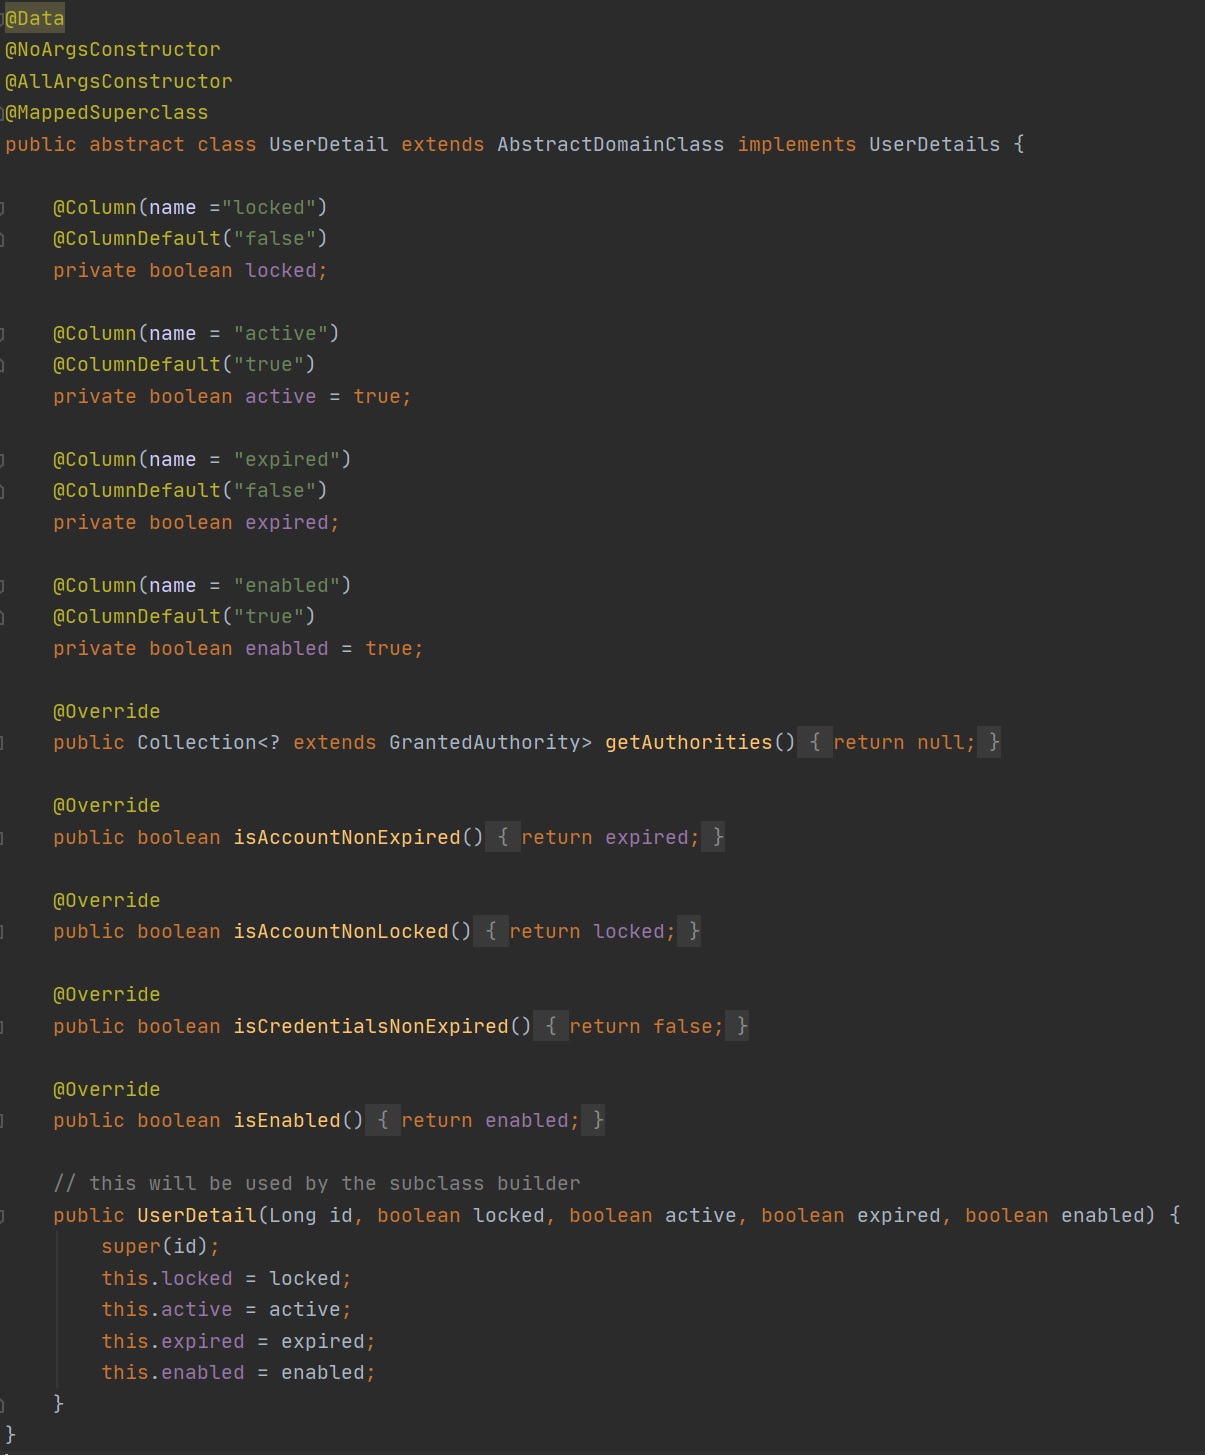
Lastly we extend the UserDetails class and which has the User entity, this class overrides the methods that holds the users authorities (roles) and can set if he account is expired, locked, credentials expired and if the account is enabled or not, all which you can either use or not use in your application. The one thing to note about this service is that it returns a UserDetails object which can then be used in your provider to obtain any of this information.
 |
 |
The only part that you need to change to make use of a database is the User entity and the UserDetail and configure a User repository and a service to manage the access to the User database table.
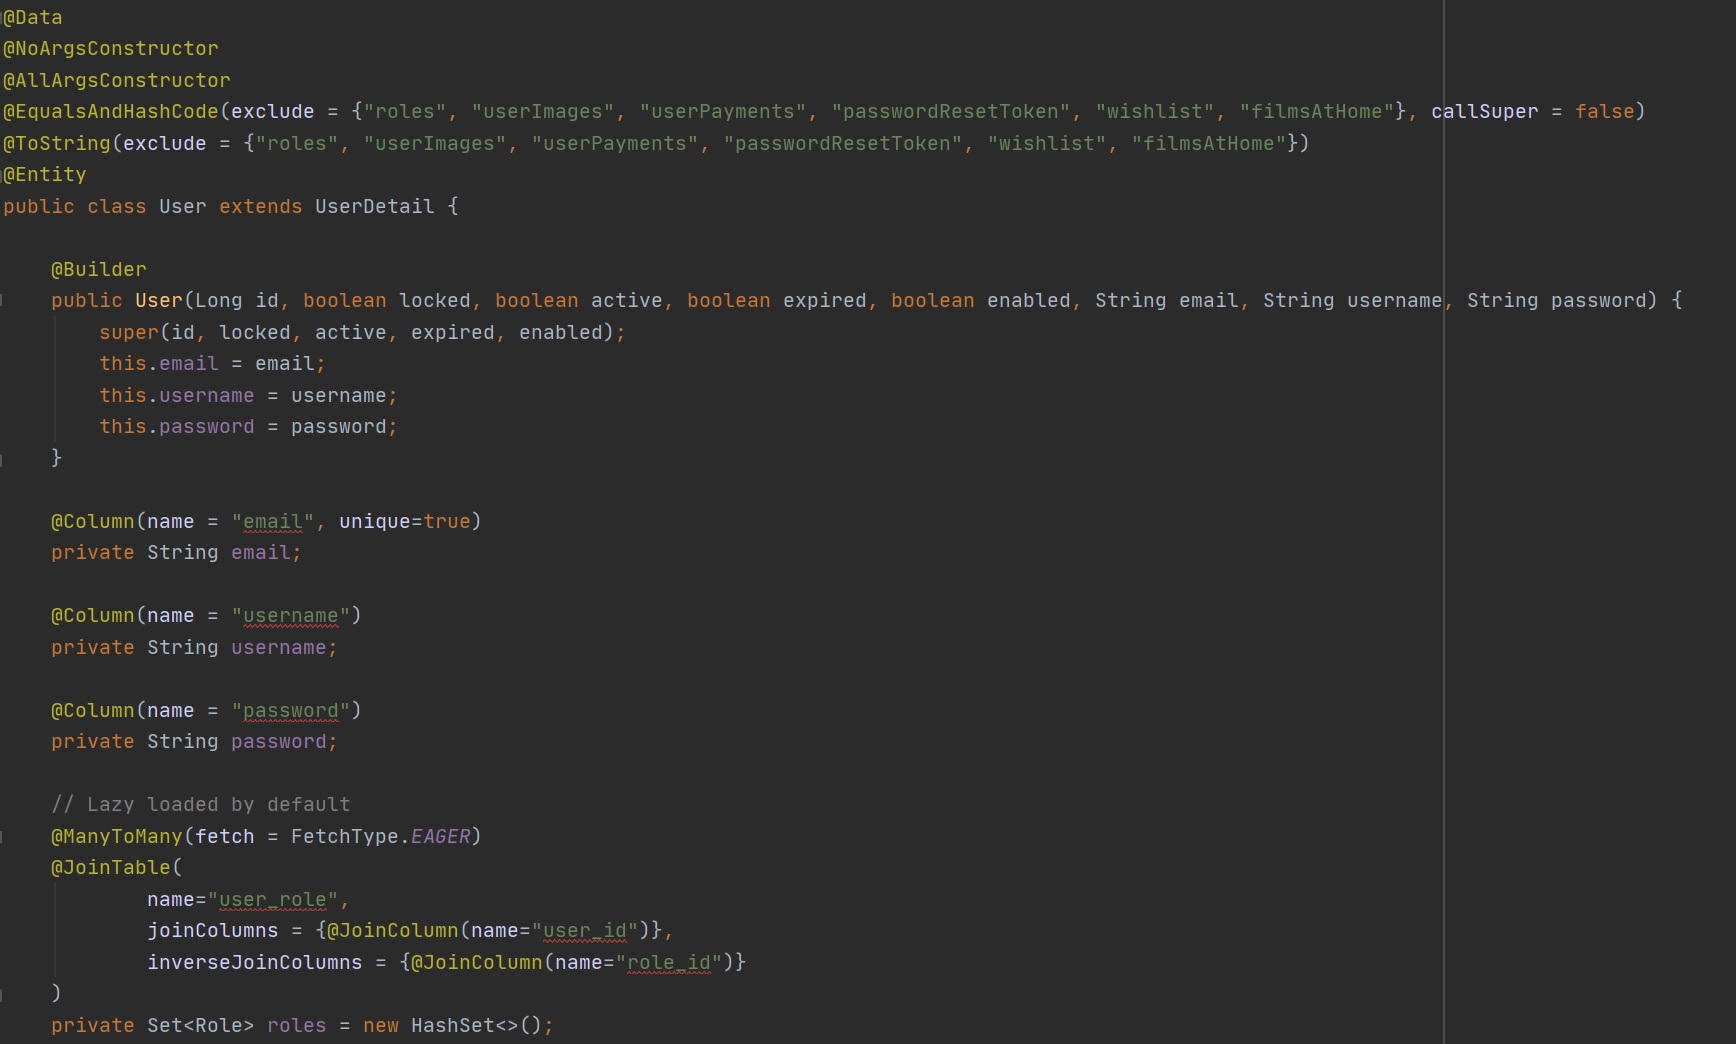
Below is the UserDetail class (left-hand screenshot) which I have added default values for specific fields, the User class implements the UserDetails class and makes use of roles which will have its own table.
 |
 |
Once everything is configured the User table should look like something below, notice that the password column is encrypted (by our password crypted bean), also we have boolean columns for the active, enabled, expired and locked columns.
