In this section I am going to cover both using JUnit and Mockito in regards to testing a Spring Boot application, again this will be more of a cheatsheet guide than a full tutorial.
There are a number of testing practices regarding testing there is Test Driven Development (TDD), Behavior Driven Development (BDD), Continuous Integration Testing (CTI) all which can be implemented, I am not going to cover such practices but making you aware of them, this section will only focus on JUnit/Mockito.
There are some terms that you need to known regarding testing, some I will cover others I will leave you to the web
- Code Under Test - the piece of code that you are testing
- Test Fixture - a fixed state of objects used as a baseline for running tests, its a fixed environment to run repeatable tests that produce repeatable results (database with known data, mock objects).
- Unit Tests/Unit Testing - code written to test code, test specific sections of code, percentage of lines of codes tested is called code coverage (aim for 70%-80%), try to make units small and fast (no starting of spring or using database)
- Integration Tests - test behaviors between objects and parts of the overall system, has a bigger scope than unit tests, can use spring and databases but will run slower that unit tests.
- Functional Tests (End-to-End testing) - testing the running application, functional touch points are tested, generally will be using a web driver (Selenium) to driver and test the application.
- TDD - Test Driven Development, you write the tests which will fail, then you write the code to fix the tests
- BDD - Behaviour Driven Development, builds on TDD and specifies thats tests should be specified in terms of desired behaviour of the unit (Cucumber/Spock using given, when, then, etc).
- Mock - a fake implementation of a class used for testing.
- Spy - a partial mock, allowing you to override select methods of a real class.
The testing goals should be as follows
- Majority of the tests should be unit tests as they are faster
- Try to test specific business logic in unit tests
- Integration tsets are slower as you will be using Spring and the database
- Use intergration tests to test interactions between components
- Think of a pyramind, base is unit tests (bigger), middle is integration and top is function tests (smaller).
There are a number of tools that you will be using
- JUnit - standard unit for testing Java applications (JUnit 4 or 5)
- Spring Test/Spring Boot Test - utilities and integration test support for Spring applications
- AssertJ - the assertion library
- Hamcrest - library of matcher objects
- Mockito - mocking framework
- JSONassert - assertion library for JSON
- JSONPath - XPath for JSON
I will be using JUnit for my testing and here are some of the annotations that will be being used
- @Test - the method is a test method
- @Before - execute before each test, ideal for preparing the test environment
- @After - execute after each test, ideal for cleanup
- @BeforeClass - executed once before any of the tests are invoked
- @AfterClass - executed once after all tests have finished
- @Ignore - marks that the test is disabled (will not run)
- @Test(expected = Exception.class) - fails if the test does not throw an exception
- @Test(timeout = 10) - fails if the test takes longer than the specified time (milliseconds)
There are also a number of Spring Boot annotations
- @RunWith(SpringRunner.class) - provides a bridge between Spring test features and JUnit 4
- @ExtendWith(SprintExtenstion.class) - same as above but for JUnit 5
- @SpringBootTest - starts a complete Spring Boot context (other options are @WebMvcTest, @DataJpaTest , see below)
- @TestConfiguration - specify a Spring configuration for your test
- @MockBean - injects Mockito mock
- @SpyBean - onjects Mockito Spy
- @JsonTest - creates a Jackson or Gson object mapper via Spring Boot
- @WebMvcTest - used to test web context without a full HTTP server
- @DataJpaTest - used to test the data layer with embedded database
- @JdbcTest - same as @DataJpaTest but does not configure entity manager
- @DataMongoTest - configures an embedded MongoDB for testing
- @RestClientTest - creates a mock server for testing rest clients
- @AutoConfigureRestDocks - allows you to use Spring Rest Docs in tests
- @BootStrapWith - used to configure how the TestContext is bootstrapped
- @ContextConfiguration - used to direct Spring how to configure the context for the test
- @ContextHierarchy - allows you to create a context hierarchy with @ContextConfiguration
- @ActiveProfiles - set which Spring profile are active for the test
- @TestPropertySource - configure the properties for the test
- @DirtiesContext - resets the Spring context after the test
- @WebAppConfiguration - Spring will use a Web Application context
- @TestExecutionListener - allows you to specify listeners for testing events
- @Transactional - run tests in transaction, rollback when completed by default
- @BeforeTransaction - action to run before starting a transaction
- @AfterTransaction - action to run after a transaction
- @Commit - specifies the transaction should be comitted after the test
- @Rollback - transaction will be rolled back after test
- @Sql - specify SQL to run before
- @SqlConfig - define metadata for SQL script
- @SqlGroup - group of @Sql annotations
- @Repeat - repeat the test a number of times
- @Timed - similar to JUnit's timeout but will wait for test to complete, unlike JUnit
- @IfProfileValue - test is enabled for specific testing environment
- @ProfileValueSourceConfiguration - specify a profile value source
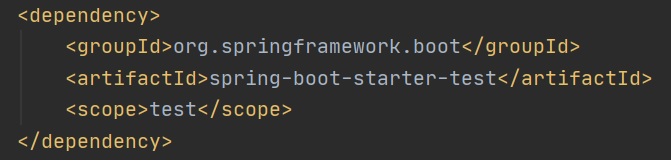
The spring-boot-starter-test dependency (left-hand screenshot) will pull in a numbert of packages (right-hand screenshot) most of which I commented on earlier in this section.
 |
 |
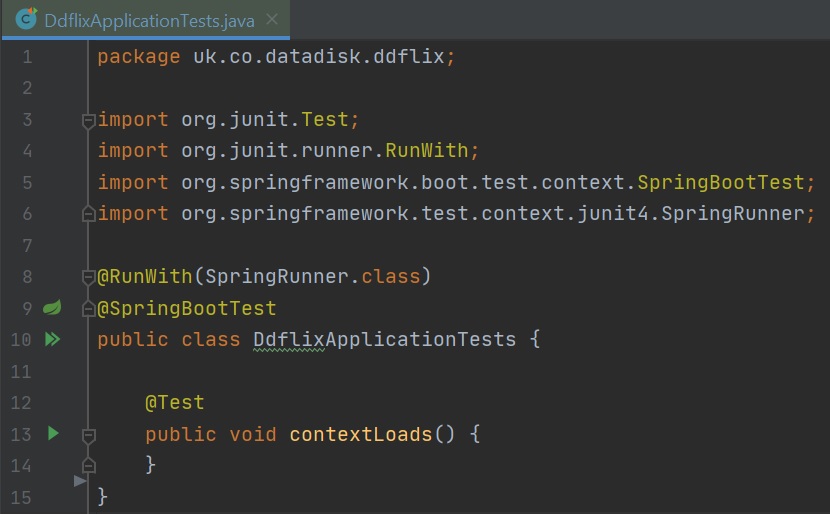
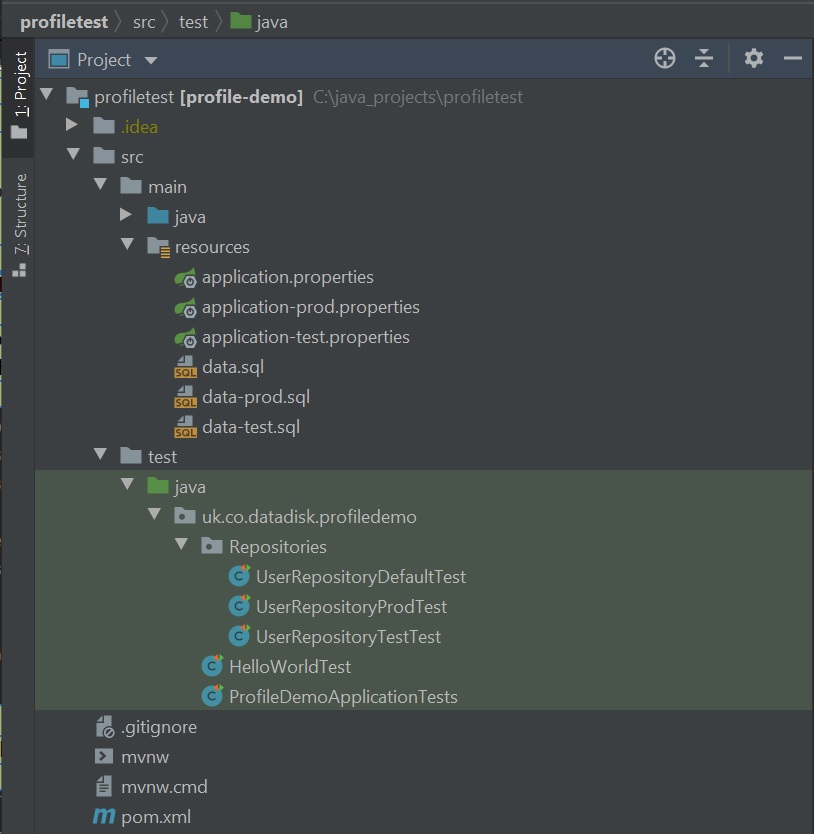
When you create a project with Intellij a test directory structure is created for you, as you create the tests you will see something similar to below

The test application class file uses the @RunWith annotation using the SpringRunner.class which integrates Spring and Junit , the @SprintBootTest starts a Spring Boot context (Integration test as Spring Boot is started)
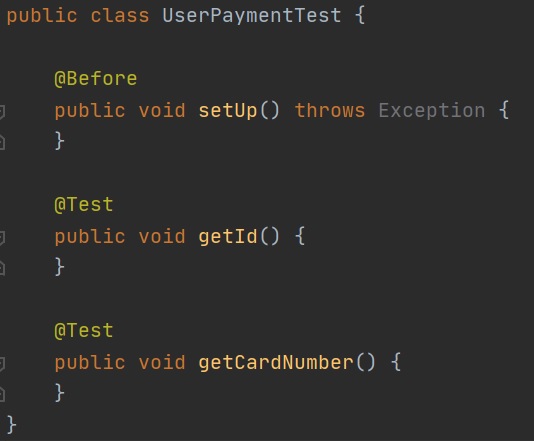
Most IDE's can easy create the basic test file and structure for you, you can see Intellij's wizard on creating a test for the UserPayment class (left-hand screenshot), there are a number of options, you can use different testing libraries Junit4, JUnit5, TestNG, etc. You can also setup @Before and @After methods and then select what test methods you required based on the members of that class. Intellij then creates a bsic test file for you in the correct directory in the test directory. At this point you can now inject any services that you need and add any test code.
 |
 |
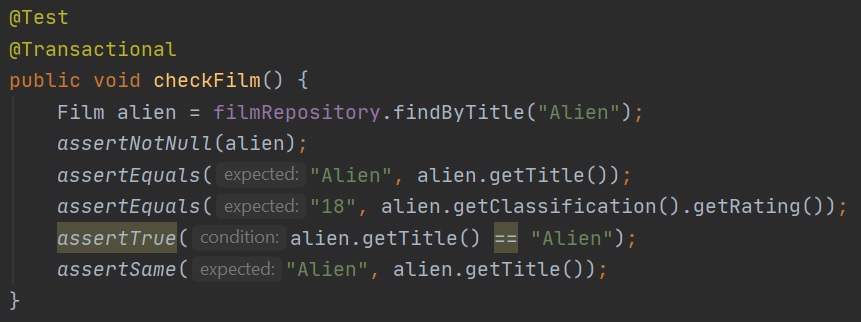
You can then use the assert method to test various parts of your code (left-hand screenshot), there are many assert test methods (right-hand screenshot)
 |
 |
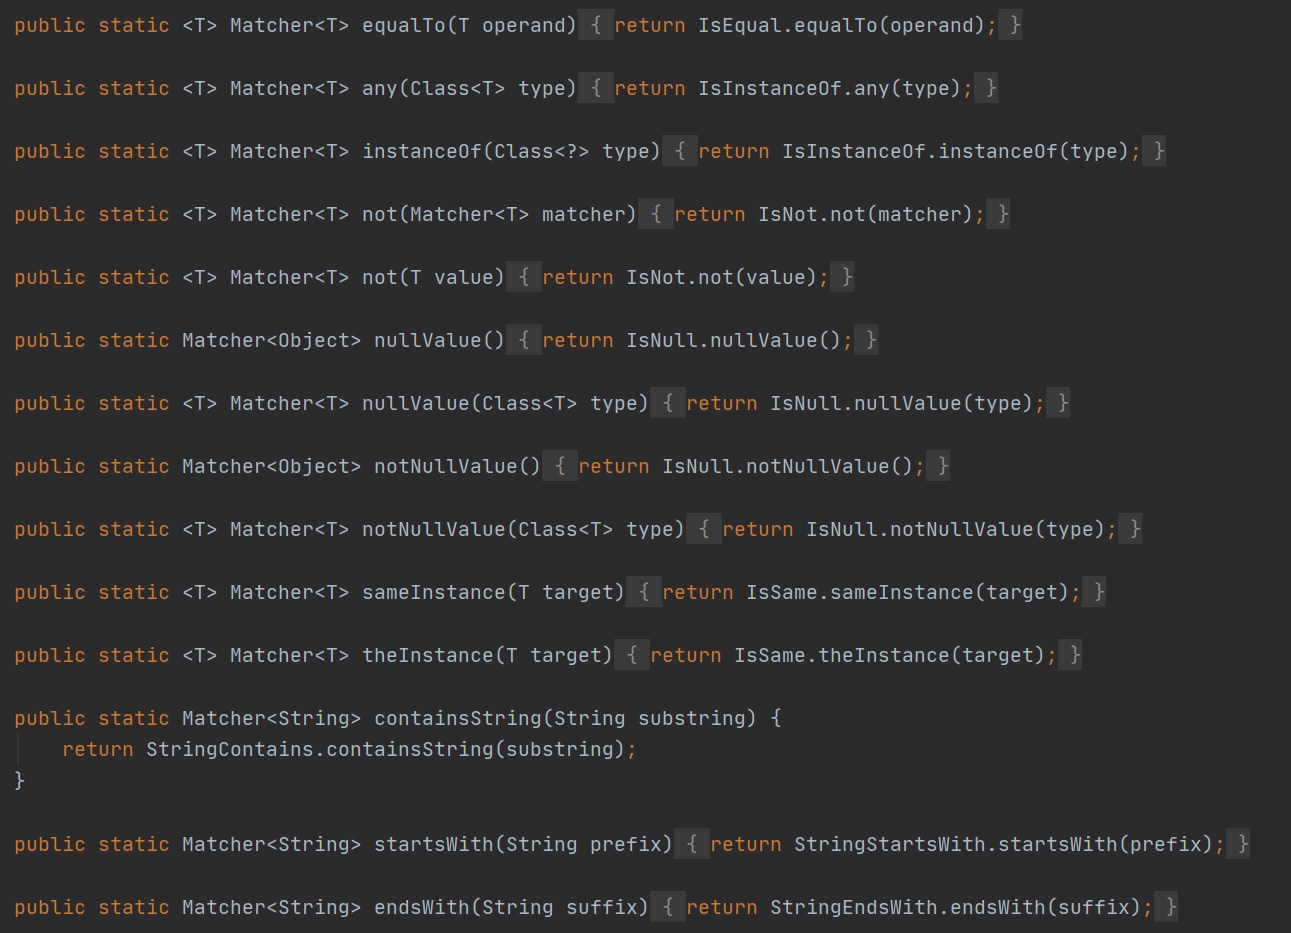
Hamcrest is a framework for writing matcher objects allowing ‘match’ rules, you can check if a string contains some text, or startwith or endwith some text, below is an example of a hamcrest matcher (left-hand screesnhot), there are many hamcrest matches (right-hand screenshot), also notice we use the assertThat method for matchers.
 |
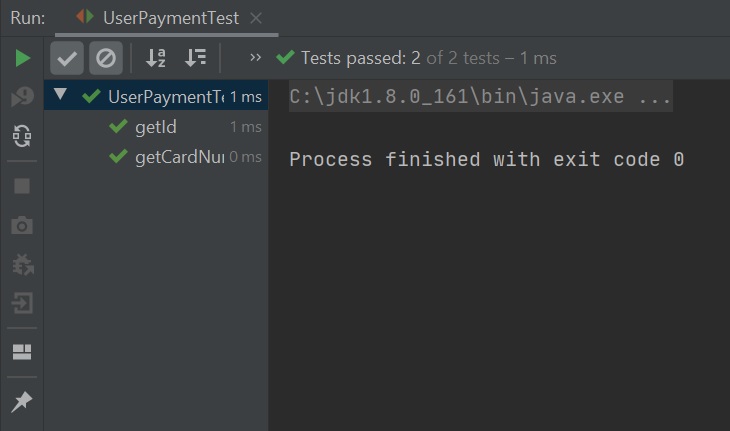
When you run the test Spring Boot will startup an Spring Boot context and then run all the tests, you have the option to run just specific tests, IDE's generally have a window that displays the test results as per Intellij's one below
A Mock object is a dummy implementation for an interface or class which you define the output of specific method class. Mock objects are configured to perform a certain behaviour during a test. Mockito allows you to create and configure mock objects. Using Mockito greatly simplifies the development of tests for classes with external dependencies. You use the @Mock annotation
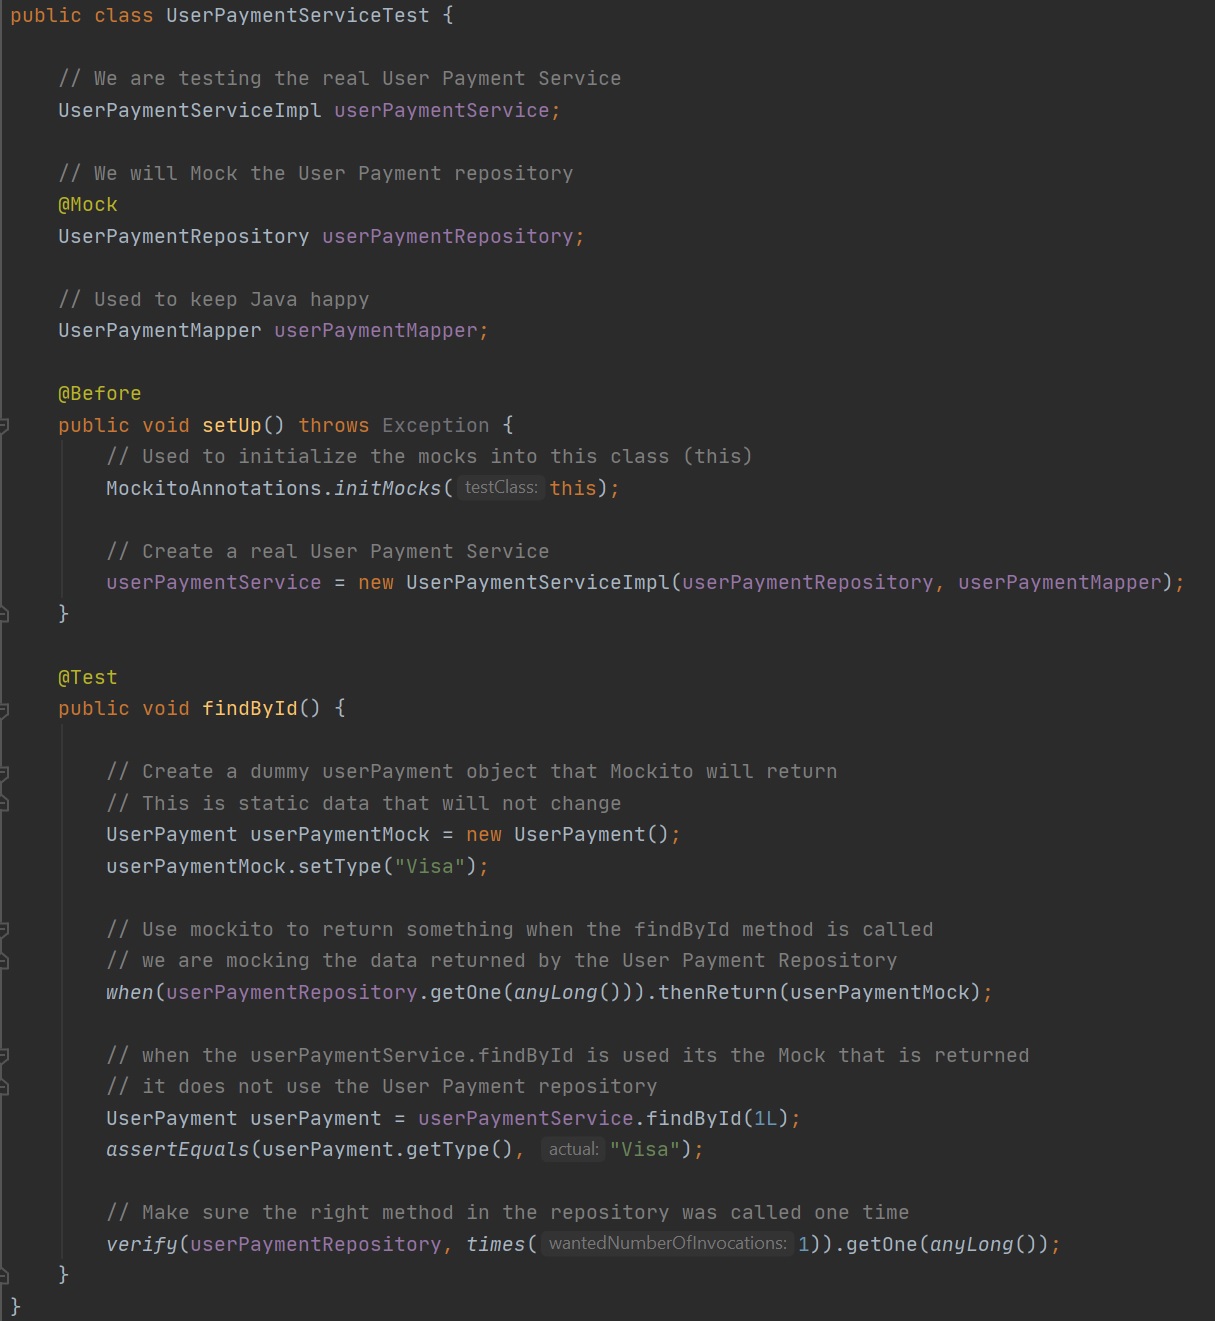
In the below example the User Payment Service uses the User Payment Repository to retrieve data from the database, however we want to use Mockito to provide a dummy User Payment object that the Repository service would normally return from the database. So we Mock the User Payment Repository and if the getOne() method is called Mockito will step in and return the dummy User Payment object that we created, and thus no database access took place speeding up the test and only testing the service layer, we don't even need the database running. I have added many comments to the code below to describe what is happening. One point to notice the MockitoAnnotations.initMocks(this); statement, this initializes the mock objects (@Mock annotations) and is required, also you can confirm that the Mock Repostory was called by the service layer using the verify and times method.
When Mockito creates a mock it does so from the Class of a Type, not from an actual instance. The mock simply creates a bare-bones shell instance of the Class, it has the same method signatures but its empty and will return either null or 0. On the other hand, the spy will wrap an existing instance. It will still behave in the same way as the normal instance which means when calling a method the actual method is called. Use SPY when you want to call the actual methods but mock others of a class (partial mocking). Below is an example of using Spy.

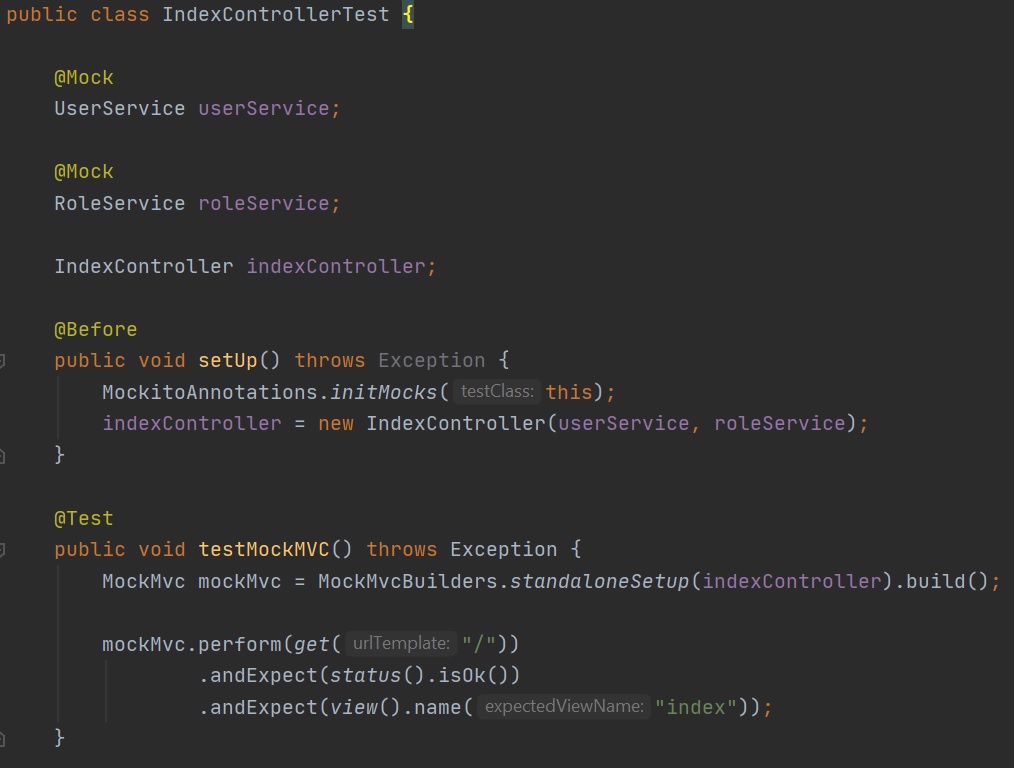
use can even test controllers by using the MockMvcBuilders.standaloneSetup() method, it builds a MockMvc instance by registering one or more @Controller instances and configuring Spring MVC infrastructure programmatically. We can then perform a HTTP method (full API tester - get, put, push, etc) and test if the return code is correct that the correct veiw was used, etc, Note that its still mocking the MVC as in standaloneSetup the MVC is not actually running. There are two methods that you can use
- standaloneSetup - does not start a Spring context and thus will be a unit test (faster testing)
- webAppContextSetup - does start a Spring context and thus will be an Integration test (slower testing)
Using Profiles and Database Setup
When testing you can use a different database based on a profile, also you can use a specific data.sql load file as well.
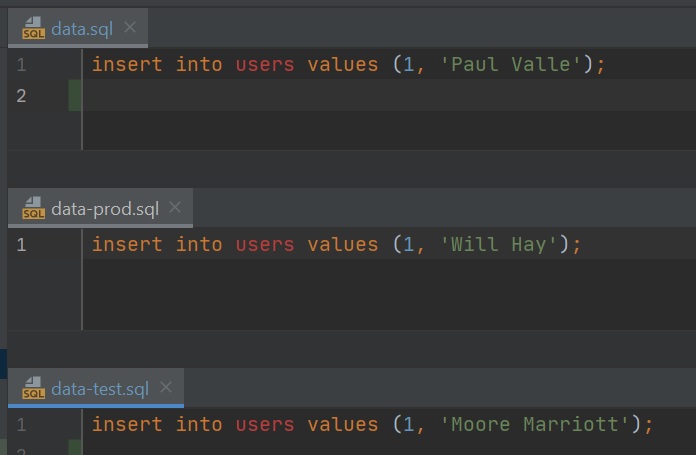
In the below screenshot, you can see 3 application property files
- application.properties - is the default profile, if nothing is specified.
- application-prod.properties - will be used by using prod profile
- application-test.properties - will be used by using the test profile
I also have 3 different data load files data.sql (default profile), data-prod.sql (prod profile) and lastly data-test.sql (test profile).
The default property file points to a profiledefault database, I also have a variable called dd.environment set to default if no profile is set then this will be used as the default. The test property file states it can be used by a test profile at the top (spring.profiles.active), we also set it to use a profiletest database and the dd.environment is set to test, also I have specified a data load script using the spring.datasource.data propery pointing it to data-test.sql
| default property file | test property file |
|---|---|
 |
 |
The data load files are normal DDL SQL for that particular database, one note is that you can use -- (double dash) as a comment
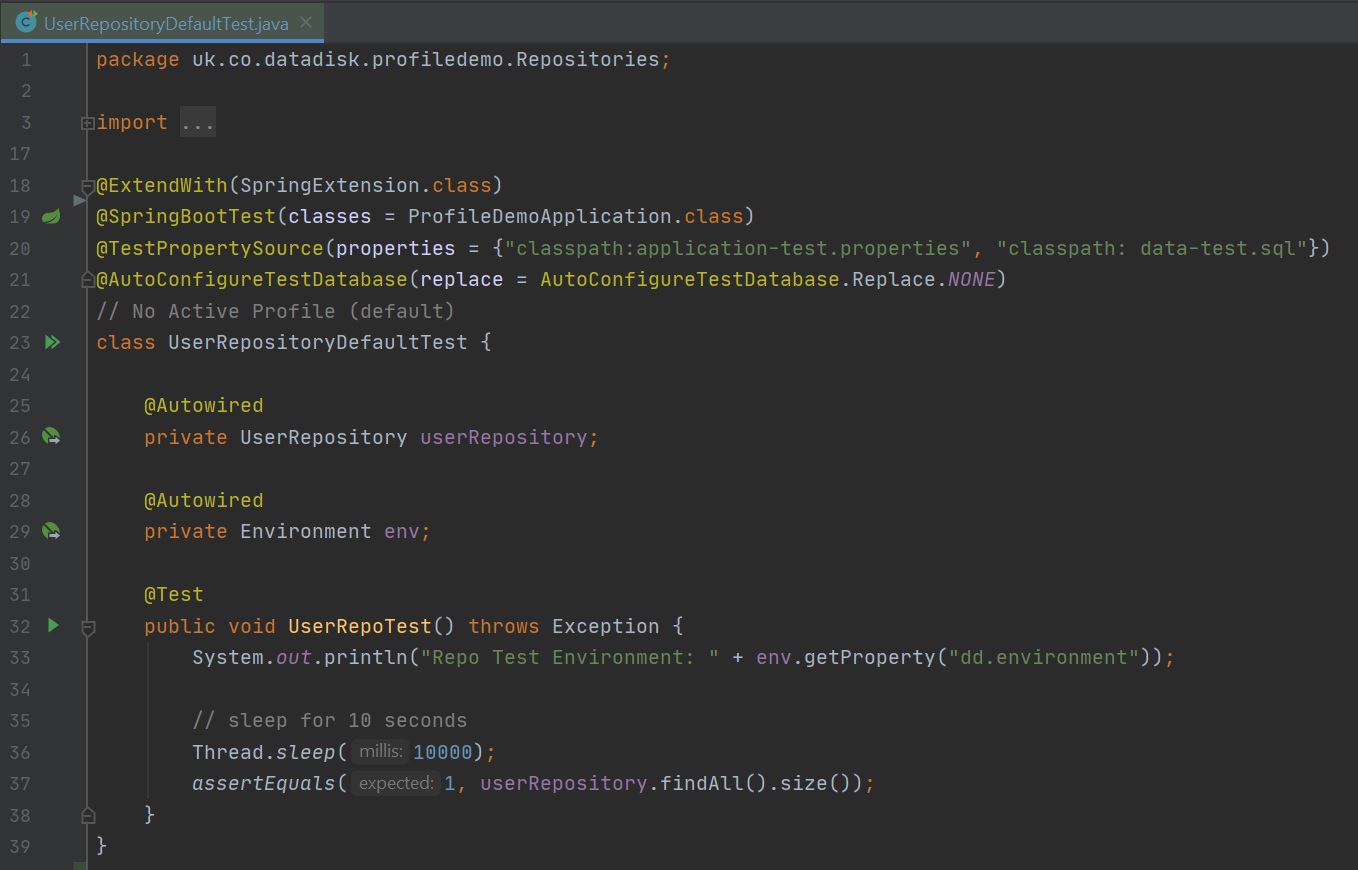
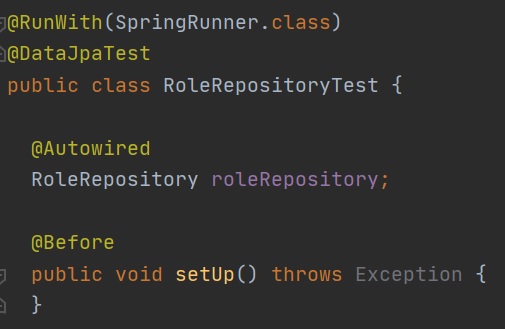
The are a number of ways to use the appropriate files, in this first example I don't use profiles but instead use the old way of using @TestPropertySource annotation, which allows me to specify the property and the data load files. You will also notice the @AutoConfigureTestDatabase annotation which overrides the default of an embedded database as I am using MySQL (overcome datasource errors). I am also using the @SpringBootTest annotation and specifying the application class that has access to all the classes/beans, the @ExtendWith is normal JUnit5 annotation, this will start the whole application and thus will slow down testing.
The next example is using profiles, as you can see I use the @ActiveProfiles annotation to use the test profile and the test data load file, this time I also use the @DataJpaTest annotation which is used to test JPA repositories, however its uses an embedded databse and hence the override by using the @AutoConfigureTestDatabase annotation (overcome datasource errors), by using profiles the classpaths are automatically added so no need to add any classpath details, and its very easy to switch profiles and use different properties or databases.
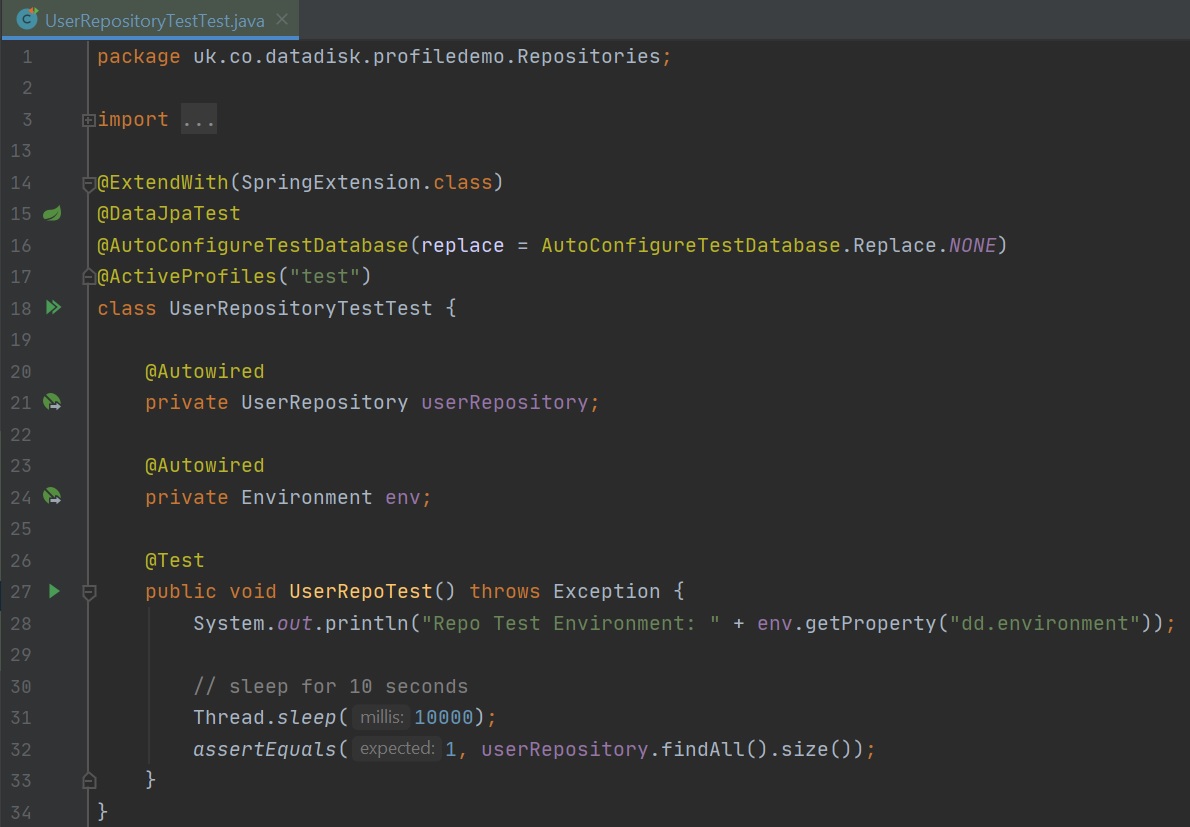
In this section I show a number of different examples of testing, first an example on using the @DataJpaTest annotation to test repositories, by adding the annotation the Spring Context will be able to any JPA related components, this means that the full Spring context is not started and means less resources and quicker tests.
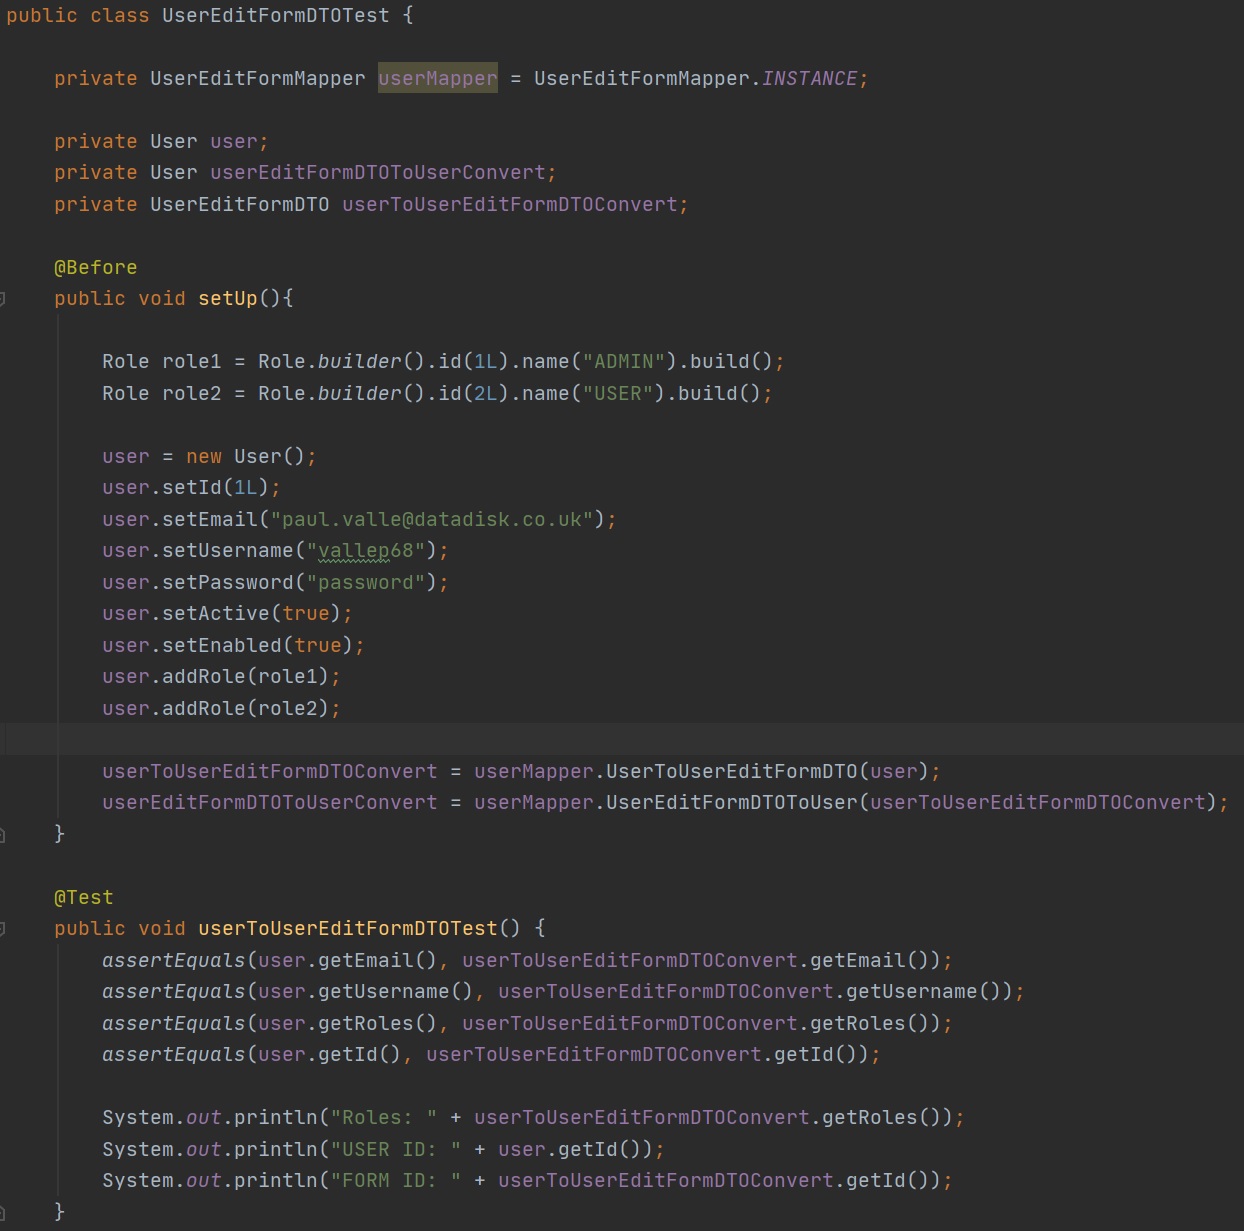
In some applications you can use a Model Mapper, I have a section on MapStruct, below is an example of testing DTO objects which is using MapStruct.
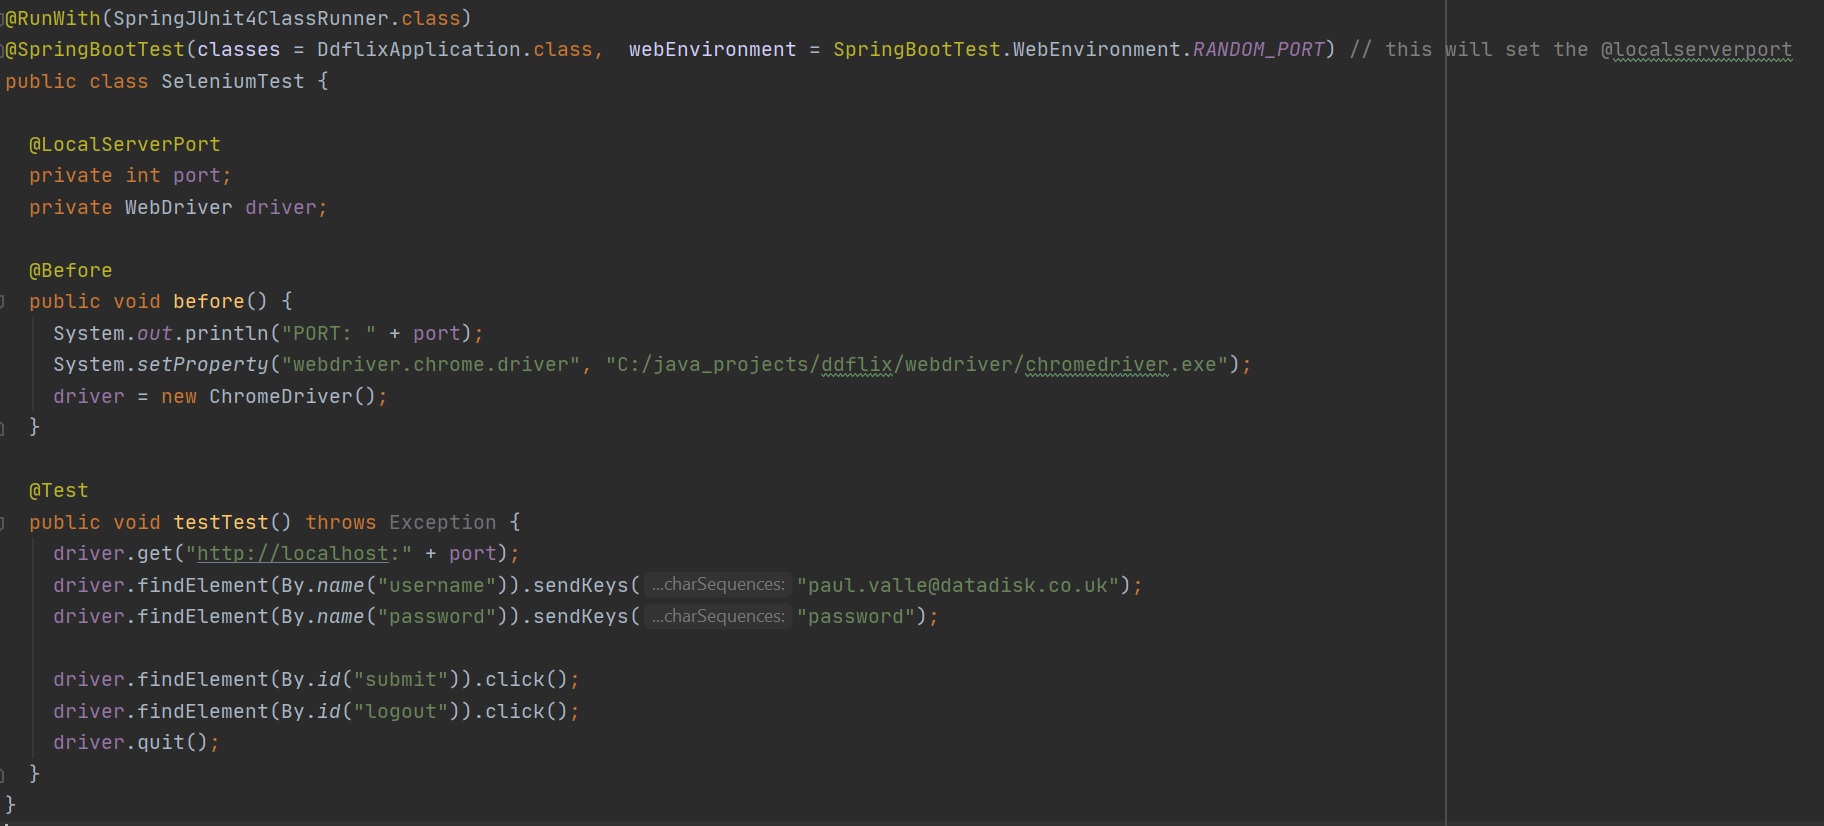
Functional testing requires you use a web driver, below is an example of using the Selenium web driver to functionall test the application, I use Selenium and a Chrome driver to drive a browser and test elements are on a web page. This type of testing is slow but the only other alternative is that a tester manually does the same thing.